


How do you perform a Git checkout on a remote branch? In this post, we'll answer that question in detail. We'll begin with an overview of what remotes are and how they work in Git. Then we'll talk about the checkout command, showing how you can use it to check out non-remote (that is, local) branches. Finally, we'll show you several ways in which Git makes it possible to work with remote repositories.
Git Remotes: An Introduction
For newcomers to Git, the way remotes work is in fact one of its most troublesome traits. Not because remotes are a particularly hard concept—they aren't. But the way in which Git's design chooses to handle collaboration is radically different from the approaches used in most other traditional centralized version control tools. For newcomers that were previously users of such tools like Subversion or TFVC, groking remotes and remote branches might take some serious unlearning.
What Are Remotes?
Let's now understand the role that remotes play in Git and how that differs from the approaches taken by centralized source control tools.
Centralized VCSs Have a Central Server
Centralized version control tools, like Subversion, have the concept of a central server that stores the repositories. When it's time to start working on something, a developer gets the code from the server to their local machine, where they have a working folder. After the work is done, the developer sends their changes to the central server, where they are incorporated into the code. When you're working with Git, what you have locally is not a mere working copy, like in centralized tools, but rather a real, full repository. You have the full history. So how do you collaborate with others when working on a team?
No Central Server in Git
Because Git is a decentralized tool, it lacks the concept of a central server. What it does have are remote repositories, often called simply remotes. You can think of remotes as copies of your project that are hosted somewhere else: They can be stored on a coworker's machine or a server in your local network, or they can be hosted on services like GitHub. For any repository, you can have as many remotes as you like. You collaborate with other people by pulling changes from and pushing changes to these remotes. You might have read access to a remote while having read and write access to others.
A Quick Example
For instance, let's say you're browsing through GitHub and you come across a nice open-source project. Let's say LiteGuard. To clone that repository (that is, make a local copy for you), you'd do this:
git clone https://github.com/adamralph/liteguard
After running the command above, you'll have a folder called liteguard. You can then use your terminal to access the folder and then ask Git about your remotes:
cd liteguard
git remote
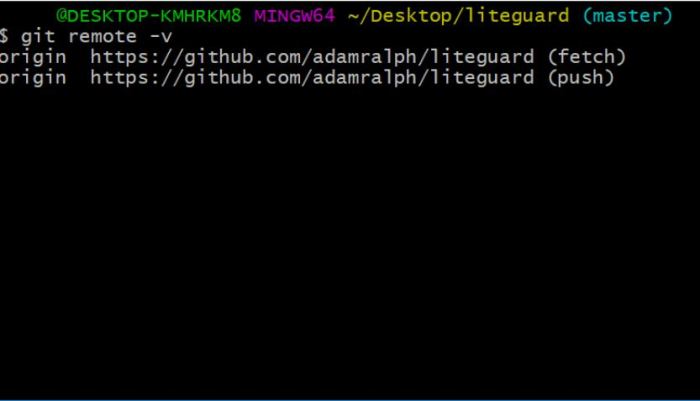
If everything works fine, you should see the word "origin" as a result. "Origin" in Git is a convention for the name of the default remote. It doesn't have any special meaning, though, and you can change it to any valid Git name. The remote command also has a verbose option. Just run git remote -v and you'll get a more detailed view, featuring the URLs for fetching and pushing data (which are, by default, the same):
Note: After cloning a repository, you might need to add a new remote. However, if a remote with the same name already exists, you could run into the Remote Origin Already Exists error.
Using the "Git Checkout" Command To Check Out a Non-Remote Branch
You can use the git checkout command for a variety of tasks, including switching to another branch. Even though the git switch command is the preferred way of doing that since version 2.23, you can still switch branches by running git checkout <branch-name>.
How Do I Check Out a Remote Branch?
How can you check out remote branches in Git? You don't.
Remote Branches Are Read-Only
Here's the thing: Git doesn't allow you to work with branches that aren't yours. What you can do is create a local branch that mirrors the remote branch you wish you could work with. Let's see how to do that in practice. First, we're going to clone another repository on GitHub. It doesn't really matter what repository we use, so I've picked a project called Simple Git, which presents itself as "a lightweight interface for running git commands in any node.js application." Start by cloning Simple Git:
git clone https://github.com/steveukx/git-js.git
Then enter the repository folder and use the git branch command to see the current branches:
cd git-js
git branch
You should see only controller as a result. To see the remote branches available, use git branch -a. The -a option stands for "all," and by using it you should see all existing branches, including remote ones, in the form remotes/origin/<branch-name>:
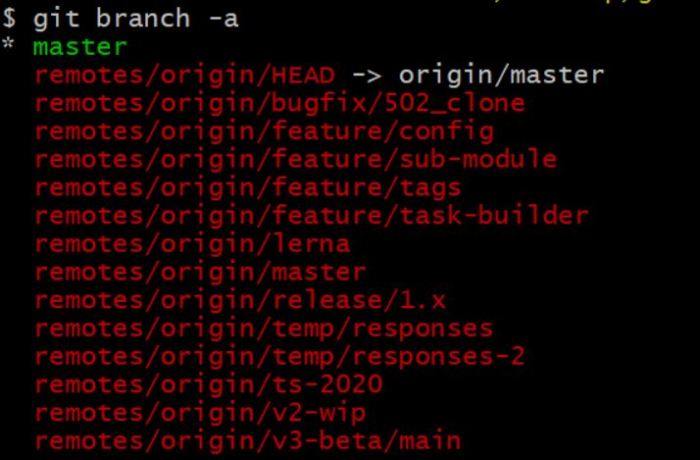
Now, this is where things can get a little confusing, so pay attention: All of this is happening on your machine. There's no networking involved at this point. So what you're seeing as "remote branches" are more like read-only mirrors of the branches that live in the original repository over on GitHub. Those were created when you cloned the repository, and they get updated when you fetch new changes from the remote. Can you "git checkout" those branches? You can, but doing so makes you land in "detached HEAD" state: You can make experimental changes, but they'll be lost unless you create a branch to preserve them.
Creating a New Local Branch, Then Checking It Out
So, to be able to add changes to a remote branch, what you really have to do is to create a new local copy of the remote branch. This is the command you have to use:
git branch v2-wip origin/v2-wip
When using the branch command, it's possible to pass a branch name as an argument, so that's what we're doing in the command above. Notice how I picked the name "v2-vip" for my new local branch. It happens to match the name of the original remote branch, to make things easier. But it doesn't have to be like that; I could've chosen any valid branch name instead. After running the command, you should see a message like this:
Branch 'v2-wip' set up to track remote branch 'v2-wip' from 'origin'.
What that means is that now your new local branch is configured to be your local representation of the remote branch and to track its changes. So when you perform operations such as fetching changes from the remote or adding new commits to your local branch, Git will compare the two and conclude what action needs to be taken (e.g., you need to push to the remote or merge from it). The next step then would be simply checking out the branch:
git checkout v2-wip
Doing It All in One Step
Of course, you could've done this all in one step, using the checkout command with the -b option:
git checkout -b v2-wip origin/v2-wip
The git switch command with the -c option (for "create") does the same:
git switch -c v2-wip origin/v2-wip
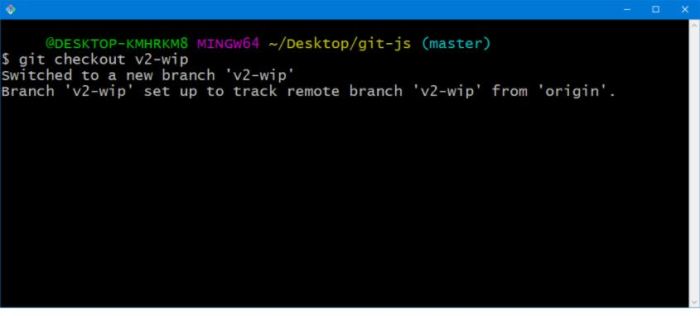
Finally, there's another version that's even easier. More recent versions of Git allow you to simply run git checkout v2-wip directly. Git looks for a local branch, and if it doesn't find one, it assumes you're talking about a remote branch of the same name. It then creates a local branch from the remote one, sets it to track the remote, and changes to the new branch, all in one go:
Git Checkout Remote Branch: A Summary
Suppose you want to check out a remote branch called bugfix15 from a remote called origin. All of the following commands will do the job:
- git branch bugfix15 origin/bugfix15, then git checkout bugfix15 (or git switch bugfix15)
- git checkout -b bugfix15 origin/bugfix15
- git switch -c bugfix15 origin/bugfix15
- git checkout bugfix15
How To Git Checkout A Remote Branch? By Not Doing It
Controlling Git is essential for software developers nowadays. The good news is that, despite what the naysayers say, Git isn't that hard to learn. However, it might present some challenges for those who are experienced users of centralized source control tools. One aspect of Git that has this characteristic is the way it handles remote repositories. In this post, you've learned a little bit more about remotes in Git and how that approach differs from the way centralized tools work. You've also learned the different ways in which you can "git checkout" a remote branch. You now know not only how to solve this specific problem, but you also have more knowledge about the fundamentals of how Git works, which will help you in the future.


