


Version control tools are great at many things. One of them is doing comparisons. In Git, you use the command git diff to compare commits, branches, individual files and more.
In this post, we’ll give you a complete yet focused guide for this Git command. You’ll learn about its main use cases and the most common options, always with practical examples.
The tutorial will assume you’re comfortable working with the command line and know your way around the basic Git commands.
Sound good? Then let’s get started.
Git Diff 101
Let’s start our git diff guide by walking you through the fundamental questions.
What Is Git Diff?
In a nutshell, git diff is the comparison command in Git. More specifically, it’s Git’s implementation of the famous diff utility.

The output from git diff comes in a standardized format that makes it easier to understand what changed but also serves the purpose of allowing the changes to be applied later. We’ll talk about this format later; for now, let’s focus on the reasons why this command is useful.

Why Do We Use Git Diff?
Being able to make comparisons in your project is extremely useful:
- It might help you track down how a bug was introduced.
- You can compare two branches to see the result of a future merge.
- It’s also possible to see the evolution of a single file through time, so you can, for instance, understand how a recent refactoring affected it.
- You can see the changes made since the last commit, to review what will go into the next commit.
How Do We Use Git Diff? A Minimum Example
After covering the “what” and “why” of git diff, let’s proceed to the “how” by showing a minimal example of this command in action.
We’ll start by creating a new repository, adding a single file and committing it:
mkdir diff-demo
cd diff-demo
git init
echo hello > file.txt
git add file.txt
git commit -m "Add text file"
The next step is appending a new line to the end of the file:
echo “more text” >> file.txt
You’re now ready to perform your first comparison. Just run git diff and you’ll see a result like the following:
diff --git a/file.txt b/file.txt
index ce01362..5d34e82 100644
--- a/file.txt
+++ b/file.txt
@@ -1 +1,2 @@
hello
+more text
The output might have different colors, depending on your configurations. Here’s what I get on Ubuntu inside WSL:
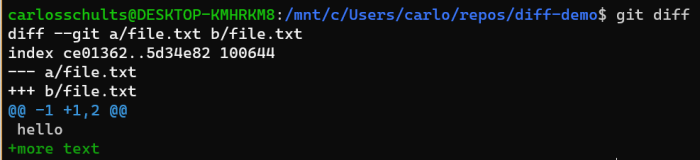
The output of git diff can be pretty overwhelming at first. For now, let’s focus on the basics:
- Git is comparing two versions of the same file (a/file.txt and b/file.txt).
- The “b” version got something added to it (as evidenced by the plus signs).
- The actual information that was added was the line “more text”.
Going Deeper With Git Diff: 3 “What” Questions
You’ve seen the bare basics of git diff. Now, let’s start going deeper by answering common questions people have about it.
What Are a and b in git diff?
The first line of the output from the previous example was diff --git a/file.txt b/file.txt. The a and b in the line are what we call “prefixes.” They indicate the source and origin for the comparison.
Some people don’t like prefixes. If you’re one of them, it’s easy to turn off prefixes by using the --no-prefix option:

You can also define custom prefixes for the source, destination or both with the --src-prefix and --dst-prefix options:
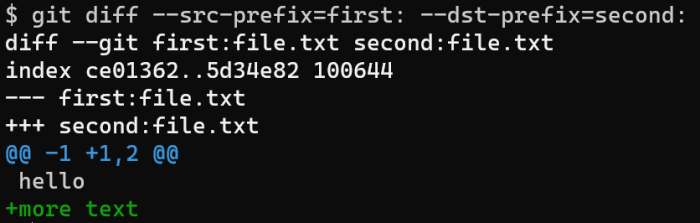
git diff --src-prefix=first --dst-prefix=second
Finally, you can get rid of prefixes for good by changing your global configuration:
git config --global diff.noprefix true
What Does the Diff Output Mean?
As promised, we’ll now cover the git diff output in more detail. As you’ll see, it’s easier than it looks. But first, we’ll need a slightly more complex change.
Start by committing the current change with git commit -am “Add new line”.
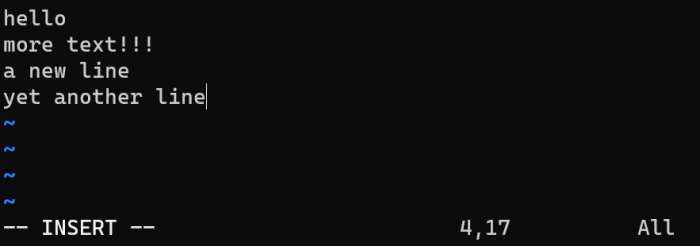
Now, do the following:
- Open the file.txt file using your favorite text editor.
- Change the last line somehow.
- Add two more lines.
- Save and close the file.
For inspiration, this is what my file looks like after the changes:
Now, run git diff without any arguments and you’ll get a result like the following:
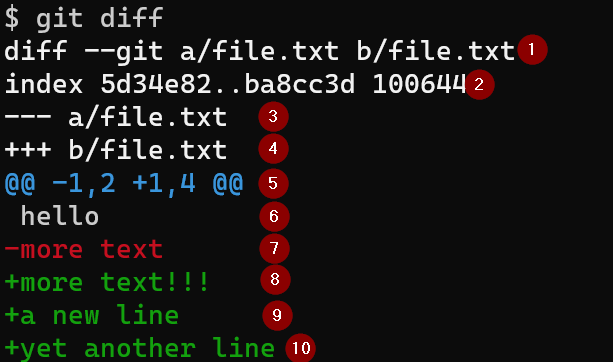
Let’s now walk you through that output line by line:
- The output starts by declaring this is a diff in the Git format, comparing these two files. Here, we have the traditional a and b as prefixes.
- This line shows us the short versions of the hash of the original and changed versions of the file. We also see the mode (100644), which indicates this is a regular, non-executable, file.
- The source file. The minus sign here means original, or old.
- The destination file. The plus sign here means new.
- We’ll skip this one now and get back to it later.
- Here we have a line that didn’t change.
- This line indicates that the “more text” line was removed. In fact, it was changed, but that’s effectively the same.
- Here we have an indication of a new line “added.” See #7.
- This indicates the first line I added.
- Finally, this indicates the last line I added.
Let’s now cover line 5. It certainly looks the most cryptic one, but it’s actually quite easy to understand. Here we have hunks, which are defined as “groups of differing lines” in the files.
The -1,2 part indicates we’ll be seeing two lines from the original file, starting at line 1. The minus sign, as you’ve seen, means “old” or “original.” The +1,4 indicates that, regarding the new version, we’ll be seeing four lines, starting at line 1. The plus sign indicates new.
One of the most valuable things about the diff output is that you can save it—for instance, in a file—and apply it to your repository afterwards. In fact, this is a totally valid form of collaboration, if only less efficient than using, say, GitHub.
Later on in the article, we’ll cover how to save the result from a diff to apply it in the future.
What’s the Difference Between git diff and git status?
The two commands can give similar results, if you get creative with the options. For instance, if you run git status -v -v (that’s right, with two v options), you get the same result as using git diff without arguments.
The main difference between the commands is that git diff is specially aimed at comparisons, and it’s very powerful at that: It can compare commits, branches, a single file across revisions or branches, etc.
On the other hand, git status is specifically for the status of the working tree.
Going Deeper With Git Diff: 6 “How-To” Questions
We’ll now answer several “how-to” questions related to git diff.
How Do I Find the Difference Between Two Branches?
For comparing two branches in Git, you simply run git diff <source-branch-name>..<destination-branch-name>. Of course, you can replace the current branch name with HEAD.
Continuing from our previous example, commit those changes that were left uncommitted. Then, create a new branch—call it “new”—and switch to it. In the new branch, add yet another line to file.txt. Also, create a second file. Commit all those changes and go back to the original branch.
Then, run git diff HEAD..new and you’ll see something like the following:
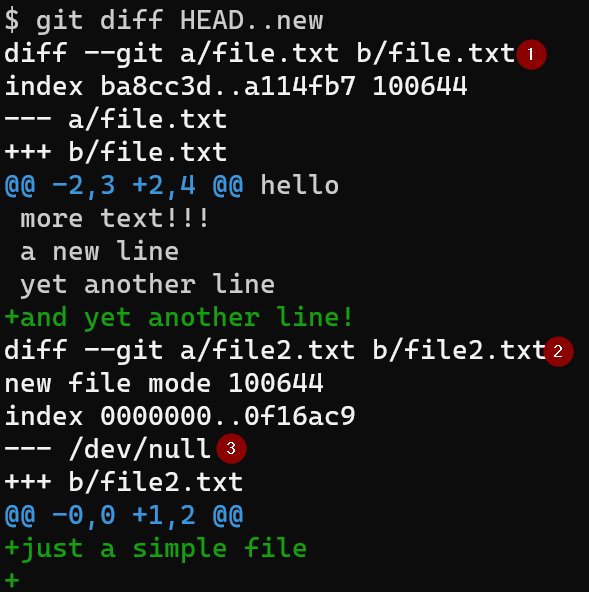
There are some interesting things here:
- This is the header for the first comparison (between the two versions of file.txt).
- Here is the header for the second comparison (between the new file and its non-existing counterpart).
- Since the file doesn’t exist in the main branch, we have /dev/null as the file name.
How Do I Find the Difference Between Two Commits?
To find the difference between two commits, just pass the hashes of both commits to git diff, with the caveat that the older commits must come first:
git diff <HASH-OLDER-COMMIT> <HASH-NEWER-COMMIT>
How Do I Diff a File Across Branches or Commits?
A common use case for diff is learning how a file changes between branches. For that, pass the path to the file at the end of the command. Example:
git diff HEAD new file.txt
The same reasoning works for diffing a file across commits, which makes perfect sense when you remember that branches are nothing more than aliases for commits:
git diff 926c32a8b4bbca635ebe..a44de9fe286bae file.txt
How Do I Diff a File Over Time in the Same Branch?
Let’s say you need to compare a given file with its revision from some amount of time ago. How would you go about that?
A possible solution would be to use git log to figure out the hash of the relevant commit that changed the specified file in the specified time frame:
git log --before="yyyy-MM-dd" --after="yyyy-MM-dd" --follow -- <PATH-TO-FILE>
An alternative solution is detailed in this StackOverflow answer.
How Do I Diff a File That Has Been Renamed?
In the past, things could get tricky if you needed to compare a file that went through a rename.
Since Git 2.9, though, the default behavior for git diff already takes into account renamed files.
To test for yourself, do the following steps:
- Create a new repository.
- Add a new file with a single line of text, and commit it.
- Add a new line to the file but don’t commit yet.
- Rename the file.
- Now you can commit.
At this point, you can use git diff to compare the last and second-to-last commits:
git diff HEAD~1..HEAD
And you should get a result like in the following image:
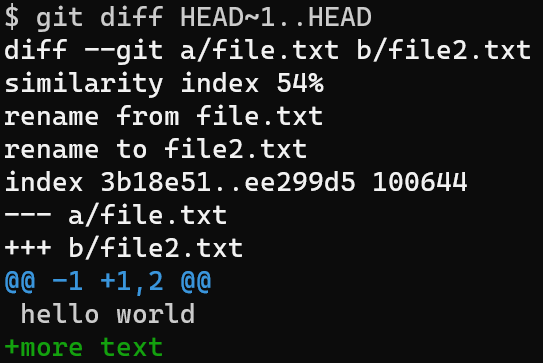
As you can see, Git can not only detect the changes to the file, but also the fact that it was renamed.
How Do I Save a Result From Diff and Apply It Later?
Before parting ways, let’s answer one final question. In the article, I’ve mentioned that you can save the output from a diff operation and apply it later. How does that work?
Well, you can always redirect the output of git diff into a file. For instance:
git diff > changes.patch
If you open the file changes.patch, you’ll see the exact same output from running the command. Now, you can do whatever you want with this file, including backing it up or emailing it to someone.
Note: Learn how the git pull command can help you keep your local repository up to date with the latest changes from the remote.
How do you apply the changes from a patch file?
You simply use the command git apply, passing the path to a patch file as a parameter. Example:
git apply changes.patch
Keep in mind that git apply doesn’t commit the changes. It only performs the changes; you still have to stage and commit them.

Learn Git; Make a Difference
Engineers often consider Git to be hard to learn. While there’s some truth to that, the fact is that learning Git is worth it. It’ll make a real difference in your day-to-day as a software engineer.
And the good news is that, while there are plenty of Git commands with even more plentiful options, you only need to master a relatively small set of core commands to be fluent with the tool.
In this post, you’ve learned about yet another one of these commands: git diff. And if you ever need to reverse a commit you made by mistake, check out our practical guide on how to undo a commit in Git. Thanks for reading, and happy coding!
This post was written by Carlos Schults. Carlos is a consultant and software engineer with experience in desktop, web and mobile development. Though his primary language is C#, he has experience with a number of languages and platforms. His main interests include automated testing, version control and code quality.


