

When you start with Jenkins, you’ll probably be working with freestyle or pipeline jobs. However, there might be times when your application needs to have multiple branches in a single git repository. Every time you create a new branch, you need to create a new Jenkins job, but that translates into a lot of work when you’re creating multiple branches. This is one of the problems that multibranch pipeline jobs solve.
Today’s blog post will cover how you can create a multibranch pipeline job in Jenkins using a demo application in git. You’ll learn the syntax of the Jenkinsfile, and once we create the first job, all the subsequent changes will be automatically detected by Jenkins. (You can also check out Darin Pope's video tutorial on this subject at the end of this post.)
But first, let’s start by reviewing in more detail what a multibranch pipeline job is.
What’s a Jenkins Multibranch Pipeline?
A multibranch job is simply a folder of pipeline jobs. For every branch you have, Jenkins will create a folder. So instead of creating a pipeline job for each of the branches you have in a git repository, you could use a multibranch job. This means that you’ll have to create only one job. You also need to define where the Jenkinsfile is, and it’s important that this file is at the same location in all the branches you create. Let’s create a job of this type to learn how to configure it.

Creating a Multibranch Pipeline
Before you even start, we need to create an empty git repository. You could use an existing one, but for this guide, we’ll start from scratch. Any git server will work, but in this guide we’ll use GitHub. So, let’s create a new public repository there, and save the repository URL because we’ll use it later.
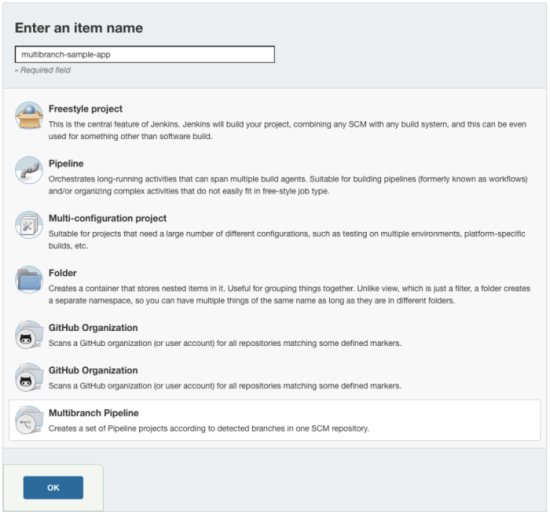
Head over to your Jenkins instance and create a new item. Enter a name for the job, and select the “Multibranch Pipeline” option at the end of the screen. Then, click on the OK button.
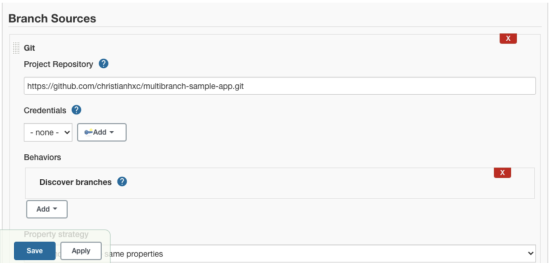
In the next screen, go to the “Branch sources” tab, click on the “Add source” button, and choose “Git” from the dropdown menu. Then enter the repository URL. Because this is a public repository, we don’t need to configure any credentials.
We’ll use all the defaults for now. So, scroll down to the end of the screen and click on the “Save” button to finish creating the job. In the logs, you should see that Jenkins is cloning the repository and it creates the job successfully, even if it’s an empty repository.
Let’s create a Jenkinsfile in the root directory, and for now let’s keep it simple, like this:
pipeline {
agent any
options {
buildDiscarder logRotator(artifactDaysToKeepStr: '', artifactNumToKeepStr: '5', daysToKeepStr: '', numToKeepStr: '5')
}
stages {
stage('Hello') {
steps {
sh '''
java -version
'''
}
}
}
}
After you commit and push the Jenkinsfile to the remote repository, you should be able to see the file created in the main branch.

Now, we need to ask Jenkins to scan the repository to find the new branch we just created. Head over to your Jenkins job, and click on “Scan Multiple Pipeline Now” on the left side of the screen. Wait for a minute and refresh the screen. Now you should see that a new branch appears and a Jenkins job has been created automatically.
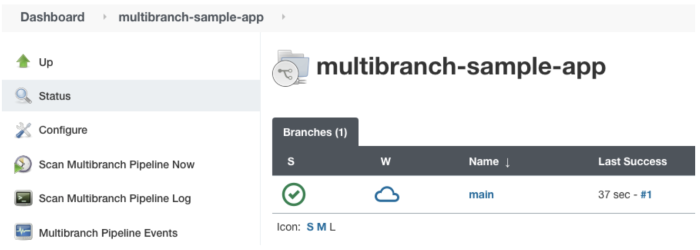
You can inspect the job and see the logs to confirm that it worked.
Adding More Branches to the Repository
At this point, you haven’t seen the benefit of creating a multibranch pipeline job. So, let’s create two more branches in git to see what happens in Jenkins. Open a terminal in your computer and clone the git repository you created before (in case you haven’t done so). Then, run the following commands to create two branches from the main branch:
git checkout -b fix-123
git checkout main
git checkout -b dev-456
Now you need to push these branches to the remote repository so that the Jenkins job is able to see them and create the jobs automatically. To do so, run these commands:
git push --set-upstream origin dev-456
git push --set-upstream origin fix-123
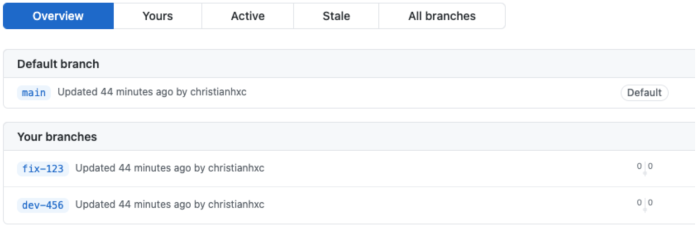
If you go to GitHub, you should see that the two new branches were pushed successfully.
Note: If you want to ensure you're syncing your local and remote repositories seamlessly while managing branches, you may want to explore how git pull works.
Let’s go back to your multibranch job in Jenkins. Click again on the “Scan Multibranch Pipeline Now” to discover the new branches and create new jobs. Wait for a minute and refresh the page. You should see that two new jobs were created because of the new branches you just pushed.
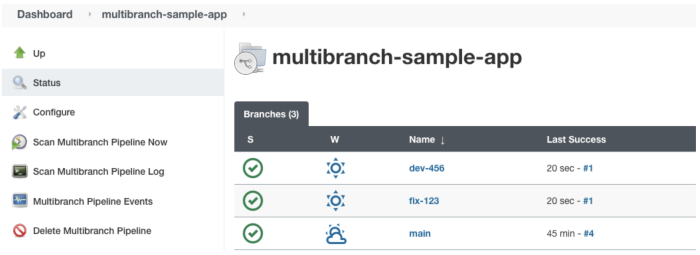
Those two new jobs have the same configuration as the one you created initially (the multibranch pipeline). Therefore, you can’t edit those jobs, at least not from the UI, but you can run them and view its logs and change the pipeline through the Jenkinsfile. This way, you can promote changes to other branches and test the pipeline several times before you push it to the main branch. Let’s see how this would work by making a change in the job through git branches.

Making Changes Through Git
Head over to the fix-123 branch to make a small change. Run the following command:
git checkout fix-123
Let's create a README.md file with the following content:
# multibranch-sample-app
Then, modify the Jenkinsfile to print out the content of the README.md file, but only for those branches whose name starts with “fix-”, like this:
pipeline {
agent any
options {
buildDiscarder logRotator(artifactDaysToKeepStr: '', artifactNumToKeepStr: '5', daysToKeepStr: '', numToKeepStr: '5')
}
stages {
stage('Hello') {
steps {
sh '''
java -version
'''
}
}
stage('cat README') {
when {
branch "fix-*"
}
steps {
sh '''
cat README.md
'''
}
}
}
}
Now add, commit, and push those changes to the remote repository, like this:
git add .
git commit -m “Adding the README.md file”
git push
Head back over to your Jenkins instance and open the fix-123 job, then run the job. You should see the new changes and the log of the job, like this:
Checking out Revision 69c8f75ccf0a106a152bdb698ffc0938344e6e54 (fix-123)
> git config core.sparsecheckout # timeout=10
> git checkout -f 69c8f75ccf0a106a152bdb698ffc0938344e6e54 # timeout=10
Commit message: "Update Jenkinsfile"
> git rev-list --no-walk fa6bd0e14e37d810dc16f73a4578d2406932a3b0 # timeout=10
[Pipeline] }
[Pipeline] // stage
[Pipeline] withEnv
[Pipeline] {
[Pipeline] stage
[Pipeline] { (Hello)
[Pipeline] sh
+ java -version
openjdk version "1.8.0_302"
OpenJDK Runtime Environment (build 1.8.0_302-b08)
OpenJDK 64-Bit Server VM (build 25.302-b08, mixed mode)
[Pipeline] }
[Pipeline] // stage
[Pipeline] stage
[Pipeline] { (cat README)
[Pipeline] sh
+ cat README.md
# multibranch-sample-app
[Pipeline] }
[Pipeline] // stage
[Pipeline] }
[Pipeline] // withEnv
[Pipeline] }
[Pipeline] // node
[Pipeline] End of Pipeline
Finished: SUCCESS
As you can see, the content of the README.md is there because the job got the update we did on the Jenkinsfile. If you run the main job again, you won't see the new change. But to confirm you can have custom behaviors in your pipelines, let's merge the fix-123 branch to main. The log should be the same as before because the logic for printing out the content of the README.md file is only for the “fix-” branches. Let's run the following commands:
git checkout main
git merge fix-123
git push
Let's also remove the local and remote fix-123 branch:
git branch -d fix-123
git push origin --delete fix-123
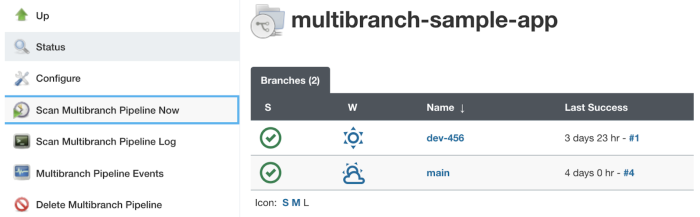
Head over to your Jenkins instance and run a scan again. You should see that the fix-123 job disappears when you refresh the page.
Additionally, when you run the main job, you shouldn´t see the contents of the README.md file in the logs and message saying that the stage has been skipped, like this:
Checking out Revision 346a949925b2dd5b130de8c2a39a3efe8ccd6a96 (main)
> git config core.sparsecheckout # timeout=10
> git checkout -f 346a949925b2dd5b130de8c2a39a3efe8ccd6a96 # timeout=10
Commit message: "Merge pull request #1 from christianhxc/fix-123"
> git rev-list --no-walk fa6bd0e14e37d810dc16f73a4578d2406932a3b0 # timeout=10
[Pipeline] }
[Pipeline] // stage
[Pipeline] withEnv
[Pipeline] {
[Pipeline] stage
[Pipeline] { (Hello)
[Pipeline] sh
+ java -version
openjdk version "1.8.0_302"
OpenJDK Runtime Environment (build 1.8.0_302-b08)
OpenJDK 64-Bit Server VM (build 25.302-b08, mixed mode)
[Pipeline] }
[Pipeline] // stage
[Pipeline] stage
[Pipeline] { (cat README)
Stage "cat README" skipped due to when conditional
[Pipeline] }
[Pipeline] // stage
[Pipeline] }
[Pipeline] // withEnv
[Pipeline] }
[Pipeline] // node
[Pipeline] End of Pipeline
Finished: SUCCESS
Conclusion
Working with multiple branches at the same time isn’t a problem in Jenkins. You saw how easy it is to create a multibranch pipeline job where Jenkins creates a new independent job automatically for every branch you create. You don't have to worry about doing maintenance as Jenkins will remove the job as well when the branch is removed. And if you need to have custom stages for branches different than the one you use for production, you can do that, too, by defining the custom behavior in the Jenkinsfile.

One final recommendation would be that you create the initial multibranch pipeline job where you define where the Jenkinsfile is, then you continue evolving the pipeline through code in the Jenkinsfile. At some point, you might end up using Jenkins to simply run the jobs on demand. You can also manage more Jenkins instances at a lower cost and release more efficiently with CloudBees.
This post was written by Christian Meléndez. Christian is a technologist that started as a software developer and has more recently become a cloud architect focused on implementing continuous delivery pipelines with applications in several flavors, including .NET, Node.js and Java, often using Docker containers.


