


Introduction
When it comes to version control systems in software development, Git is the most widely used—by far. Git may indeed dominate version control today, but it has a popular feature that many developers still don’t fully understand.

You can use Git to travel back in time and safely undo your changes in a project through a command called git reset. It can be a tad bit tricky to grasp, so I’ll demystify some underlying concepts for you in this post. I’ll walk you through some use cases of the reset command and different ways you can implement it, along with a few examples.

The Three Trees
To clearly understand how git reset works, let’s do a quick refresher on Git’s internal state management. Create a new directory and initialize an empty Git repository inside it:
$ mkdir git-reset-examples && cd git-reset-examples && git init
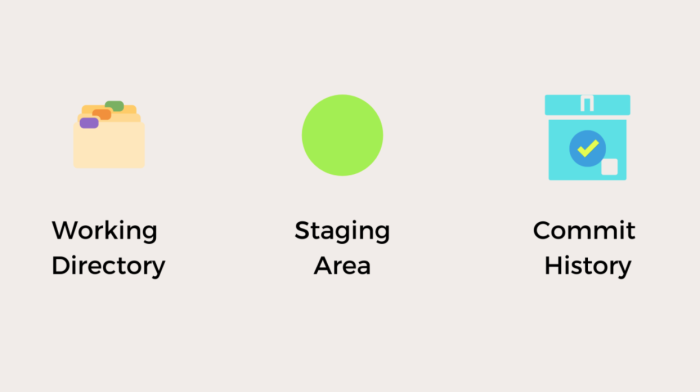
Git manages and tracks the state of our project using three trees: the Working Directory, the Staging Area or Staging Index, and the Commit History. Let’s see what each tree represents.
The Working Directory
This Working Directory represents the current state of your project on your code editor. Let’s create two simple text files inside our directory with some text inside them:
$ echo hello>file1.txt $ echo hello>file2.txt
Next, let’s check the status of our project by running:
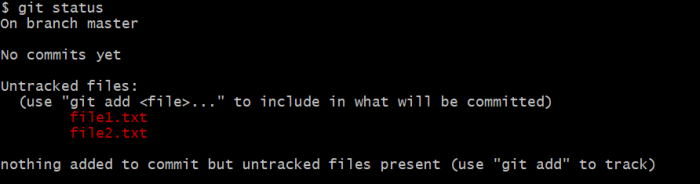
$ git status
Our Working Directory consists of two text files, each having the word “Hello” inside it. Git marks them as “Untracked files,” highlighting them in red and representing them as changes in your Working Directory.
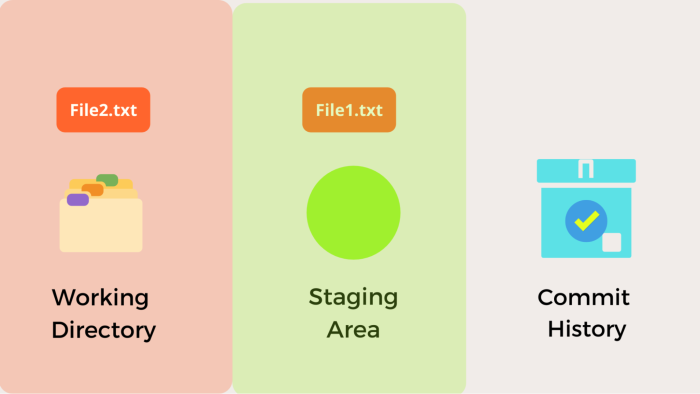
Here’s a visual representation of the current state of our project:

The Staging Area
After you make changes in your Working Directory, you move them to a pre-commit area to tell Git that your changes are ready to be committed. We can use the add command here to tell Git which files it needs to track for commits.
Let’s add one of our files (file1.txt) to the Staging Area using the following command:
$ git add file1.txt
You can also directly use the git add . command to move all your changes to the Staging Area.
Let’s check the status of our project now:
$ git status
Git highlights file1.txt in green, indicating that it’s inside our Staging Area.
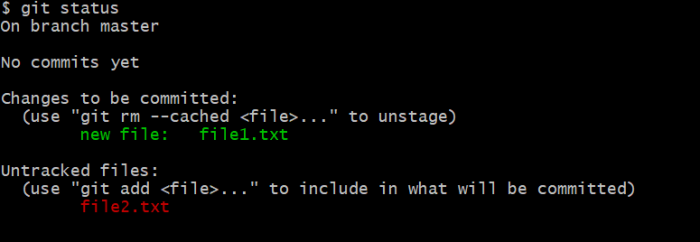
Our second file, file2.txt, still remains in the Working Directory. The state of our project now becomes:
The Commit History
The Commit History contains a snapshot of all your work as commits. Once you move your changes to the Staging Area, you can confirm them by committing them locally. Consequently, you can also commit them to a remote repository.
$ git commit -m "Added content to File1"
Once you execute the above command, Git tells you the commit message, your current branch where you committed your changes, and the number of insertions and deletions pertaining to those changes. It also gives you a unique commit id (5607c8b in this case) corresponding to that commit.

The above command moves your changes in file1.txt to the Commit History. The state of your project now looks like this:

How Does Git Undo Your Changes?
When you commit your changes, Git uses a pointer called HEAD to maintain the latest commit of your project. The HEAD pointer always points to the last commit you made on your currently checked-out branch. When you tell Git to undo your committed changes, it updates the HEAD pointer as well as the state of the trees described in the previous section.
The reset command in its raw form looks like this:
$ git reset
However, you can pass three arguments to the above command, depending on how you want it to update the state of your trees.
Mixed Reset
You can explicitly pass the --mixed flag to the reset command, but if you don’t, Git assumes that you’re performing a mixed reset, as it’s the default reset option. Previously, we were at the following state:
Let’s add another text file with some content:
$ echo hello>file3.txt
And move this file to the Staging Area:
$ git add file3.txt
We’ll also modify the contents of our file file1.txt, which was sitting in the Commit History:
$ echo mixed>>file1.txt
And add these changes to the Staging Area:
$ git add file1.txt
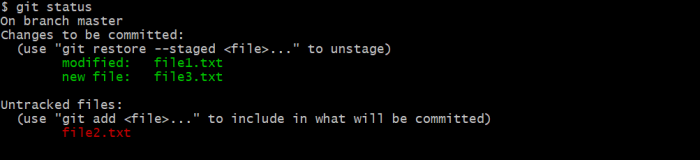
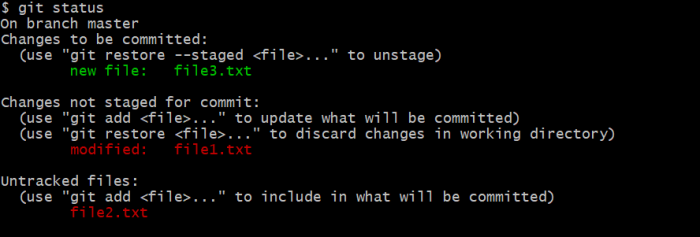
To summarize, we added a new file in our project and updated the contents of one of our previous files. The rest of our project remains unchanged (remember, one of our files, file2.txt, is still in the Working Directory). Let’s check the status of our project now:
$ git status
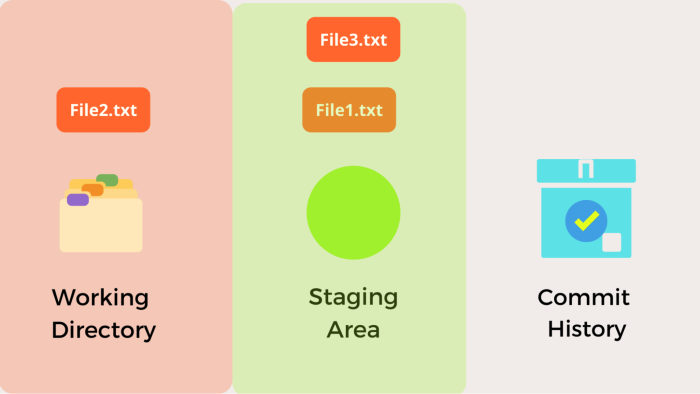
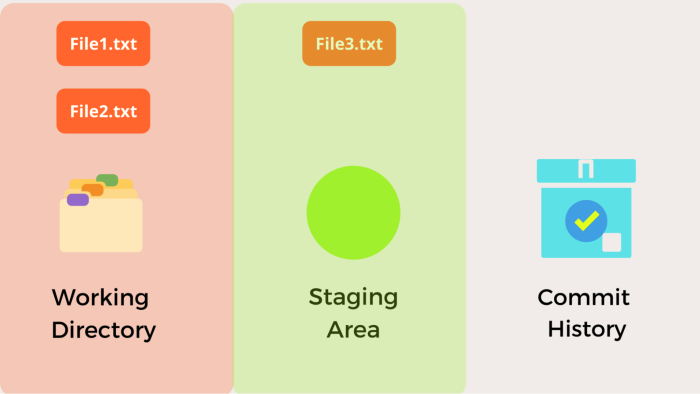
We expect our modified file file1.txt along with our new file file3.txt to be in the Staging Area, while one of our previous files, file2.txt, is still in the Working Directory.
Visually, here’s the current state of our project:
Now, let’s run the reset command with the mixed option:
$ git reset --mixed
If we check the status of our project now:
$ git status
Git tells us that our Staging Area is empty and our changes have been moved to the Working Directory:
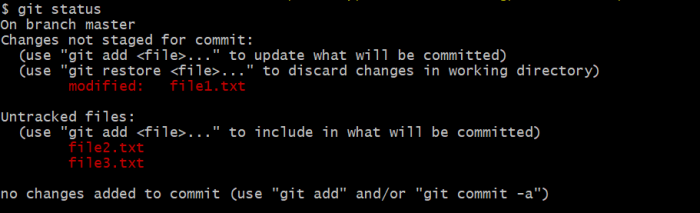
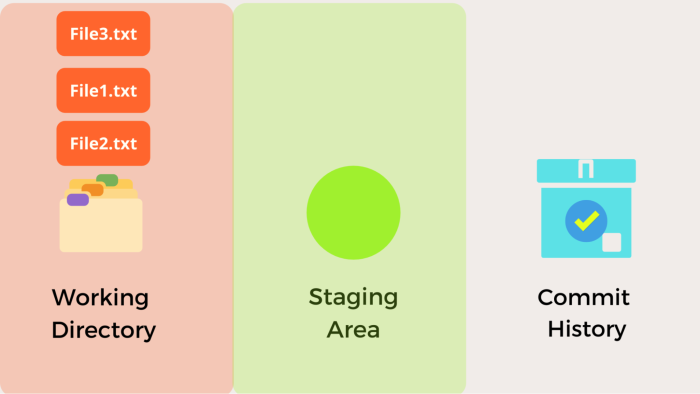
This is how the mixed reset command works. Your Staging Area changes are moved to the Working Directory and your current Staging Area is reset. Here’s what the state of our project looks like after the mixed reset command:
In a nutshell, the mixed option resets your changes in a safe way by preserving your uncommitted or staged changes and resetting them as unstaged changes. It gives you a chance to undo your changes that were ready to commit but didn’t actually get committed.
Hard Reset
The hard reset is a more direct and dangerous way to undo your changes. Let’s continue from our previous example. After we had done a mixed reset, all our files were sitting inside the Working Directory.
We created a new file, file3.txt, so let’s move it to the Staging Area:
$ git add file3.txt
Let’s check the status of our project now:
$ git status
We have two files in the Working Directory: our original file2.txt and our updated file1.txt. Our file2.txt is untracked by Git since we never moved it to the Staging Area. However, we did add file3.txt to the Staging Area once, so Git knows to track changes in this file.
Visually, here’s what the state of our project looks like:
Let’s execute the hard reset command by passing the --hard flag as shown below:
$ git reset --hardHEAD is now at 5607c8b Added content to File1
Git tells us that our HEAD pointer has moved back to one of our earlier commits. This is the commit we made back when we were on the Commit History tree! So what exactly happened here?
The hard reset moves the HEAD pointer to your last commit and also resets the Staging Area as well as the Working Directory to that commit. This means all your changes in the working tree and Staging Area are completely lost. You can verify by this by displaying the contents of your directory:
$ dirfile1.txt file2.txt
In other words, our project’s state is reset to how it was at the time we made our last commit:
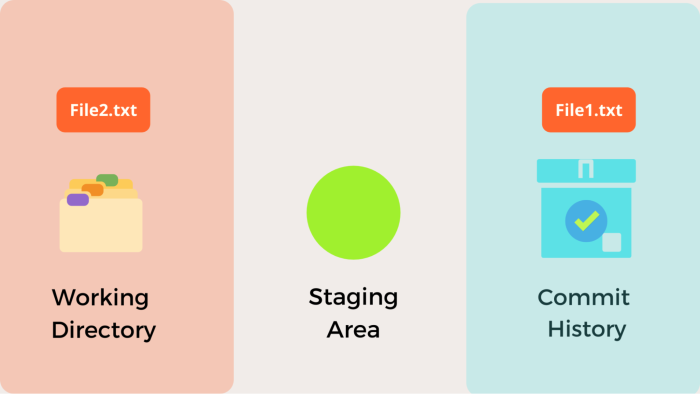
We have completely lost file3.txt, which we just created, along with the changes we made to file2.txt.
Soft Reset
The soft reset command can be executed by passing the --soft flag and only updates the HEAD pointer. It leaves both your Staging Area and your Working Directory unchanged.
We lost our file3.txt due to a hard reset, but we've had file2.txt sitting idle in the Working Directory for an eternity! Let’s finally move it to the Staging Area:
$ git add file2.txt
Before we do anything else, let’s run the status command:
$ git status
Here’s what we should get back on the terminal:

If you execute the soft reset command:
$ git reset --soft
Nothing will change. You moved file2.txt from the Working Directory to the Staging Area, but since a soft reset doesn’t operate on these trees, everything remains exactly the same.
Let’s commit our changes to file2.txt and move it to the Commit History:
$ git commit -m "file2 added to commit history"[master e824bfe] file2 added to commit history 1 file changed, 1 insertion(+) create mode 100644 file2.txt
Here’s our Commit History now:
$ git logcommit e824bfe43449fe12ff092c175ec2d0266cf2a3a9 (HEAD -> master)Author: fuzzysidDate: Sat Sep 4 19:29:55 2021 +0530 file2 added to commit historycommit 5607c8b32638c89ee02832e70aacfe59b90cc1fbAuthor: fuzzysidDate: Sat Sep 4 12:09:50 2021 +0530 Added content to File1
Let’s do a soft reset to one of our previous commits by running:
$ git reset --soft 5607c8b32638c89ee02832e70aacfe59b90cc1fb
Git will now move back to our previous commits but will keep file2.txt ready in the Staging Area as it was before. If you run git status now, you’ll see the same result you saw previously when you ran the status command after moving file2.txt to the Staging Area:
Reset vs. Revert
The git revert command looks a lot like the reset command, and is also used to undo your changes in a project. We saw earlier how reset just wipes off data in your Git’s state, and these commits are completely removed from the Commit History. The revert command, on the other hand, pushes an additional commit in the Commit History after its execution.

You can safely undo your local changes using the reset command. However, if you want to undo changes you have committed to a remote repository, always use the revert command instead.
Conclusion
In this post, you learned all about the reset command, including how and where it is used. The reset command is best suited with the mixed flag if you want to undo any local changes. If you wish to revert remote commits, avoid using reset—use the revert command instead. If you're new to the revert command, check out this guide.
Check Out These Other Git Resources
- Git Push: Learn how to push your changes to a remote repository.
- Git Pull: Discover how to pull the latest changes from the remote.
- Git Merge: Learn the ins and outs of merging branches in Git.
- Git Undo Commit: Learn how to reverse a commit.
This post was written by Siddhant Varma. Siddhant is a full-stack JavaScript developer with expertise in front-end engineering. He’s worked with scaling multiple startups in India and has experience building products in the educational technology and healthcare industries.


