


Though most operations in Git are offline, collaborating requires syncing to at least one remote repository. The main commands for that are git pull and git push. As for the former, you can check out the tutorial we already created. The latter is the topic of today’s tutorial.
This post assumes you’re comfortable with the command line and familiar with at least the most basic Git commands. You’ll also need a GitHub account. Create one if you don’t already have it.
What Does a git push Do?
If you’re working with other people, you need to get your changes to them somehow. Even if you’re working alone, you probably have some remote on GitHub or somewhere similar and need to get your code there, too.
The command you’ll use in all of those scenarios is git push. It helps you push your changes up to a remote repo.
How Do I Push to a Remote Branch? A Minimal Example
Let’s start with a minimum, practical example of git push.
Start by creating a new repository on GitHub. If you’re not already logged into your GitHub account, the link will take you to the login page. Just sign in to continue.
The name of the repo doesn’t matter, nor does the privacy configuration. Make sure to check the option to create a README file. Here are my configurations:
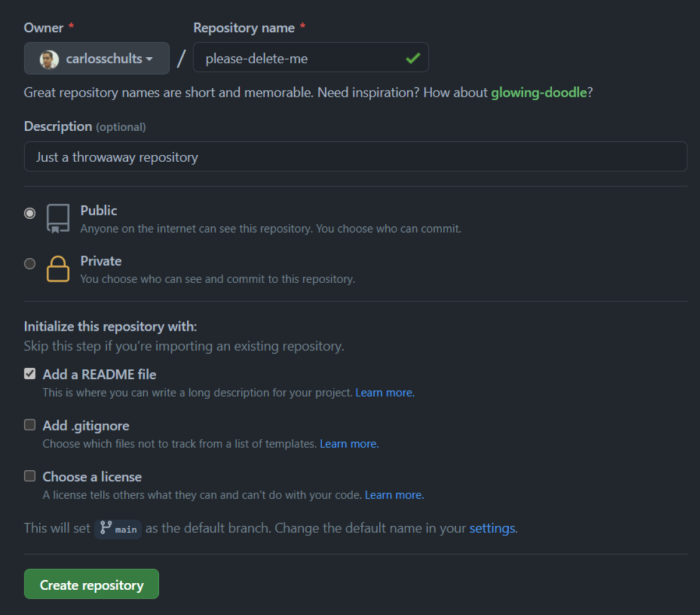
Just click on Create repository and you’re done. You now have a repo on GitHub with a single commit.
Now, it’s time to clone the repository locally. Go to your terminal and run:
git clone https://github.com/<YOUR-USERNAME>/<YOUR-REPO>
Now, let’s add a couple of commits:
echo “One line” >> README.md
git commit -am “Update README.md”
echo “Another line” >> README.md
git commit -am “Update README.md”
If you now run git status, you should see the following result:

The message makes it clear: to send your changes to the remote, run git push. Get back to GitHub on your browser, press F5 and you’ll see the changes in the README file as well as the new commits now being displayed.
Note: if you ever need to undo a commit you just made before pushing, here’s a helpful guide on how to undo a commit in Git.
Git Network Fundamentals: Commits, Remotes and More
Now let’s go deeper into the git push command. This will require you to learn more about the fundamentals of network operations on Git.
Git Commits in a Nutshell
Git is a decentralized version control system. So, unlike Subversion and others, it doesn’t have a central server, which means there’s no central authority who can assign revision numbers to commit.
In Git, committing is a local operation, which simply means “saving” changes to your local database. Each commit object is identified by a hash, which is calculated from the information on the commit and is virtually guaranteed to be unique.
When it’s time to collaborate with others, you push your commits—that is, you send them over the network.
Remotes: What They Are and How They Work
In Git, you don’t have a central server, so how can you collaborate with others? You don’t have a central server, but you can have one or more remote repositories, or simply remotes.
Remotes, in a nutshell, are repositories on other machines. Well, you can actually have remotes on your own machine, but it’s not typical.
If you have write privileges to a remote, you can push your commits to it. That’s exactly what you did in the previous example.
Local Branch vs. Remote Branch vs. Remote-Tracking Branch
The last piece of the puzzle to understand collaboration in Git are branches. Generally speaking, there are three types of branches in Git: local branches, remote branches and remote-tracking branches.
- Local branches are the ones you have in your local repository. They’re yours, and you can do anything you want with them.
- Remote branches are branches that live in a remote.
- Remote-tracking branches are sort of “read-only” branches you have locally that track the status of a remote branch. You can’t write to them, but Git updates them whenever you do some network communication—e.g., when you fetch from the remote.
How do these three types of branches interact with each other? What role do they play when you push and pull code around? Let’s answer that next.

A Picture Is Worth a Thousand Words: A Visual Explanation of git push
We’ll now give you a step-by-step visual guide of the git push command. We’ll walk you through our first example, but this time with diagrams rather than code samples.
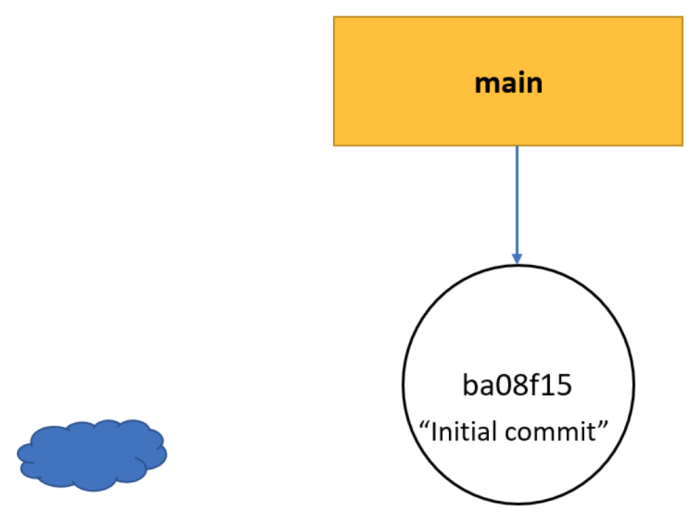
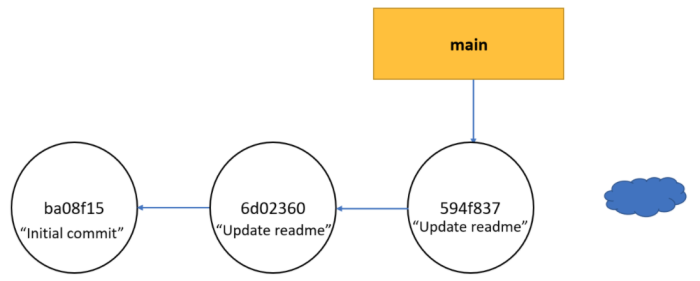
First, consider the state of your GitHub repository after creating it online:
As you’ll remember, we started out by cloning the GitHub repo. So, this is what the local repo looks like on your machine:
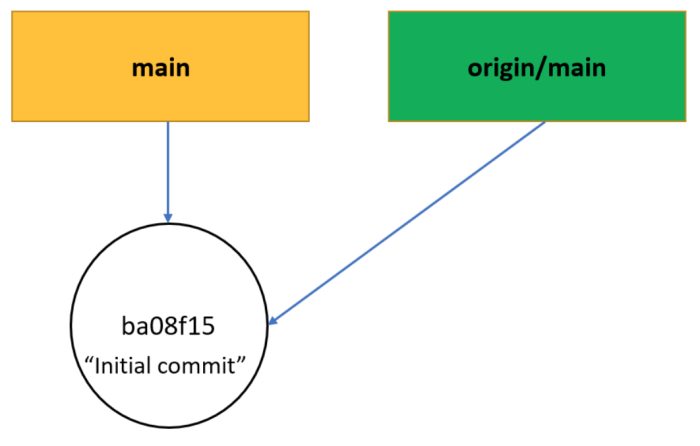
As you can see, besides the regular main branch, we also have origin/branch. This is what we call a remote tracking branch. It exists solely to track the progress of the remote branch on the original remote repository.
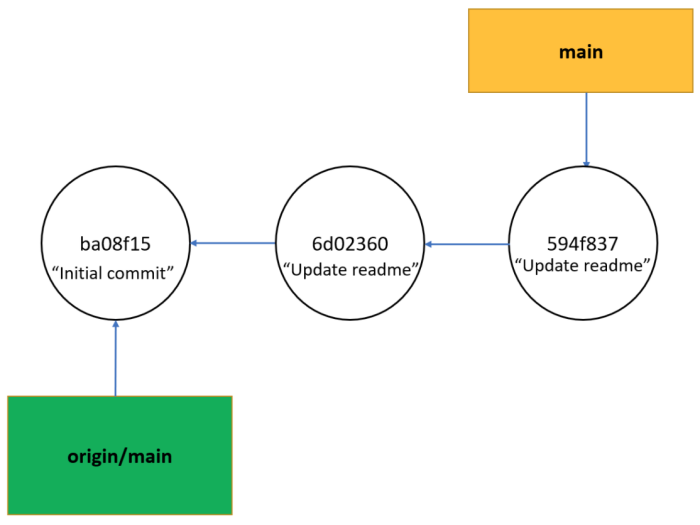
However, after adding two more commits, the repo looks like the image above. As you can see, main now points to the last commit. origin/main, however, still points to the first commit. That’s why when you run git status, you see this message:
So, let’s now see what happens when you run git push:
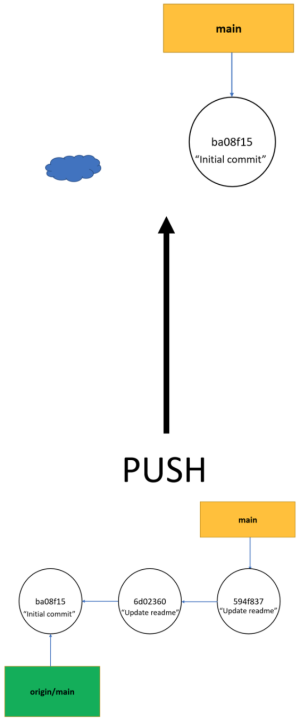
First, you send the commits using git push.
Now, the remote repo looks like the image above, containing the new commits you’ve created locally.
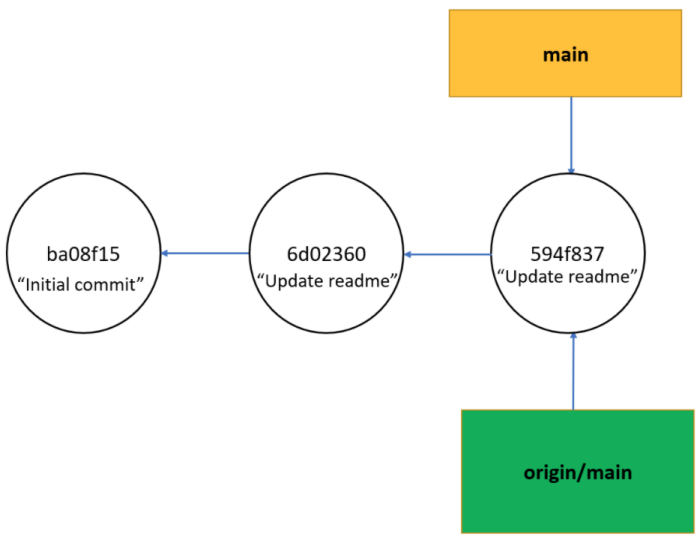
As a last step, the origin/main remote tracking branch locally is updated to point to the last commit.
Git Push: Several Usage Examples
We’ll now walk you through several more examples of git push.
What’s the -U Flag in Git Push?
It’s important to note that local branches aren’t automatically linked to remote branches.
Let’s see an example.
Go to the terminal and open the repository from the previous example. Create a new branch, switch to it and add at least one commit to it:
git switch -c exp
echo hello > file.txt
git add file.txt
git commit -m "Add new file"
Now you want to push this new branch and its commits to the remote repo. Does running git push work? No, it doesn’t. Git shows us the message “the current branch exp has no upstream branch.”
In other words, Git has no idea to which branch in the repo it should send our commits. Actually, we want Git to create this new branch on the remote. We can solve this by explicitly telling Git the names of the remote and the branch, using the syntax git push <REMOTE-NAME> <BRANCH-NAME>.
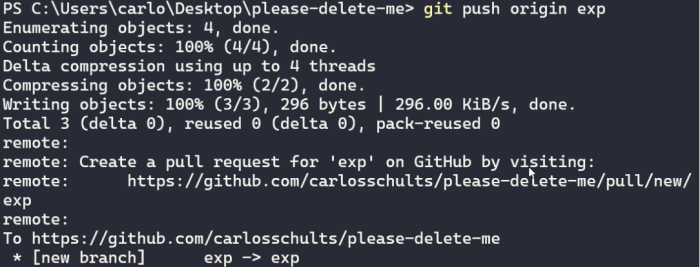
In our case, the complete command is git push origin exp. And now it works!
However, having to type git push origin exp every time will get old quickly. Fortunately, there’s a way out of that: you just have to set an upstream for your branch. In other words, you say to Git what branch on the remote you want to associate with the local branch. And from then on, you can just type git push, and Git will know where it should send your commits. This is the command syntax:
git push --set-upstream <REMOTE-NAME> <BRANCH-NAME>
The actual command then would be git push --set-upstream origin exp.
There’s an even easier version, which consists of using the -u option:
git push -u origin exp
What’s the -all Flag in Git Push?
If you have many branches you need to push, doing that manually gets old quickly. Luckily, you don’t need to do it manually. Just use the --all option to push all local branches at once.
How Do I Push Tags?
Git tags are “labels” you can add to commits to identify them. Like branches, tags are references. Unlike branches, they’re unmovable. Probably the main use case for tags is to mark version numbers.
By default, when you use git push, you push only commits. You can push a tag using git push <remote-name> <tagname>.
For instance, to create a tag called v1 at the exact point where you are—in other words, the HEAD—and then send it to the remote called “origin,” you can simply run:
git tag v1
git push origin v1
How Do I Delete a Remote Branch?
As weird as it may seem, you use git push to delete a remote branch.
To delete a local branch, you usually use git branch -d <branch-name>. If the branch contains unmerged commits, you’ll have to use the uppercase -D to force the exclusion.
However, deleting a remote branch is different. You just run git push <remote-name> --delete <branch-name>
It’s like you’re pushing the “order” to delete the branch. Let’s see a quick example.
In our case, to delete the exp branch, you’d simply run:
git push origin --delete exp
Don’t Push Your Luck With Git: Learn It, and Learn It Well
In Git, you can work 100% locally, but you’ll often want to collaborate with others. Collaborating includes making sure your local repository is in sync with the remote ones.

In this post, you’ve learned about git push, the command you use to send your commits to your remotes. A good remote management is essential for working effectively with Git, and mastering git push is a vital part of that.
This post was written by Carlos Schults. Carlos is a consultant and software engineer with experience in desktop, web and mobile development. Though his primary language is C#, he has experience with a number of languages and platforms. His main interests include automated testing, version control and code quality.


