

Git is one of the most common integrations within a CloudBees CI job, especially if we’re working through defining the pipeline as code in version control. GitHub is an extremely popular host of software development projects that use Git for version control. CloudBees has supported integration with GitHub for project creation based on the GitHub repository structure, and you can use any file you store in a GitHub repository—either to build your application or to define the pipeline as code. When you define your pipeline as code, you’ll be spending more time on improving your pipeline through Git than in the CloudBees UI. When you work with several branches, it’s preferable to configure your pipeline through code than a UI.
In this post, we’ll be covering how to integrate GitHub in a multibranch pipeline in CloudBees CI. We’ll also discuss additional features you get when working with CloudBees CI for your pipelines as code with multiple branches.
If you'd like to follow along with a video, you can watch Developer Advocate Darin Pope walk through a similar tutorial below.
Okay, let's proceed.
Setting Up GitHub Permissions
Before we start creating the multibranch pipeline, we need to make sure to have a CloudBees CI controller with connectivity to GitHub. We could do this simply by having direct outbound internet access or through a proxy. In order to receive webhooks from GitHub, we will need to allow traffic from GitHub to our CloudBees CI controller. One way to do that is by setting up a tunnel using a tool like ngrok. We also need a GitHub account with administrative access, and a GitHub project.
Then, we need to create a GitHub App.
Why Create a GitHub App Rather Than Use a Token or SSH Key to Authenticate?
At this point, you may be wondering why you can’t just use a username/token or SSH key. Wouldn’t either approach be easier than using a GitHub App?
Well, you can authenticate in those ways, but we recommend you don’t. A GitHub App is more scalable and allows for better control of privileges. To understand the full reasoning behind this recommendation, check out the documentation.
Creating a GitHub App
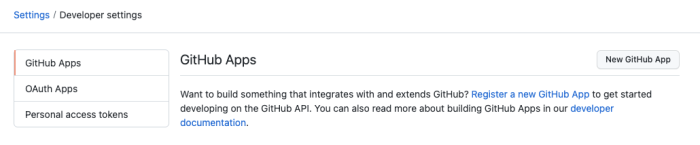
To create a GitHub App, head over to your GitHub account and open the “Settings” page under your profile. Scroll down a little bit, click on the “Developer Settings” link, and then click on the “New GitHub App” button at the right.
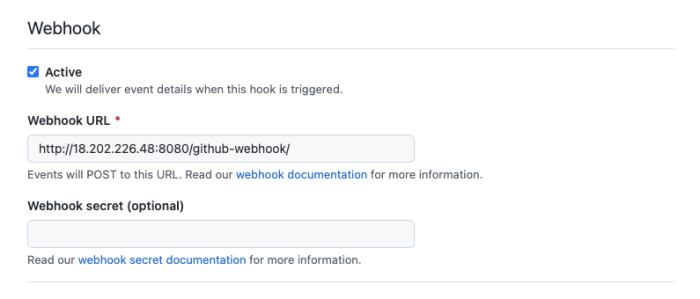
Fill in the form with the information required, like the app name and the homepage URL (you could use your GitHub profile link). Scroll down a little bit. The most important information you need to set here is the “Webhook URL” field. This is going to be the public endpoint for CloudBees CI with the “/github-webhook/” path, like the below screen:
In the “Repository permissions” section, you need to choose “Read-only” access to Administration, Contents, Metadata, and Pull requests. Then, choose “Read & write” for Checks and Commit statuses.
Scroll down to the “Subscribe to events” section and check the following boxes: Check run, Check suite, Pull request, Push, and Repository. Then, scroll down to the end of the page and click on the green “Create GitHub App” button. You’ll see a confirmation page like this:
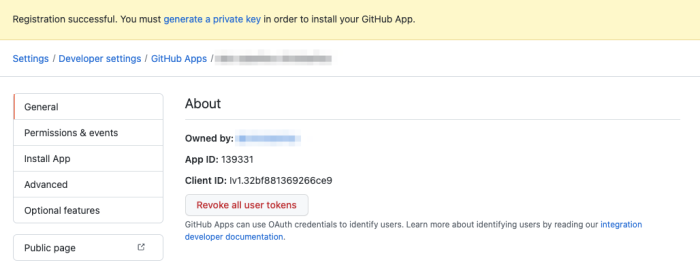
Then, scroll down to the end of the page and click on the green “Generate a private key” button. When the key is generated, save it locally. Now open a new terminal or command prompt and run the following command in the folder where you’ve downloaded the key to convert it into a different format (you need to use your key name for the “in” parameter):
LANG:code
openssl pkcs8 -topk8 -inform PEM -outform PEM -in
YOUR-PRIVATE-KEY-NAME.pem -out cbci-pipeline-converted.pem -nocrypt
Finally, in the left menu, click on the “Install App” link and choose your account. Then, click on the green “Install” button. See the screen below for a reference:
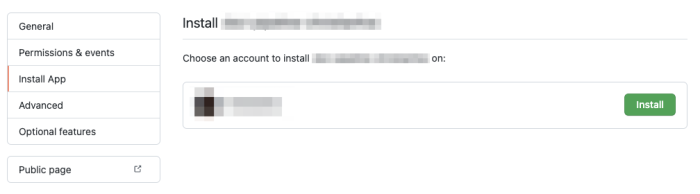
Then, choose a repository or install the app to all repositories. We’d recommend you choose only the repository you’re going to use. You can always come back later to give permissions to other repositories. Click on the green “Install” button.
Setting up GitHub Credentials in CloudBees CI
Go back to your CloudBees CI controller home page and click on “Manage Jenkins” in the left menu. Now click on the “Manage Credentials” link in the “Security” section. Click on the “global” domain, and then click on the “Add Credentials” link in the left menu.
In this screen, for the “Kind” dropdown box, choose “GitHub App,” and in the “ID” field type the name of the app you created in GitHub (ideally, the same name). Then, in the “App ID” field, type the ID from your GitHub App (to find it, go to your developer settings and click on the app). Finally, for the “Key” section, copy and paste the content of the new key format you generated before with the command from above. To confirm that everything is working, click on the “Test Connection” button.
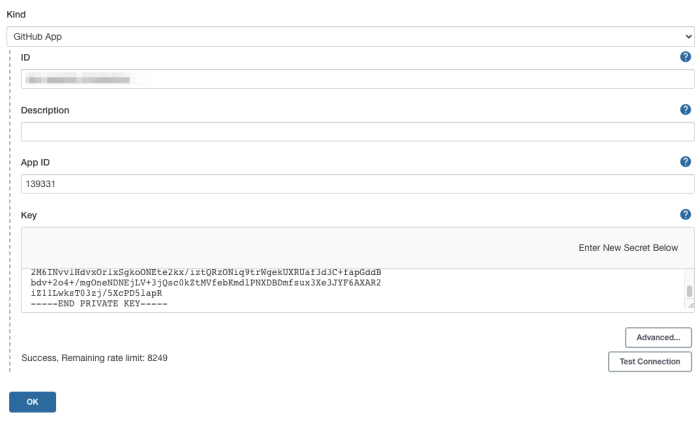
Click on the blue “OK” button.
Creating a Multibranch Pipeline
Go back to the main screen in CloudBees CI and click on the “New Item” link to create a new multibranch job. Type a name for the job, choose the “Multibranch Pipeline,” and click on the blue “OK” button. Scroll down to the “Branch Sources” section and choose “GitHub” in the “Add source” dropdown. Then, copy and paste the repository URL and click on the “Validate” button to confirm that everything is working.

Click on the blue “Save” button. If you’re creating everything from scratch, the repository doesn’t have a Jenkinsfile yet. Let’s create a simple one with the following content:
LANG:code
pipeline {
  agent any
  options {
    buildDiscarder logRotator(artifactDaysToKeepStr: '', artifactNumToKeepStr: '5', daysToKeepStr: '', numToKeepStr: '5')
  }
  stages {
    stage('Hello') {
      steps {
        sh '''
          java -version
        '''
      }
    }
  }
}
When you commit and push the new file, the pipeline should catch the new commit through the webhook configured before with GitHub, and the pipeline will run automatically.
Modifying the Jenkinsfile Through a Pull Request
Let’s modify the Jenkinsfile by making a pull request (PR) using a new branch.
Open a new terminal or command prompt and run the following git pull command:
LANG:bash
git pull
git checkout -b dev-456
git push --set-upstream origin dev-456
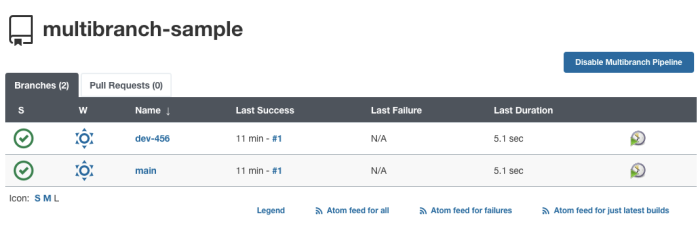
Go back to GitHub, and when you list the branches for the repository, you should see the branch dev-456 listed. When you go back to your pipeline in CloudBees CI, you should see that the new branch has been picked up.
Review and Merge the Pull Request
Let’s change the Jenkinsfile in the dev-456 branch. Use the following content:
LANG:code
pipeline {
  agent any
  options {
    buildDiscarder logRotator(artifactDaysToKeepStr: '', artifactNumToKeepStr: '5', daysToKeepStr: '', numToKeepStr: '5')
  }
  stages {
    stage('Hello') {
      steps {
        sh '''
          java -version
        '''
      }
    }
    stage('cat README') {
      steps {
        sh '''
          cat README.md
        '''
      }
    }
  }
}
Commit and push the new Jenkinsfile version. The CloudBees CI controller will catch the new change and run the pipeline automatically. But you’ve seen that working already. So, let’s go back to GitHub and create a new PR to merge dev-456 into main. When you’re in the home screen of your repository, you should see a message saying that dev-456 had recent pushes. Click on the green “Compare & pull request” button to create the PR.

Leave everything as default, and click on the green “Create pull request” button.
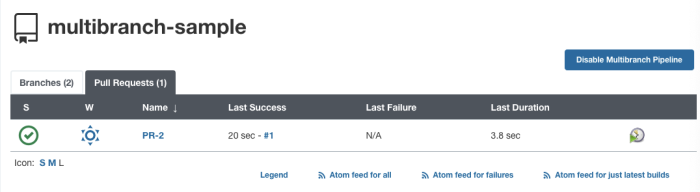
Go back to your CloudBees CI controller. In the home page for the multibranch pipeline, you should see that it picked up the new PR you created on GitHub and has created a new pipeline automatically.
When you merge that branch into main, and delete the dev-456 branch, your multibranch pipeline will mark as “completed” the jobs it created automatically, both for the PR and for the dev-456 branch. You can delete them manually if you don’t want to keep a history. And of course, the main pipeline will run again with the recent updates.


Conclusion
As you’ve seen in this post, integrating GitHub with CloudBees CI requires some initial setup to ensure a secure communication. But once you’ve done that, creating a pipeline job using GitHub as the source is just a matter of picking the proper credentials. Everything will work automatically under the hood every time you create a new branch or a PR. Using multibranch pipeline jobs allows you to experiment safely and keep everything as code. Reviews and team interactions can be done on GitHub, and when the changes are good to go, they can be merged to the main pipeline.
This post was written by Christian Meléndez. Christian is a technologist that started as a software developer and has more recently become a cloud architect focused on implementing continuous delivery pipelines with applications in several flavors, including .NET, Node.js, and Java, often using Docker containers.