

Updated February 15, 2025.
What is Docker?
Docker is an open-source platform that enables developers to build, deploy, and run applications in lightweight, portable containers.
Unlike traditional virtual machines, Docker containers share the host operating system’s kernel, making them more efficient and faster to start. This isolation eliminates compatibility issues between different environments, allowing developers to confidently deploy applications without worrying about system configurations.
With Docker, you can:
- Package applications with dependencies to ensure consistent behavior across various environments.
- Simplify deployment and scaling by using containerized services.
- Enhance portability, as containers can run on any system that supports Docker, from local machines to cloud infrastructure.
Docker is a powerful tool for isolating dependencies. Using it, you can run any application on a supported host, regardless of its individual needs. But you don't always want or need complete isolation: Sometimes, your applications need to be reachable outside their container. They need access to the network.
You control network access to a Docker container via network ports. Docker has two tools for managing ports: Docker expose port and Docker port mapping. These tools can be easy to confuse, and they don't serve the same purposes. Understanding the differences will help you build and deploy your network-aware container applications. So, we'll cover both in this post.
What Is a Port?
Before we cover how to manipulate ports, we should define what they are.
Every computer on a TCP/IP network has a unique IP address. While that address identifies a computer, you still need a way to identify the application you want to talk to. You do that with the service port, or just plain "port" for short. When you view the IP address and port together, you have the exact coordinates of a program running on a computer.
Let's look at a v4 IP address for an application:

This diagram represents the complete address for attaching to a system via Secure Shell (ssh).
- 192.9.200: This is the network portion of the IP address. The first three octets in a v4 IP address are not always the network portion. In this example, I'm assuming the network is using the standard Class C netmask for an address that begins with 192.
- 23: After removing the network part of an address, you're left with the host.
- 22: This is the standard service port for ssh.
So when you connect to the host at 192.9.200.23 on port 22, you're connected to its Secure Shell daemon.
Many applications, like ssh, have standard service ports. This is how computers generally communicate with each other. Some standard ports are 80 for webservers, 443 for webservers running over encryption (TLS/SSL), and 25 for mail.
So when you want to allow applications to connect to your container, you need to expose one or more ports to the outside world. Let's see how to do that.
What Is Docker Expose Port?
The expose keyword in a Dockerfile tells Docker that a container listens for traffic on the specified port. So, for a container running a web server, you might add this to your Dockerfile:
EXPOSE 80
This tells Docker your webserver will listen on port 80 for TCP connections since TCP is the default. For UDP, specify the protocol after the port.
EXPOSE 35/udp
For more than one port, you can list EXPOSE more than once.
EXPOSE 80/tcpEXPOSE 80/udpEXPOSE 443/tcpEXPOSE 8081/udp
While you don't have to specify TCP, it often makes a list of mixed protocol ports easier to read.
Exposing a port doesn't make it available when you run a container. To do that, you need to publish your ports. Depending on how you want to use the port, you need to map it, too.

Publishing Docker Ports
You publish ports when you run a container with the -p or -P command-line arguments. Let's look at some examples.
We'll use the Nginx container image for these exercises. First, pull the image down to your host with docker pull.
LANG:yaml
$ docker pull nginx
Using default tag: latest
latest: Pulling from library/nginx
5eb5b503b376: Pull complete
Digest: sha256:2834dc507516af02784808c5f48b7cbe38b8ed5d0f4837f16e78d00deb7e7767
Status: Downloaded newer image for nginx:latest
docker.io/library/nginx:latest
Now, use docker image inspect to see which ports this image has exposed.
By passing it a format string, you can have inspect filter everything except the published ports.
LANG:code
$ docker image inspect nginx -f '{{ .ContainerConfig.ExposedPorts }}'
map[80/tcp:{}]
Just as you would expect, Nginx is listening on port 80. Let's see how to use this port.
Exposing Docker Ports
The easiest way to publish ports is with the -P command line option, but depending on how you're using the container, it might not do what you want.
Start the Nginx container with this command:
LANG:code
$ docker run -d -P nginx
efb8b8ba5dc14d31150defc4cdd4f590b9156833e283ca94889cf3f8e8afbccb
Then, point your web browser at it. My container is running on 192.168.7.156.
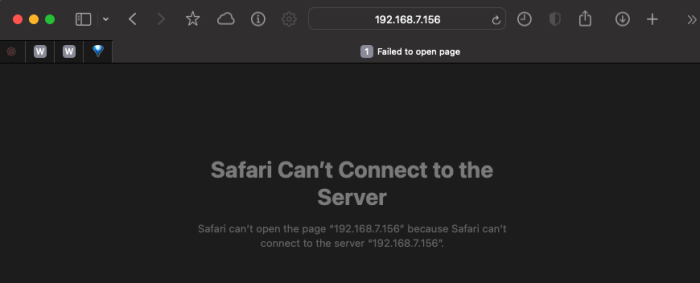
Since I didn't tell my browser otherwise, it expected to find a web server on port 80, but it's not there.
Where is Nginx listening for connections? Take a look with docker ps -a:
LANG:code
$ docker ps -a
CONTAINER ID IMAGE  COMMAND                CREATED       STATUS        PORTS                                     NAMES
efb8b8ba5dc1 nginx  "/docker-entrypoint.…" 5 minutes ago Up 5 minutes  0.0.0.0:49155->80/tcp, :::49155->80/tcp
The web server is listening on port 49155? Why? (The port on your system may be different.)
With the -P option, Docker picks a port to map the exposed port to. My system assigned the web server port 49155.
Plug the port you see into your browser after the IP address:
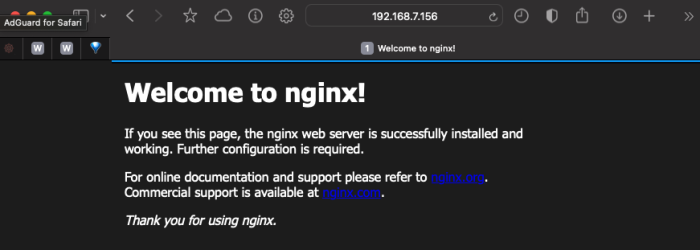
It's listening on port 80 now.
A peek at docker ps -a verifies that.
LANG:code
$ docker ps -a
CONTAINER ID IMAGE COMMAND CREATED STATUS PORTS
716353d6f763 nginx "/docker-entrypoint.…" 3 seconds ago Up 3 seconds 0.0.0.0:80->80/tcp, :::80->80/tcp
The syntax for port mapping is host address:container port. This diagram should help:

When you specify the host address, you have the option of using an IP address. If you don't, the port will be available everywhere (i.e., on all interfaces). If you do, it will only be available on that address.
127.0.0.1 is a special loopback interface on Linux hosts. It's only reachable for applications running on the same host. So this command would only allow programs running in the same host to connect to Nginx.
$ docker run -d -p 127.0.0.1:80:80 nginx
0.0.0.0 is shorthand for all interfaces. So this command is the equivalent to what you ran earlier; it allows connections from anywhere.
$ docker run -d -p 0.0.0.0:80:80 nginx
This next option only allows connection via the interface with the listed IP address. Some programs would not be able to reach the server via loopback or any network connections other than the one specified.
$ docker run -d -p 192.168.7.149:80:80 nginx
Displaying Docker Ports
You've already seen how you can view Docker ports from docker ps -a:
LANG:code
$ docker ps -a
CONTAINER ID IMAGE  COMMAND                CREATED       STATUS        PORTS                                     NAMES
efb8b8ba5dc1 nginx  "/docker-entrypoint.…" 5 minutes ago Up 5 minutes  0.0.0.0:49155->80/tcp, :::49155->80/tcp
But the output from docker ps is a bit much, and using its format option is a lot of work.
There's an easier way to view Docker ports. Use docker port <container name>:
$ docker port adoring_ardinghelli80/tcp -> 0.0.0.0:8080/tcp -> :::80
Docker port lists the mappings from right to left instead of left to right, which is how the -p option expects it. This is to keep you on your toes.
If you specify the private or inside port after the container name, port lists the mapping.
$ docker port adoring_ardinghelli 800.0.0.0:80:::80
This is useful for writing scripts that list dynamically assigned network ports.
Mastering Docker Networking With Ports
In this post, we covered what network ports are and how they make programs available to each other over a network. Then, we discussed Docker expose and how you use it to make network ports in a containerized application available to the outside world.
From there, we used a few examples to demonstrate the differences between exposing and mapping Docker container ports. You saw that, in most cases, you'll want to use port mapping to ensure that your containerized applications will be reachable where your clients expect them.
Note: Alongside networking, mastering CMD vs. ENTRYPOINT ensures that your containers start up and function as expected in any environment.
Docker expose port and Docker port mapping are critical tools in your container toolbox. Get started using them today!


