


Updated April 20, 2025
It’s an understatement to say that Docker is a game-changer for systems engineers and developers. You can run almost any application with a single command and customize it for your environment via a consistent container-based interface. But as containers proliferate, controlling them gets more complicated, too. Managing containers from the command line can be painful, but setting up an orchestration tool like Kubernetes or Docker Swarm is overkill for smaller systems.
Stopping and removing a container from the command line takes two steps. Stopping and removing two containers is four. And stopping and removing 10 containers is—well, you get the idea. Let’s look at how to make the Docker command line easier to use. We’ll focus on stopping and removing containers. Then, we’ll look at Docker Compose, another tool that makes managing smaller collections of containers easier.
These examples will be for systems that use Docker’s shell-based tools, including macOS, Linux, and Windows with WSL. You’ll need to have Docker installed, as well as docker-compose.

Docker: Stopping and Removing All Containers
Here’s a command that will stop and remove all of the containers on your system, assuming the user running it is root or a member of the docker group.
$ docker ps -aq | xargs docker stop | xargs docker rm
How does this command work? Let’s take a closer look.
Listing Containers
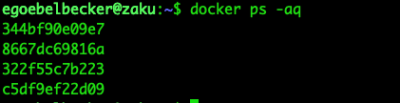
The first part of the command lists all of the containers on the system. Here’s a screenshot of a system with four containers:
The -aq option tells docker ps to list all containers (-a) by container ID (-q). You can combine the two arguments after a single dash (-).
If you drop the a, you only see three containers:

That’s because one of them isn’t currently running. Here’s a long listing:

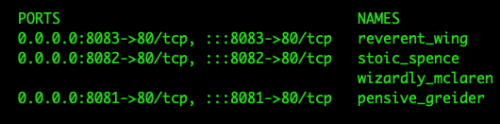
Here’s the other half of the display. You’ll want to refer to it later.
So, if you want to stop all of the running containers and remove everything, regardless of its previous state, provide the -a to docker ps.
Executing Commands With Xargs
The next two parts of the command to stop and remove all containers start with xargs. Xargs is a Linux utility that accepts entries from its input and executes the command you specify for each entry.
Here’s an example that gives you an idea of what’s happening when you pipe the output of docker ps -aq to xargs.
Remember the output from docker ps -aq.
When you pass it to xargs without any additional arguments, it defaults to /bin/echo for its command, and it appends its input to the end of the command you specify:

This command transformed the output of docker ps to:
echo 344bf90e09e7 echo 8667dc69816a echo 322f55c7b223 echo c5df9ef22d09
Since you didn’t tell echo to add a carriage return, it printed all four IDs on one line.
That’s not a very useful example. So, let’s get fancy.
Docker port lists information about network ports in a container.

You need to pass it the container ID and the port you’re interested in. So, we need to tell xargs how to run this command.
Here’s how to examine port 80 on all four containers.
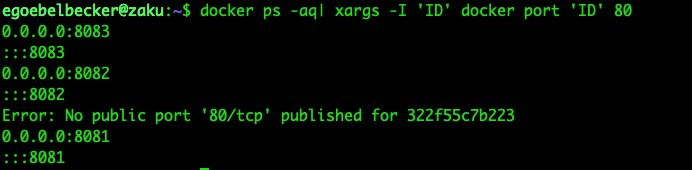
First, this command line runs docker ps -aq.
Then it pipes (|) the output to xargs with -I ‘ID’ as the first two arguments. This tells xargs that when it sees ‘ID’ in the command that follows, replace it with the input from the pipe.
So, xargs transforms command docker port ‘ID’ 80 into these four commands:
docker port 344bf90e09e7 80docker port 8667dc69816a 80docker port 322f55c7b223 80docker port c5df9ef22d09 80
The output from these four commands shows us that Docker has mapped three of the containers to ports 8083, 8082, and 8081. The fourth container has no port since it never finished starting.
0.0.0.0:8083:::80830.0.0.0:8082:::8082Error: No public port ‘80/tcp’ published for 322f55c7b2230.0.0.0:8081:::8081
Scroll back to the beginning of this post to see the output of docker ps a to see the mappings.
Stopping and Removing All Containers in Practice
So now we know how the rest of the command works.
$ docker ps -aq | xargs docker stop | xargs docker rm
Will be expanded to:
docker stop 344bf90e09e7docker stop 8667dc69816adocker stop 322f55c7b223docker stop c5df9ef22d09docker rm 344bf90e09e7docker rm 8667dc69816adocker rm 322f55c7b223docker rm c5df9ef22d09
Let’s try it on the demo system:
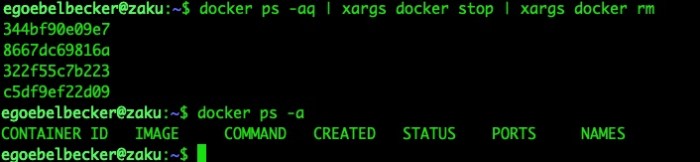
Success! Docker rm echoed the IDs of the containers as it deleted them. Since you can’t delete a running container, the stop commands must have worked.
That’s the nice way to stop and remove a set of containers.
Other Stop and Remove Options
There’s a shorter, more concise, and much less friendly way to stop and remove all containers on a system.
$ docker ps -aq | xargs docker rm -f
This runs docker rm -f on each container. It’s an easier way to remove the containers, but you probably don’t want to use it.
Here’s why: In order to stop a container, Docker has to shut down the process running inside it. It does this by sending the application a signal. A signal is a notification to a Linux process that something happened. In this case, the signal means it’s time to shut down.
But not all signals are created equal.
Docker stop sends SIGTERM. Applications have the option to ignore, block, or handle SIGTERM. Well-behaved applications use this opportunity to close any threads or child processes and perform basic house-cleaning tasks. For example, a server application could notify clients that it is going away, or a database could flush any unsaved transactions.
Docker rm -f sends SIGKILL. Processes cannot block or handle this signal. They are immediately terminated, with no chance to do any housekeeping at all. This can lead to data loss.
Docker stop will only use SIGKILL if the application does not shut down in a reasonable period of time.
So, using stop instead of rm -f is a good idea, whether you’re stopping a set of containers or just one at a time.
Stopping and Removing Containers With Docker Compose
If you don’t want to spend a lot of time on the command line managing containers, or if you have a set of containers that need to talk to each other, Docker Compose might be a better option than the command line.

Docker Compose uses a YAML configuration file to configure, start, and stop containers. Let’s look at a simple file that starts three containers:
# docker-compose.ymlversion: '3.7'services: one: image: docker/getting-started user: root ports: - 8081:80 container_name: one two: image: docker/getting-started user: root ports: - 8082:80 container_name: two three: image: docker/getting-started user: root ports: - 8083:80 container_name: three
Each container is defined as a service. This file defines three containers, named one, two, and three. Each service will execute its defined commands based on CMD and ENTRYPOINT settings within its corresponding image. Like the example above, they run Docker’s getting-started image and map port 80 to 8081, 8082, and 8083, respectively.
Create this file in an empty directory. Then tell docker-compose to start with docker-compose up -d.
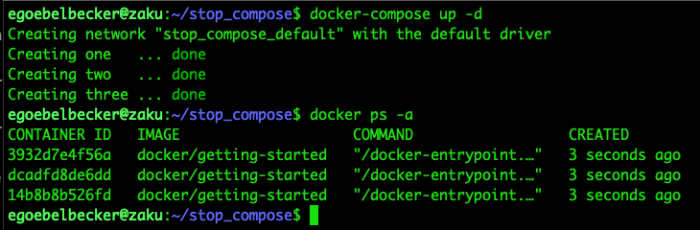
It created the three containers, and you can see them running with docker ps -a.
Stopping them is just as easy. Simply run docker-compose down in the same directory.
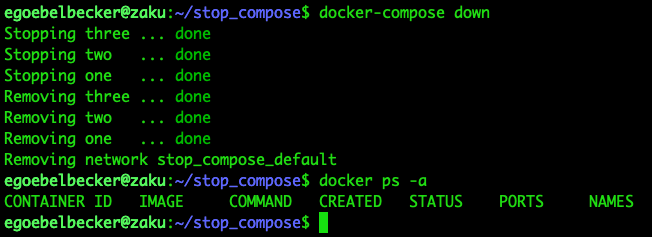
Docker-compose’s output is more user-friendly than Docker’s. It stopped all of the containers listed in the file. Docker ps confirms that they are gone.
This is only the tip of the iceberg when it comes to Docker Compose’s capabilities. You can use it to define containers, volumes to store persistent data, access control, private networks for containers to communicate over, and much more. CloudBees has a tutorial on how to install and run Jenkins with Docker Compose that demonstrates more of its capabilities.
Better Container Management
In this post, you saw how to stop and remove all containers on your system with a single command. You learned how to use xargs to tell Docker to run the same command over a set of containers. You also took a look at the nice and not-so-nice ways to shut down a containerized application.
Then, we covered Docker Compose and how you can use it to manage a set of containers. You saw how to replace the command line examples we covered with a YAML configuration file and a pair of simple commands.
So, start using these tools to manage your containers today, and check out our Docker Compose tutorial for more ideas.
This post was written by Eric Goebelbecker. Eric has worked in the financial markets in New York City for 25 years, developing infrastructure for market data and financial information exchange (FIX) protocol networks. He loves to talk about what makes teams effective (or not so effective!).


