

Rails apps come in many shapes and sizes. On the one hand, you have large monolithic applications where the entire application (admin, API, front-end, and all the work it needs to perform) is in a single place. On the other end of the spectrum, you have a series of microservices, all communicating with each other with the goal of breaking up the work into more manageable chunks.
This use of microservices is what's called Service Oriented Architecture (SOA). Rails apps from what I have seen tend to lean toward being monolithic, but there is nothing stopping a developer from having multiple Rails apps which work together and/or connecting to services written in other languages or frameworks to help them accomplish the task at hand.
Monoliths don't need to be written poorly, but poorly written monoliths broken up into microservices will most likely end up being poorly written as well. There are several ways you can write your app which will not only help you write cleaner (and more easily testable) code, but will also help you if/when the need arises to break up the application.
Our Use Case for a Rails App with Microservices
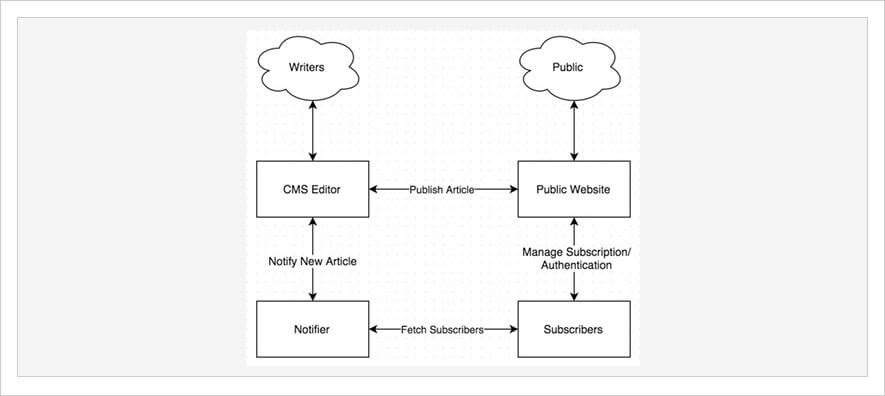
For this article, we'll be talking about building a website that is a CMS. Imagine any large newspaper or blog that has multiple writers contributing articles with users that can subscribe to receive alerts about certain topics.
Martin Fowler wrote a great article on why editing and publishing should be separated into two different systems. We're taking that example and adding two more components: Notifications and Subscribers.
The CMS we're talking about has four main components:
- CMS Editor: Used by writers and editors to create, edit, and publish articles.
- Public Website: Used by the public to view published articles.
- Notifier: Used to notify subscribers of new published articles.
- Subscribers: Used to manage user accounts and subscriptions.
Should I Build My Rails App as an SOA?
So how do you decide if it makes more sense to build your Rails app as a monolith or to build it using microservices? There is no right or wrong answer, but asking yourself the following questions may help you decide.
How are my teams organized?
Deciding to go with an SOA often has very little to do with technical reasons but rather how the different development teams are organized.
It may make more sense for four teams to each take one of the major components to work in a silo than to have everyone working on a single system. If you are working on a team of just a few developers, deciding to start right from the beginning with microservices may actually decrease development speed by adding the increased flexibility of having four different systems communicate with one another (and deploy).
Do different components scale differently?
There's a good chance that in our use-case system in this article, the Public Website will have a lot more traffic to it than the CMS Editor that the writers and editors will be using.
By building them as separate systems, we can scale them independently and/or apply different caching techniques for the different parts of the system. You can still scale the system as a monolith, but you would be scaling the entire thing at once, rather than the different components individually.
Do different components use different technologies?
You may want to build your CMS Editor as a Single Page Application (SPA) with React or Angular and have the main public facing website be more of a traditional server-rendered Rails app (for SEO purposes). Maybe the Notifier would be better suited as an Elixir app due to the language's concurrency and parallelism support.
By having them as different systems, you're free to choose the best language for the job in each of the services.
Defining Boundaries
The most important part in all of this is that there are well-defined boundaries between the different components of the system.
One part of the system should think of itself as the Client communicating to an external Server. It doesn't matter if the communication happens through method calls or over HTTP, it just knows that it has to talk to another part of the system.
One way we can do this is through defining clear boundaries.
Let's say that when an article is published two things need to happen:
- First that we send the published version of the article to the Public Website, which will return to us a URL that it is published at.
- Second that we send the newly created public URL, the topic, and the title to the Notifier which will handle notifying all interested subscribers. This second task can be done asynchronously because it may take a while to notify everyone, and there isn't really a response that we need back.
For example, take the following code which publishes an article. The article doesn't really know whether the service being called is simply a method call or if it is an HTTP call.
LANG:python
class Publisher
  attr_reader :article, :service
  def initialize(article, service)
    @article = article
    @service = service
  end
  def publish
    mark_as_published call_service
    article
  end
  private
  def call_service
    service.new(
      author: article.author,
      title: article.title,
      slug: article.slug,
      category: article.category,
      body: article.body
    ).call
  end
  def mark_as_published(published_url)
    article.published_at = Time.zone.now
    article.published_url = published_url
  end
end
This type of coding also allows us to easily test the Publisher class' functionality by using a TestPublisherService which returns canned answers.
LANG:code
require "rails_helper"
RSpec.describe Publisher, type: :model do
  let(:article) {
    OpenStruct.new({
      author: 'Carlos Valderrama',
      title: 'My Hair Secrets',
      slug: 'my-hair-secrets',
      category: 'Soccer',
      body: "# My Hair Secrets\nHow hair was the secret to my soccer success."
    })
  }
  class TestPublisherService < PublisherService
    def call
      "http://www.website.com/article/#{slug}"
    end
  end
  describe 'publishes an article to public website' do
    subject { Publisher.new(article, TestPublisherService) }
    it 'sets published url' do
      published_article = subject.publish
      expect(published_article.published_url).to eq('http://www.website.com/article/my-hair-secrets')
    end
    it 'sets published at' do
      published_article = subject.publish
      expect(published_article.published_at).to be_a(Time)
    end
  end
end
In fact, the implementation of the PublisherService hasn't even been built yet, but it doesn't stop us from writing tests to ensure that the client (in this case the Publisher) works as expected.
LANG:python
class PublisherService
  attr_reader :author, :title, :slug, :category, :body
  def initialize(author:, title:, slug:, category:, body:)
    @author = author
    @title = title
    @slug = slug
    @category = category
    @body = body
  end
  def call
    # coming soon
  end
end
Service Communication
Services need to be able to communicate with each other. This is something as Ruby developers we're already familiar with even if we haven't built microservices before.
When you "call" the method of an Object, what you're really doing is sending a message to it, as can be seen by changing Time.now to Time.send(:now). Whether the message is sent via a method call or whether the communication happens over HTTP, the idea is the same. We're wanting to send a message to another part of the system, and often we want a response back.
Communication over HTTP
Communicating over HTTP is a great way to send messages to a service when you need an instant response -- when you're relying on receiving a piece of data back to continue program execution.
I've taken the original PublisherService class and have implemented an HTTP post to our service using the Faraday gem.
LANG:python
class PublisherService < HttpService
  attr_reader :author, :title, :slug, :category, :body
  def initialize(author:, title:, slug:, category:, body:)
    @author   = author
    @title    = title
    @slug     = slug
    @category = category
    @body     = body
  end
  def call
    post["published_url"]
  end
  private
  def conn
    Faraday.new(url: Cms::PUBLIC_WEBSITE_URL)
  end
  def post
    resp = conn.post '/articles/publish', payload
    if resp.success?
      JSON.parse resp.body
    else
      raise ServiceResponseError
    end
  end
  def payload
    {author: author, title: title, slug: slug, category: category, body: body}
  end
end
Its job is to build the data that will be posted to the service and handle its response. It also verifies that the response is a success and will raise an exception otherwise. More on that later.
I've used the constant Cms::PUBLIC_WEBSITE_URL, which gets its value through an initializer. This allows us to configure it using ENV variables for the different environments we end up deploying our app to.
LANG:yaml
Cms::PUBLIC_WEBSITE_URL = ENV['PUBLIC_WEBSITE_URL'] || 'http://localhost:3000'
Testing our services
Now it's time to test that our PublisherService class works correctly.
For this I don't recommend making an actual HTTP call; that would slow down testing and require that you have the service up and running at all times on your development machine (or continuous integration server). For this we can use the WebMock gem to intercept the HTTP call and get the required response.
LANG:code
RSpec.describe PublisherService, type: :model do
  let(:article) {
    OpenStruct.new({
      author:   'Carlos Valderrama',
      title:    'My Hair Secrets',
      slug:     'my-hair-secrets',
      category: 'Soccer',
      body:     "# My Hair Secrets\nHow hair was the secret to my soccer success."
    })
  }
  describe 'call the publisher service' do
    subject {
      PublisherService.new(
        author:   article.author,
        title:    article.title,
        slug:     article.slug,
        category: article.category,
        body:     article.body
      )
    }
    let(:post_url) {
      "#{Cms::PUBLIC_WEBSITE_URL}/articles/publish"
    }
    let(:payload) {
      {published_url: 'http://www.website.com/article/my-hair-secrets'}.to_json
    }
    it 'parses response for published url' do
      stub_request(:post, post_url).to_return(body: payload)
      expect(subject.call).to eq('http://www.website.com/article/my-hair-secrets')
    end
    it 'raises exception on failure' do
      stub_request(:post, post_url).to_return(status: 500)
      expect{subject.call}.to raise_error(PublisherService::ServiceResponseError)
    end
  end
end
Planning for failure
There will inevitably come a time when the service is down or times out, and we need to handle that error.
It's really up to the developer to decide what needs to be done when the service is down. Can the website continue to work when it's down? In the case of our CMS application, it can work fine for creating and editing articles, but we'll have to show an error to the user when they attempt to publish an article.
As part of the test above, there is a case that looks for a 500 response from the server and checks to ensure it raises the PublisherService::ServiceResponseError exception. This error comes from its parent class, HttpService, which for now doesn't contain much other than the error classes.
LANG:code
class HttpService
  class Error < RuntimeError
  end
  class ServiceResponseError < Error
  end
end
In another article by Martin Fowler, he talks about a pattern called the CircuitBreaker, whose job it is to detect when a service is misbehaving and to avoid making a call that would most likely end up in an error anyway.
Another technique that can be used to make our application more resilient is to make it aware of the status of the different services that it needs to function.
This could be controlled manually by developers, giving them the ability to turn off certain website functionality when a service is known to be down and avoiding errors altogether. However, it could also be controlled in conjunction with some sort of CircuitBreaker pattern programmatically.
Before showing the Publish button to your users, a quick check to PublisherService.available? will help avoid errors.
Communication with queues
HTTP isn't the only way to communicate to other services. Queues are a great way to pass asynchronous messages back and forth between the various services. The perfect situation for this is when you have some work that you want done but you don't need a direct response back from the receiver of this message (sending emails for example).
In our CMS app, after an article is published, any subscribers to that article's topic are notified (either through email, a website alert, or push notification) that there is a new article that might be of interest to them. Our app doesn't need a response back from the Notifier service, it just needs to send a message to it and let it do its work.
Using Rails queues
In a previous article, I wrote about how you can use ActiveJob, which comes with Rails to handle this type of background, asynchronous work.
ActiveJob expects the receiving code to be running inside of a Rails environment, but it is a great option that is very easy to get up and running.
Using RabbitMQ
RabbitMQ on the other hand is Rails (and Ruby) agnostic and can act as a generic messaging system between your various services. It is possible to use RabbitMQ as a way to handle Remote Procedure Calls (RPC), but it is much more common to use RabbitMQ as a means to send asynchronous messages to other services. They have a great tutorial for getting started in Ruby.
Below is a class built for sending a message to the Notifier service about a newly published article.
LANG:python
class NotifierService
  attr_reader :category, :title, :published_url
  def initialize(category, title, published_url)
    @category = category
    @title = title
    @published_url = published_url
  end
  def call
    publish payload
  end
  private
  def publish(data)
    channel.default_exchange.publish(data, routing_key: queue.name)
    connection.close
  end
  def payload
    {category: category, title: title, published_url: published_url}.to_json
  end
  def connection
    @conn ||= begin
      conn = Bunny.new
      conn.start
    end
  end
  def channel
    @channel ||= connection.create_channel
  end
  def queue
    @queue ||= channel.queue 'notifier'
  end
end
This code can now be used like this:
LANG:code
NotifierService.new("Soccer", "My Hair Secrets", "http://localhost:3000/article/my-hair-secrets").call
Conclusion
Microservices aren't something to be afraid of, but they should also be approached with caution. It is in fact possible to have too much of a good thing. My advice is to start with a simple system with well defined boundaries, allowing you to easily extract services as required.
More services will require more dev-ops work (you're not just deploying a single app any more but a number of smaller ones), and for that you may want to check out an article I wrote about deploying Docker containers.
PS: If you liked this article you might also be interested in one of our free eBooks from our Codeship Resources Library. Download it here: Breaking up your Monolith into Microservices or in checking out one of these other posts on the Codeship blog:
- Speed up ActiveRecord on Rails
- Building a JSON API with Rails 5
- How to Build Rails APIs Following the json:api Spec
- Docker & Rails: Running a Rails Development Environment in Docker
- Unobtrusive JavaScript via AJAX in Rails Tutorial
Want to test and deploy your microservices with Codeship Pro? Find out more here.
PS: If you liked this article you can also download it as a PDF eBook here: Breaking up your Monolith into Microservices or watch our re-run of our webinar: An Introduction to Building Your Apps with Microservices.


