
Docker’s ability to run applications in highly customized, isolated, and efficient environments makes it an invaluable tool for CI/CD pipelines. But even when you pair Jenkins with powerful tools like Docker Compose, you still need to know how to stop, start, and remove containers. It’s also helpful to understand how to examine their states.
So, in this post, we’re going to take a close look at Docker’s command line options and how you can use them to step up your container game.
What Is a Docker Container?
Before we delve into listing, examining, and managing containers, let’s take a moment to talk about what containers are.
Docker containers are runtime environments. While they provide applications with a virtualized interface to the systems they run on, they’re not virtual machines. The most significant difference between a container and a virtual machine (VM) is that containers are designed to run one application. In contrast, virtual machines can run as many applications as their allocated resources can handle. (Yes, you can use docker exec to run a program inside an existing container, but exec still has limitations that a VM does not.)
Containers offer an isolated and standardized environment for applications that allows them to run on any properly equipped host system. In a CI/CD pipeline, that means you can set up a variety of disparate build environments in a set of containers and run them on one build host.
Finally, Docker images and containers are not the same things. An image is a file Docker uses to build a container. Actually, Docker uses many images as “layers” to create a container. When you start a container, you refer to a single image that refers to others when Docker loads it into the runtime.
Since images and containers are not the same, you manage them with different tools. We’ll be looking at the tools for containers in this article.
docker ps
While its similarity to Linux’s ps command might make you think otherwise, docker ps is your primary tool for examining all containers in all states, not just containers that are running.
What Containers Are Running?
To list the containers running on your host, use docker ps.

Here we have three containers. The STATUS column tells us that they are all Up—one for 12 days and the other two for less than a minute.
What Containers Are Loaded?
When you use docker ps -a, you often get a completely different picture.

There are two more containers in the Exited, or stopped, state. Both were stopped about four minutes ago.
docker ps Columns
Let’s look at the columns docker ps displays when you list containers.
- CONTAINER ID: Docker assigns each container a unique ID. You can usually use this instead of the name to refer to a container on the command line.
- IMAGE: The image Docker loaded to start the container.
- COMMAND: The command Docker ran to start the container. This command may have come from the image or the command line. Many developers design images so you can start them with more than one command. Developers control container startup behavior using CMD and ENTRYPOINT instructions to specify how applications should run.
- CREATED: When the container was started.
- STATUS: The container status. We’ll cover the statuses in detail below.
- PORTS: The network port mappings for the container. Stopped containers have no port mappings.
- NAMES: The container’s names.
Container Status
Containers are in one of seven states:
- Created: A created container was prepared but never started. You can create a container in advance with docker create in preparation for a job you want to run later. It’s also possible for a container to get stuck in the created state. This can happen when it needs a resource that another container already has, such as a network port.
- Restarting: A container is in the process of restarting. You can manually restart a container with docker restart or configure a container to restart on failure.
- Running: A container that’s up and running. This indicates that docker start succeeded.
- Removing: After you stop a container, it remains available until it’s removed. This state indicates that removal has started. This state may mean it’s a large container or there’s a problem removing it.
- Paused: A container has been paused with docker pause.
- Exited: The command that started the container has exited. This may be because of an exception, the docker stop command, or because the command completed. An exited container isn’t consuming any CPU or memory.
- Dead: Containers in a dead state aren’t operational and can only be removed.
Container Port Mappings
A container can’t talk to the outside world without access to the network. Docker supports a few different networking models, but the most common is via network ports mapped to the host system’s network.
Here’s a closer look at the network port mappings in the listing above.
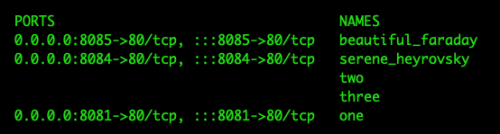
In this example, beautiful_faraday’s ports have two listings:
0.0.0.0:8085->80/tcp indicates that port 8085 on the host machine is mapped to port 80 in the container. 0.0.0.0 means that this port is mapped for all interfaces in the host machine.
:::8085->80/tcp means that the same port is mapped for IPv6, too.
Note: If you're wondering how this differs from using the EXPOSE instruction in a Dockerfile, this guide on Docker EXPOSE breaks down what it does—and what it doesn’t do, especially in relation to port mappings.
List Container Examples
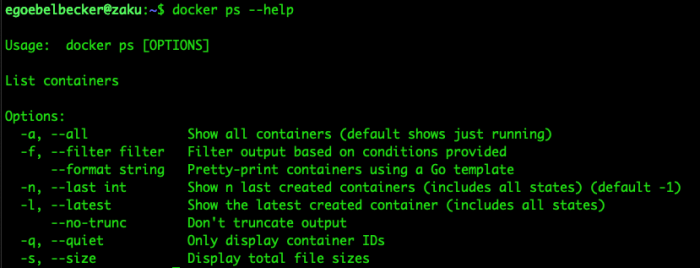
Now, let’s look at all the options for docker ps.
We’ve already looked at listing every container with docker ps -a.
The filter (-f) option accepts a key=value pair. docker ps -a -f status=exited will list only the exited containers.

You can filter on any column and use expressions instead of just text matches.
As an example, let’s restart container two and then take another look.

Container two moved from exited to running.
We don’t need any stopped containers to hang around, even though they don’t use any resources. Let’s get rid of three.

Use docker rm to get rid of container three. Now there are no exited containers and the same number of running containers as before. If you’d like to streamline this process, stop and remove all containers at once, which is especially useful for clearing out large environments. If containers have become unresponsive, you can kill all containers.
Next, let’s skip ahead to the size option (docker ps -s).

This adds a new column at the end with the real and virtual space used by each container.
The -q option limits the output of docker ps to the container IDs.

Why would you want this? So you can pipe the list to another command.
Finally, --format is helpful for building reports on your container statuses.
Let’s combine --format and --no-trunc to see the complete command Docker uses to start these containers.

Now, let’s go one step further and look at when the containers were started, how long they've been running, and what network they’re using.

The two newer containers are using the bridge network that connects to the host. The older containers were started with docker-compose and use a different one.
Also, when you use --format to display the container's created time, you get a complete timestamp instead of the more human-friendly “X days ago” format.
Listing Your Containers
Even though DevOps always favors automation over manual labor, there’s a lot to be gained by becoming familiar with Docker’s command line tools. In this post, we saw how to use docker ps to list docker containers, regardless of status. We looked at what container statuses mean, along with all the information docker ps lists about the containers on your system.
Then we looked at each of the ps options, including how to list container by status, filter its output, and generate more detailed reports.
That's it—now you know everything there is to know about listing the Docker containers on your system. You're ready to get started with your Docker systems today!
This post was written by Eric Goebelbecker. Eric has worked in the financial markets in New York City for 25 years, developing infrastructure for market data and financial information exchange (FIX) protocol networks. He loves to talk about what makes teams effective (or not so effective!).