

When you’re versioning your project with Git, you’ll have files transitioning between several different states. One of those is when a file is untracked—that is to say, Git can “see” a new file there but isn’t actively versioning it. You’ll often need to remove untracked files, so how do you go about it?
This is what this post is all about: learning how to remove those files. We’ll start by defining in more detail what untracked files are and why you’d want to get rid of them. After that, you’ll get your hands dirty learning how to do it in practice.
If you read any of our Git tutorials, you know how it goes: We expect you to be familiar with some basic Git commands and be comfortable working with the command line.
With that out of the way, let’s get started.
What Are Untracked Files?
Untracked files are the ones still not versioned—”tracked”—by Git. This is the state of new files you add to your repository.
That basically means Git is aware the file exists, but still hasn't saved it in its internal database. That has an important implication: If you lose the information from an untracked file, it’s typically gone for good. Git can’t recover it since it didn’t store it in the first place.

Why Remove Untracked Files?
When it comes to untracked files, the typical course of action would be to track them—using the command git add—so you can commit them, saving them inside your repo’s history.
Why would you want to remove untracked files? You might have files added accidentally to the project’s folder or automatically generated assets that aren’t supposed to be versioned, to name just two possible scenarios.

It’s important to emphasize that untracked files do no harm; you could just leave them where they are. However, removing them makes your working directory cleaner and more organized.
Finally, you often have files that need to be present inside your repository folder but that you shouldn’t version. Build artifacts and individual configuration files are two classic examples. For those cases, you shouldn’t remove the files but ignore them. More on that later.
Git Remove Untracked Files: How?
With the “what” and the “why” out of the way, it’s time for the “how.”
The first approach to delete untracked files is simply to delete them. This has basically the same effect as the correct approach you’ll read about soon. However, this can get tedious pretty quickly if you have a lot of files, or if they’re spread across different hierarchical levels within the project’s file structure.
The proper solution is to use the command git clean.
Git Clean to the Rescue
Git clean is a somewhat lesser-known git command. You can use it to clean all untracked files at once.
As a default, you need to specify a parameter; otherwise, you’ll get an error message. We’ll now walk you through the main parameters and provide examples.
Start by creating a repository. We’ll use the same repo through the examples.
mkdir untracked-files-tutorialcd untracked-files-tutorialgit init
Forcing a Clean git clean -f
The -f parameter is for force. It forces the deletion of the files. Let’s see an example.
In the same repo you’ve just created, create a new file:
echo hello > file.txt
Now, if you run git status, you’ll see a result like this:
On branch main
No commits yet
Untracked files: (use "git add <file>..." to include in what will be committed) file.txt
nothing added to commit but untracked files present (use "git add" to track)
Git tells us the file is untracked and even instructs us how to include it in the next commit. We’re not doing that, of course. Instead, run this:
git clean -f
You’ll get a result like this:
Removing file.txt
That's it. The file is gone. To prove it to yourself, you can use git status or even ls/dir.
Simulating a Clean git clean -n
When you use the -n parameter, git clean displays what would happen but doesn’t actively remove anything.
Here’s another example. Repeat the steps from the previous section to create a file and use git status to verify it’s really there and untracked.
Now, run:
git clean -n
The result is this:
Would remove file.txt
This time, if you use git status or ls/dir, you’ll see the file remains there.
Interactive Clean With git clean -i
The -i parameter is for interactive. It displays a menu with options you can use for cleaning.
For this example, create two files, totaling three (you didn’t remove the file from the last example, remember?).
Now, run git clean -i to see the following menu:
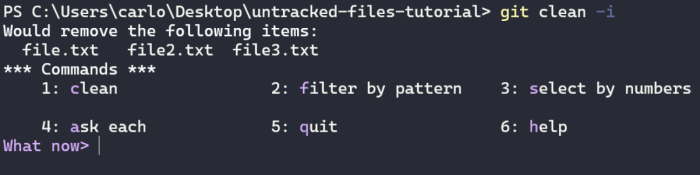
As you can see, besides displaying the options menu—which you can access by typing the corresponding number or the first letter of the option—Git tells you which files would be removed should you continue with the operation.
Let’s walk through each option.
Clean
The first option is clean. It wipes out the files:
Removing file.txtRemoving file2.txtRemoving file3.txt
Filter by Pattern
This option allows you to enter patterns you want Git to ignore.
To continue, create a few files again. Create at least one file with an extension other than .txt.
After selecting the filter by pattern option, you’ll see something like this:
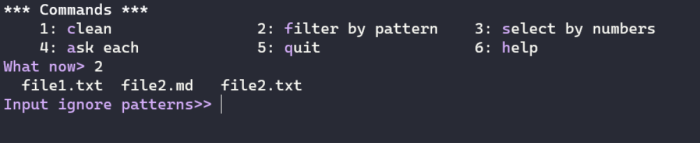
Let’s say I want Git to ignore files with the .md extension. I’ll type this:
*.md
Git then displays the files not filtered out by the pattern:
file1.txt file2.txt
Now, I can simply press Enter to go back to the main menu, where I can decide the fate of these two files.
Select by Numbers
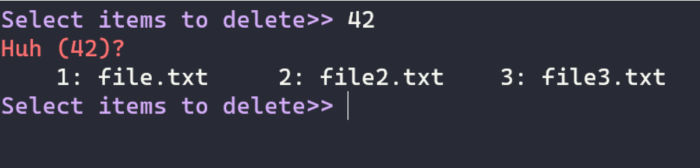
This option allows you to select which files to delete, using numbers. After selecting it, you’ll see numbers assigned to each file:

If you type something different from the three numbers, Git will—somewhat humorously—ask you to do it again:
On the other hand, if you press Enter without entering a valid number, Git simply says, “No more files to clean, exiting” and quits.
To actually remove one or more files, just enter the corresponding numbers. You can either type a single number or multiple numbers separated by space or comma. It’s also possible to use a range (e.g., 1-3) or a * to mean everything.
In our case, let’s remove the first two files:
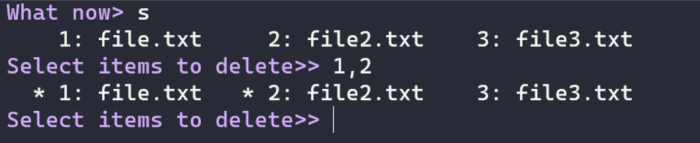
As you can see, the selected files are marked for exclusion. Press Enter to confirm. You’ll be taken back to the main menu, where you can proceed with the exclusion.
Ask Each
This option walks you through each file, asking whether to exclude it or not. You can answer it with y or n:
What now> 4Remove file.txt [y/N]? nRemove file2.txt [y/N]? nRemove file3.txt [y/N]? yRemoving file3.txt
Quit
Use this option if you changed your mind about removing the files. Just press 5 or the letter q, and Git will display a message saying “Bye” and will do no harm to the files.
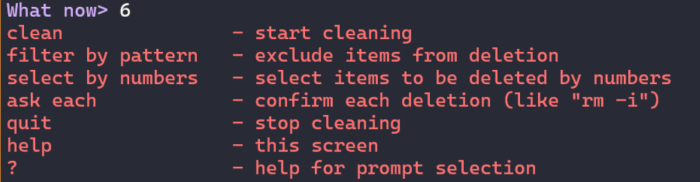
Help
Finally, this option—which you can access with h or 6—displays a useful yet concise help screen:
Git Remove Untracked Files: Going Further
Having covered the fundamentals of the “Git remove untracked files” operation, let’s now go a little bit deeper, explaining some more topics that might come in handy.
Forcing a Clean by Default
Remember I said that, by default, git clean without arguments doesn’t work. Well, that’s true, but you can change that.
This behavior is due to the clean.requireForce configuration, and you can change it with the git config command.
Just run:
git config clean.requireForce false
Now, running git clean will remove the untracked files without error and without asking for anything. Use it with caution.
Optionally, you may use the --global option so the configuration applies to all repositories.

Ignoring Files
A common scenario occurs when you don’t want to get rid of unversioned files. You want to keep them there, inside the project’s folder, but not version them.
This is useful for things like personal configuration files or build artifacts. For that scenario, you can use the .gitignore file. This is a file, added to the root of your project, in which you determine files that Git should completely ignore.
It’d be out of the scope of this post to cover .gitignore in much detail, but you can always head to documentation. The good news is that, most of the time, you don’t need to create your .gitignore file yourself. Many frameworks already add them by default when initiating a new application; IDEs can also generate them. Finally, there are sites and public repos dedicated to make .gitignore files available for a variety of languages and ecosystems.
Git: Remove Untracked Files at Your Peril
Generally speaking, it’s hard to lose information for good in Git. The VCS tool does a great job protecting your data once you’ve committed it. But if you get rid of data that Git didn’t save to its internal database, good luck with that.
(Note: If you do make a mistake after committing, you might want to learn how to undo a commit in Git.)
Your IDE or text editor might offer a way for you to recover the file; maybe you have some form of backup setup on your machine that can save you. As far as Git is concerned, though, you’re out of luck.
Today, you’ve learned how to remove untracked files in Git. This is a useful feature, but as we’ve seen, it can be dangerous. Only use it when you're sure that you know what you’re doing.
This post was written by Carlos Schults. Carlos is a consultant and software engineer with experience in desktop, web and mobile development. Though his primary language is C#, he has experience with a number of languages and platforms. His main interests include automated testing, version control and code quality.


