


Critical business functions running on production environments must have a Disaster recovery (DR) plan for restoring its services in case of unplanned loss of the entire installation to a fallback zone or region.
That's why we decided to do a proof-of-concept, to see how well such a disaster recovery plan could be implemented for CloudBees CI on modern cloud platforms.
We focused on the following scenario: CloudBees CI running in Elastic Kubernetes Service (EKS), using Elastic Block Store (EBS) for $JENKINS_HOME volumes, and a domain managed by Route 53. It demonstrates use of the popular OSS Velero project as a backup system, using Simple Storage Service (S3) for metadata, and EBS snapshots for the main data.
Why did we choose this scenario? Using Kubernetes allows us to focus on the behavior of the application and less on the infrastructure. When using a tool such as Velero on Kubernetes, not only are the data volumes backed up and restored, but all of the metadata is backed up and restored as well. This means that we can run major operations with a few straightforward and portable commands.
Can I use another tool than Velero? Yes, of course. The concepts shown in this blog post can be implemented with other open-source or commercial backup tools, on Kubernetes or otherwise, as long as they are able to synchronize data across regions. For example, Google Cloud (GCP) is planning a native integrated backup system for Google Kubernetes Engine (GKE).
Can you give me a spoiler alert? What is the result? Ok, but there is more interesting info and context below, so read on. We tested to the scale of around 100 active managed controllers and were able to meet the RPO and RTO goals. More specifically, we could achieve a low RPO based on backups scheduled every 15 minutes and an RTO in the same vicinity.
DR requirements for CloudBees CI
Broadly speaking, there are several requirements for cross-region DR of CloudBees CI:
- Filesystem data, such as $JENKINS_HOME volumes, must have been copied to the fallback region before the disaster. After the disaster has started, it may be too late to recover data.
- Metadata, such as a list of processes, network configuration, or anything not in $JENKINS_HOME, must also have been replicated in advance. The primary region should be assumed to be totally inaccessible.
- There must be a simple, mostly automated way for an administrator to trigger the failover. (It is not required that a failover occur automatically when a problem is detected in the primary region.)
- Once restored to the fallback region, CloudBees CI must start without any serious errors from half-written files or similar.
- The failover procedure must include switching the DNS entry for CloudBees CI to the new physical location, so any browser bookmarks, webhooks, or similar, continue to function as they did before the restore.
- The recovery time objective (RTO) is determined by the administrator, but typically on the order of an hour or less. This means the failover procedure needs to complete within minutes, and CloudBees CI should be up and running and ready to perform builds soon afterward.
- The recovery point objective (RPO) may be longer, on the order of a day, but may also be comparable to the RTO. Therefore, only a few very recent builds or configuration changes may be lost.
- The administrator should be shown a clear indication that a restored system is actually restored from backup, and given an opportunity to review any builds that may have been interrupted by the failover.
Notes:
- Due to the Jenkins architecture, there will be a brief period where the UI is inaccessible and any incoming webhooks will also be lost. However, systems listening to hooks, such as Multibranch projects, should be configured to occasionally poll as a fallback.
- It is not expected that builds that may have been interrupted by the failover resume or restart automatically, nor is any attempt made to preserve the contents of workspaces or live process states from agents.
DR support in CloudBees CI
CloudBees CI is compatible with DR, including across regions. From a technical standpoint, the following major components are involved:
- Jenkins core and plugins generally keep both configuration and runtime state in a filesystem hierarchy. Therefore, simply copying the $JENKINS_HOME volume to a new location is sufficient for backup purposes. Wherever practical, metadata files are written atomically, and every effort is made to gracefully tolerate missing, truncated, or corrupted files, with a few exceptions for security reasons.
- Pipeline plugins are designed to allow builds to run across controller restarts. The same mechanisms work in backup and restore or DR scenarios for steps such as input, which pause without the involvement of an agent. When a build is actively running on an agent inside a node block and the agent is destroyed or otherwise lost, due to a regional outage or more commonplace problems, it is not currently possible for the build to retry that stage on a fresh agent. However, the situation can at least be recorded in the build log and metadata, and the build can be restarted from the beginning, from a checkpoint using Scripted syntax, or from the start of the failed stage using Declarative syntax.
- CloudBees CI includes proprietary functionality to detect a restore scenario, displaying a specialized notification to the administrator, and enumerating builds potentially or definitely affected.
Some functional improvements are available in April 2022 in the CloudBees CI 2.332.2.6 release. We will continue to learn from the feedback coming from our customers and make appropriate improvements as needed.
CloudBees CI on Kubernetes additionally benefits from the robust container management of the Kubernetes control plane. Aside from the operations center and managed controllers running as StatefulSets, controllers use the Jenkins Kubernetes plugin to schedule builds on disposable agent pods, eliminating the need to explicitly manage worker infrastructure. Provided that the cluster in the fallback region has sufficient capacity, the restored installation will be ready to run new builds as soon as managed controllers start up again. A backup does not need to include Pods, as the operations center or managed controller pods are recreated automatically. Agent pods cannot be restored from backup.
Hibernation of managed controllers is also supported for DR purposes. If only a portion of the defined managed controllers were actually running at the time of the last backup, the same is true after the restore. SCM webhooks delivered to the restored cluster can “wake up” hibernated managed controllers and trigger builds as usual.
CloudBees CI also offers Configuration as Code (CasC) functionality. An installation that has been completely converted to CasC may not need traditional backups to achieve DR; a restore operation could consist simply of running a CasC bootstrap script in a fresh cluster. However, if you need to preserve transient data such as build history, then it may be still desirable to perform a filesystem-level restore from backup for DR purposes.
Using Velero on AWS
Velero includes a standard plugin for AWS, specifically based on S3 metadata storage and EBS volume snapshots. Unfortunately, this plugin does not currently offer cross-region support.
As an example implementation for this proof-of-concept, we developed a custom patch to this Velero plugin which implements cross-region EBS snapshot replication. To keep RPO low, we also developed a custom patch to Velero core to parallelize volume snapshot operations. Backups can be restored to either the primary or failover regions and the appropriate snapshots are selected automatically at restore time.
IMPORTANT: These patches should be considered experimental and unsupported. They are not accepted upstream by the Velero project in their current form. General cross-region support for Velero is under discussion, as it may be based on a new fundamental infrastructure.
Additionally, we have also developed a simple Velero plugin for CloudBees CI that is not specific to AWS. It records the identifier of the current restore in every StatefulSet as an environment variable, so that managed controllers using the Restart Aborted Builds plugin are alerted to the fact that a restore from a backup has occurred.
The Demonstration
The Code
There is a companion repository and release that demonstrates the content of this blog post and extends it in more details.
- Repository: https://github.com/cloudbees-oss/cbci-eks-dr-demo
- Release: cbci-velero-eks
NOTE: The architecture presented here and the code are aimed at a proof-of-concept and does not set a standard regarding how to deploy CloudBees CI in production environments.
The architecture
The below figure illustrates all the AWS components deployed to run the demonstration.
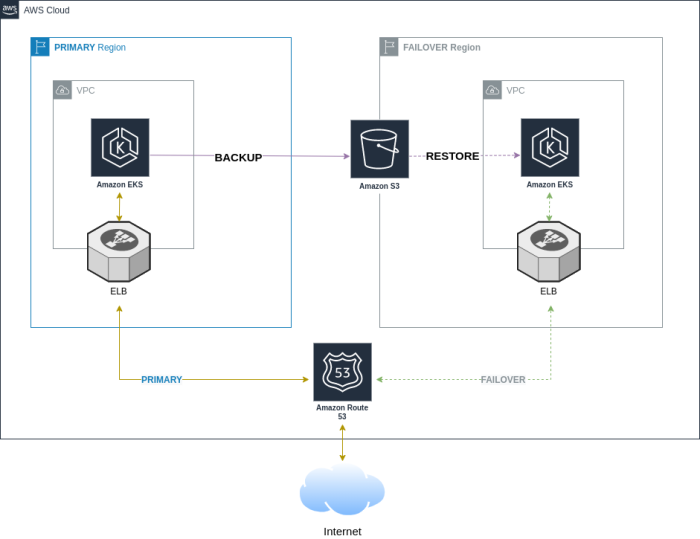
Figure 1: Architecture Diagram for the Demo. Overview
The Process
Building phase
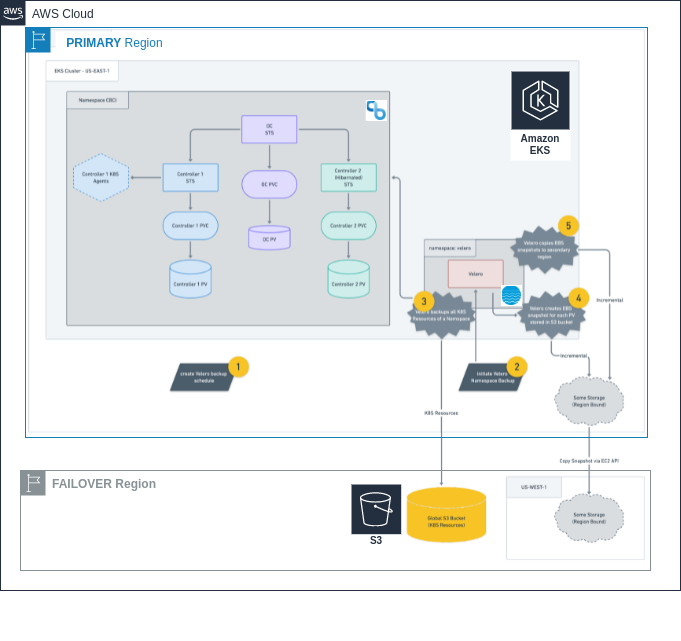
Figure 2: Architecture Diagram for the Demo. Focus on the Building Phase
Once the automation scripts for building the DR demo finish with all their steps, the following elements will be created in the Original (East) and Failover (West) regions:
- A Kubernetes Cluster running on the top of EKS

Figure 3: Kubernetes context for the Main (East) and Failover (West) Regions. View from K9s tool
- The k8s resources deployed within the Nginx ingress controller and Velero charts as well as the k8s Metrics Server components

Figure 4: Kubernetes Replica sets available from the Failover Region right after running the demo setup. View from K9s tool
Next to the common elements across regions, the original region will host the Deployment of CloudBees CI for modern cloud platforms, consisting of an operations center with a set of managed controllers configured via Helm and CasC.
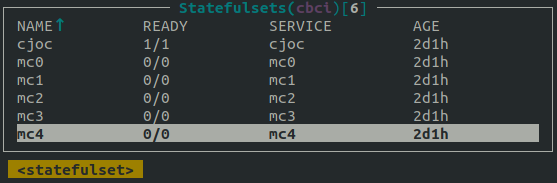
Figure 5: Kubernetes Statefulset available from the Main Region right after running the demo setup with MC_COUNT set to 5. View from K9s tool.
Outside mentioned regions, at Global level, the following elements are created
- An A record within AWS Route 53 pointing to the AWS ELB alias from the ingress controller of the Primary region.

Figure 6: AWS A Record from Route 53 pointing to the Main AWS ELB alias right after running the demo setup. View from Amazon AWS Console
- A Global S3 bucket (attached to the West Region) storing the Velero backups, since the Velero scheduler is created right after the deployment of the CloudBees CI charts.
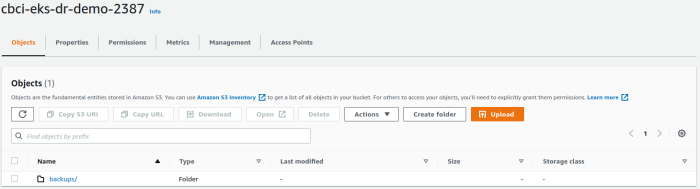
Figure 7: Global AWS S3 Bucket available right after running the demo setup. View from Amazon AWS Console
Finally, a Velero backup schedule is created for all K8s objects in the Primary Region except pods and events. It will orchestrate the following events:
- The Velero Namespace Backup
- The CloudBees CI Namespace Backup
- EBS Snapshots for each PV stored in s3 Bucket
- Copies EBS Snapshots to the Failover region
NOTE: Alternatively, the backup.sh script initiate a backup, if you do not wish to use a scheduled backup
CI Workload simulation
At this point, the cluster nodegroup can be scaled up according to your DR test requirements, updating the initial desiredCapacity defined on cbci-eks-dr-demo/infra/cluster.yaml
Once nodes have scaled successfully, it is time to emulate CI workload by running the script reload-cbci.shin the Primary region,which will trigger 3 times the 3 pipelines hosted in every Managed Controller. Important to note that prior to run the load command, you should adjust the new value of MC_COUNTto accommodate the new size of the node group).
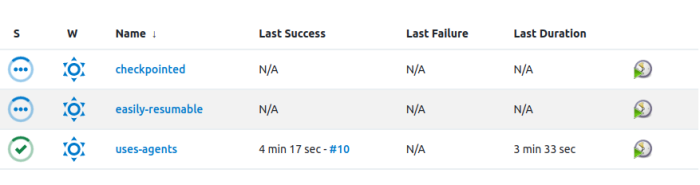
Figure 8: Jenkins Pipelines jobs running from one of the Controllers. View from CloudBees CI controllers Dashboard
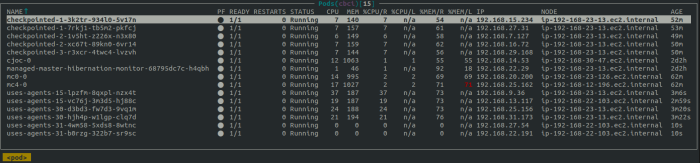
Figure 9: Kubernetes Pods from agents buildings the above Jenkins Pipelines jobs. View from K9s tool
DR Failover
Figure 10: Architecture Diagram for the Demo. Focus on the Failover Phase
Before moving to the failover part, it is critical to ensure the health of the Velero backups: Check that they are non-expired backups "Completed"with no errors or warnings.

Figure 11: Descriptive list of the available velero backups. Focus on the Failover Phase. View from terminal
Then, the restore of the CloudBees CI platform to the failover region can be performed, transferring from the latest healthy backup all K8s resources containing the application configuration along with the build information. Previously, Velero initiated its namespace restore.
It is important to remark that running pipelines in the Primary region before the failover event are resumed in the Failover Region right after the restore operation. See also the advantages of the CloudBees checkpoint feature for this type of scenario.
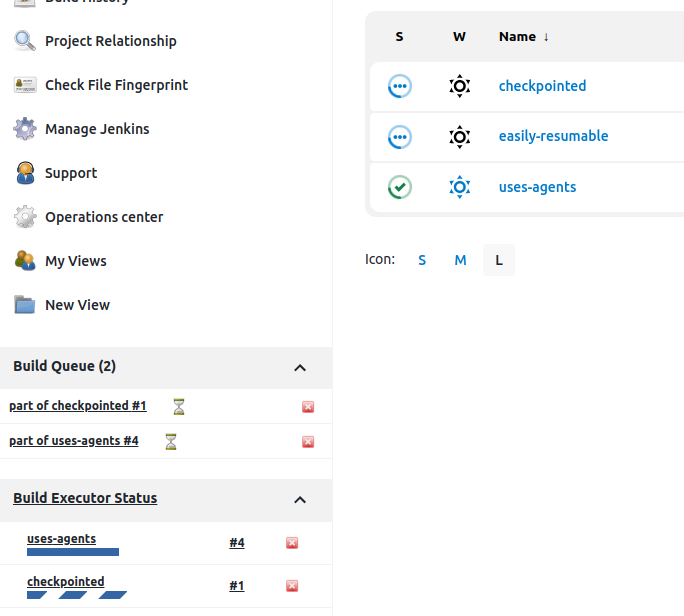
Figure 12: Running Pipelines in the Failover region. View from CloudBees CI controllers Dashboard
To validate that the restore happened successfully, go to the restored managed controller's Managed Jenkins dashboard and a message like This controller is newly restored from backup can be seen from the administrative monitor from the Restart Aborted Builds plugin
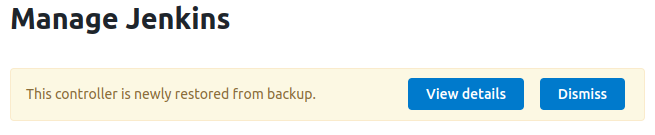
Figure 13: Message from the Restore Build Plugin. View from CloudBees CI Controller > Manage Jenkins
In addition, the Velero restore operation can be described from its CLI, to check its status
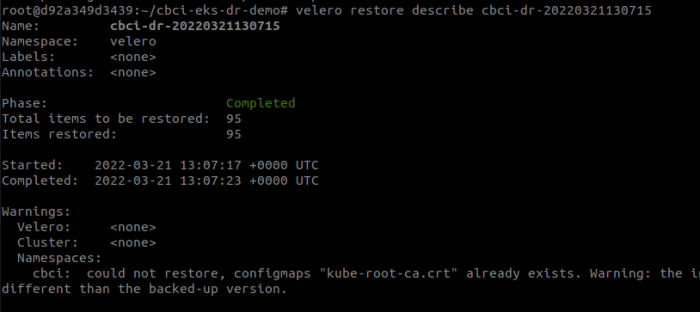
Figure 14: Full Description of restore performed by Velero backup. View from terminal
The DNS switch
CloudBees applications will be accessible from the failover region because there is a DNS switch from the alias of the ELB in the East to the West.
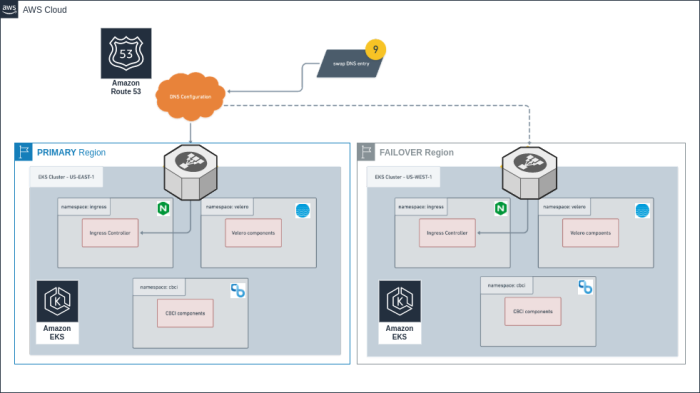
Figure 15: Architecture Diagram for the Demo. Focus on the DNS switch Phase
It can be validated from the Route 53 Hosted Zone

Figure 16: AWS A Record from Route 53 pointing to the Failover AWS ELB alias right after running the DNS switch. View from Amazon AWS Console
Tests and Results
In combination, the Velero patches have been tested to the scale of around 100 active managed controllers. Hibernated managed controllers have little impact on backup time since EBS volume snapshots, as well as cross-region snapshot replication, are incremental. With the backup completing in just a few minutes under plausible load conditions, a low RPO based on backups scheduled every 15 minutes can be achieved. An RTO in the same vicinity is also possible since reconstruction of Kubernetes metadata is fairly quick. Volumes created from EBS snapshots are loaded lazily, so the operations center and managed controller startup time is somewhat slower than usual, but still tolerable.
Actual results vary depending on numerous factors, with backup performance mainly depending on the number of modified 512 KiB blocks. Managed controllers which can modify numerous or large files, for example by running many concurrent builds, using large log files, or storing build artifacts within the $JENKINS_HOME (S3-based artifact storage is recommended for this task) impose the most load, thus time. Volumes created from EBS snapshots are loaded lazily, so the operations center and managed controller startup time is somewhat slower than usual, but quite acceptable.
Considerations
If you want to try out the experimental Velero plugin patch, notice that there are a few limitations:
- It only supports volumes in a single Availability Zone (AZ), even though EKS can be configured to run stateful workloads using EBS across several AZs in the region. However, stateless pods such as agents could be run in a node pool in another AZ.
- It only supports one failover region, and does not implement metadata replication. Metadata is sent to S3 in the failover region only, so a restore from backup in the primary region would not work if the failover region happened to be down.
Also note that AWS Elastic File System (EFS) has a very different snapshot and replication architecture and is not covered by this plugin (patched or otherwise).
DR-related AWS billing costs can vary, so make sure to monitor daily, weekly, or monthly cost usage graphs per “service”. It is expected that cross-region replication of EBS snapshots should not add significantly to the monthly bill compared to compute (EC2) costs. Holding EBS snapshots, even within a region, incurs a noticeable cost, but still likely much less than compute costs. However, this would be necessary for routine backup purposes anyway.
Creating an EKS cluster from scratch is time-consuming, at approximately 27 minutes, which precludes short RTOs. In addition, this can be error-prone. Therefore, it is advisable to keep an empty cluster—with only a control plane and the Velero service—active in the failover region, for $5 per day. Scaling up a node pool is surprisingly much faster and seemingly reliable, so it is reasonable to do this on demand as part of the recovery process. This saves costs at the expense of a few minutes added to RTO. It is also possible to use Amazon EC2 Spot Instances to save considerably on compute costs.
Acknowledgments
Thanks to Steve Boardwell for his reviews and demo tests to validate its cross compatibility.
This post was written by By Jesse Glick, Principal Software Engineer: Continuous Integration and Carlos Rodriguez Lopez, DevOps Consultant, CloudBees. Jesse has been developing Jenkins core and plugins for years. He is the coauthor with Kohsuke of the core infrastructure of the Pipeline system. Carlos is an Automation Consultant embracing the DevOps culture. He has an extensive background of Java Web and Data Management and Analysis and running CI/CD pipelines in the Cloud.


