


Continuous Delivery (CD) and DevOps practices look like they’re here to stay, according to the 2024 State of CI/CD Report. 83% of developers are now engaged in DevOps-related activities, a 6% increase since 2022.
Many companies begin their CI/CD journey with Jenkins because of its cost-effectiveness and high level of customization. However, as enterprise demands grow, so does the need to implement granular security, customize workflows with additional plugins, and ensure system availability and scalability. So organizations seek solutions tailored to meet growing demand. This is where platforms like CloudBees and GitHub Actions help.
CloudBees is a comprehensive DevSecOps platform offering various solutions to automate and secure software deployments and delivery processes. GitHub Actions, integrated within GitHub, also aims to streamline and automate the software delivery process. But both platforms serve different types of organizations, and there's a reason the most common response developers have to the question of which tool to choose is "It depends" or "It's complicated.
This article compares CloudBees and GitHub Actions, examining their unique features, similarities, and differences. By the end, you'll have the insights to determine which platform best aligns with your organization's requirements and software development workflows.
CloudBees vs GitHub Actions: An Overview
Choosing CloudBees or GitHub Actions depends on specific organizational workflows and requirements. CloudBees is a great fit for organizations that require enterprise-level configurations, workflows, and security functionality, making it ideal for large companies with a hybrid or complex tech stack. On the other hand, GitHub Actions is well-suited for smaller teams with more straightforward software development workflows.
CloudBees
CloudBees offers a comprehensive suite of products designed to enhance enterprise software delivery, security, and compliance. These products work together to provide an integrated DevSecOps solution that covers the entire software development lifecycle. The key components include:
- CloudBees CI: An enterprise Continuous Integration (CI) solution built upon the foundation of the Jenkins engine. It enhances Jenkins with enterprise-grade features such as centralized management, granular role-based security, and enhanced scalability. CloudBees CI enables development teams to automate the building and testing of code changes, ensuring continuous integration and improving software quality.
- CloudBees CD/RO: Focusing on Continuous Delivery (CD) and Release Orchestration (RO), this product extends automation to the deployment and release phases. It provides pipeline orchestration, environment management, and release analytics, enabling organizations to automate and efficiently manage their software release processes across various environments, including cloud, on-premises, and Kubernetes clusters. CloudBees CD/RO works seamlessly with CloudBees CI to ensure that code changes are integrated, delivered, and deployed reliably.
- CloudBees Platform: A fully managed, cloud-native DevSecOps solution for platform engineers and developers. It integrates both CloudBees CI and CloudBees CD/RO, along with native support for tools like Jenkins, Kubernetes, and GitHub Actions-style workflows. Users can create custom workflows or leverage pre-configured action options using an intuitive YAML editor similar to GitHub Actions. The platform's extensibility allows organizations to integrate additional tools and services based on their needs.
Together, these products create a unified ecosystem that provides end-to-end software delivery. For example, when developers commit new code, CloudBees CI automatically triggers the build and test processes. Once the code is validated, CloudBees CD/RO orchestrates its deployment across development, staging, and production environments. Both CloudBees CI and CloudBees CD/RO can be managed individually or centrally through the CloudBees Platform, which also assists in managing cloud-native development environments.
GitHub Actions
GitHub Actions is a CI/CD platform that is directly integrated into the GitHub source control environment. It enables developers to automate workflows based on repository events such as code pushes, pull requests, or scheduled tasks. This tight integration with GitHub repositories makes it straightforward for teams to set up automation for common development tasks.
Continuous Integration (CI): GitHub Actions provides workflows to automate the building and testing of code. These workflows are defined using YAML files stored in the repository, specifying the steps required to compile the code and run automated tests across different environments or configurations.
Continuous Deployment (CD): After testing, GitHub Actions can automatically deploy applications to various environments, including cloud and on-prem servers.
GitHub Actions offers a variety of pre-built and custom actions that can be reused across multiple workflows. Developers can monitor the status of their workflows, view logs, and troubleshoot issues from the GitHub interface. While GitHub Actions provides powerful tools for automating CI/CD workflows, it primarily focuses on the GitHub ecosystem. Organizations looking for more extensive enterprise features—such as advanced security, compliance, and built-in support for cloud-native and Jenkins environments —may need to integrate additional tools or services to meet those needs.
CloudBees vs GitHub Actions: Side-by-Side Comparison
Understanding how CloudBees and GitHub actions handle CI/CD workflows can help you decide which tool best meets your organizational requirements. Let's compare the two tools side by side.
1. GitOps Workflow Support
GitOps is a modern approach to continuous delivery and infrastructure management that leverages Git repositories as the source of truth for managing infrastructure and application deployments. The main premise of GitOps is that by storing the desired state of the environment in Git, we gain a comprehensive history of changes that occur in the environment, with full audibility and clarity on what was changed, who made the changes, and why.
CloudBees
CloudBees CI embraces GitOps through Configuration as Code (CasC). A set of YAML-based files (called configuration bundles) allows you to manage and version-control Jenkins configurations. These bundles integrate with Git repositories like GitHub and BitBucket, allowing for seamless tracking and rollback of configurations. This ensures that Jenkins setups are consistent and reproducible across various environments.
For cloud-native companies using Kubernetes, CloudBees CD/RO and CloudBees Platform enhance GitOps workflows by integrating with GitOps tools like Argo CD. Argo CD continuously monitors the Git repository containing your Helm charts or Kubernetes resources to determine the desired state of your infrastructure and application code. When a change is detected, Argo CD synchronizes these changes within the Kubernetes clusters, automatically deploying the updates to the environment.
Following the initial deployment triggered by Argo CD, CloudBees manages the subsequent stages of the release process. This includes automatic scaling, pipeline approvals, coordinating deployment to multiple environments(development, staging, and release), and executing post-deployment validations.
GitHub Actions
GitHub Actions offers a repository-centric approach to GitOps, tightly coupled with GitHub’s ecosystem. Workflows are defined in YAML files and stored within the same repository as the application code. These workflows can be set up to automatically apply configuration manifests when changes are pushed to the main branch. This tight integration simplifies the adoption of GitOps practices for teams already using GitHub.
However, managing all GitOps workflows within a single repository can become complex for large projects with multiple microservices. It could also create a single point of failure, as any error or misconfiguration in one workflow can affect other workflows within the same repository.
2. Container/Kubernetes Deployment
Containerization technologies like Docker and Kubernetes have become integral to modern application development and deployment, providing scalability, flexibility, and consistency across diverse environments.
CloudBees
CloudBees CI on modern cloud platforms is designed to run on Kubernetes environments, allowing Jenkins controllers and agents to operate inside Kubernetes clusters. This setup allows teams to fully take advantage of Kubernetes’ orchestration, scalability, and high-availability features using Jenkins.
In addition, the CloudBees Platform provides native support for deploying and managing Kubernetes environments using the open-source Tekton framework. This allows teams to build, test, and deploy containerized applications across multiple cloud providers or on-premises environments, abstracting away the underlying infrastructure complexities. By doing so, the CloudBees platform helps standardize CI/CD processes and tooling across vendors, languages, and deployment environments.
For instance, a development team managing a microservices application across multiple Kubernetes clusters can use CloudBees to deploy container images, scale pods, and manage Kubernetes resources directly within their pipelines, all while using familiar tools and concepts such as Helm charts.
The CloudBees Kubernetes-native architecture allows for more efficient handling of complex workflows, especially in enterprise environments that leverage container and cloud-native applications.
GitHub Actions
GitHub Actions supports Kubernetes deployments, but deploying to a Kubernetes cluster requires setting up a specialized controller, known as a runner, that applies your YAML configurations. While GitHub-hosted runners are available, they have limited resources like CPU and memory, which might not be sufficient for complex or resource-intensive Kubernetes deployments.
You can use self-hosted runners to overcome these limitations, but they introduce their own challenges. Managing self-hosted runners can be complex, as it involves provisioning, maintaining, and securing the runner infrastructure yourself. Additionally, if your Kubernetes clusters are hosted in a private network, such as within a virtual private cloud (VPC), connecting GitHub Actions runners to these clusters might require further networking configurations, such as setting up virtual private networks (VPNs) or private endpoints, which adds even more complexity to the process.
This lack of native Kubernetes integration can pose challenges, especially for teams looking for simple, out-of-the-box container solutions.
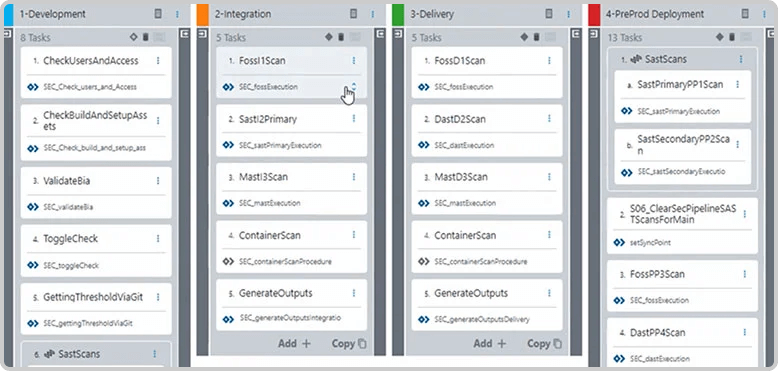
3. SDLC Security and Compliance Orchestration
From an enterprise point of view, ensuring security and compliance throughout the Software Development Life Cycle (SDLC) is key to releasing quality and reliable software products that meet regulatory requirements.
CloudBees
All CloudBees products contain built-in support for hierarchical configuration and RBAC access control, ensuring that only authorized personnel can deploy changes to production.
The CloudBees platform offers a comprehensive approach to security and compliance by providing pre-configured workflow templates incorporating security best practices. These templates abstract sensitive information like passwords and tokens from the pipeline code itself, reducing the risk of exposure.
You can also incorporate security checks directly into the workflows, using static application security testing (SAST) and software composition analysis (SCA) tools directly integrated into the platform. Additionally, you can set up notifications and alerts to ensure that any security vulnerabilities or compliance issues detected during these scans are reported to the relevant teams.
GitHub Actions
GitHub Actions allows you to define workflows that can automate various tasks, including running security scans, compliance checks, and other security-related operations. Additionally, GitHub offers security features like Dependabot, which automatically checks for vulnerabilities in dependencies and suggests updates to maintain security compliance.
GitHub Actions also offers RBAC. However, it lacks the granular control enterprises often require. Specifically, because workflows are tied to repositories, there is no built-in mechanism to restrict access to individual workflows within a repository.
For example, say a repository contains multiple workflows for deploying code to production, running security scans, or managing secrets. In GitHub Actions, users can modify any of these workflows if they have write access to the repository. This broad level of access increases the risk of unauthorized changes, such as a developer mistakenly or maliciously altering a production deployment workflow.
4. Issue Tracking
Effective issue-tracking functionality is essential for enterprises managing numerous projects and teams. It helps monitor software development progress, especially in a fast-paced Agile environment.
CloudBees
Although it doesn't include a native issue-tracking feature, CloudBees offers seamless integration with the popular issue-tracking tool Jira. This integration ensures that every aspect of feature development is carefully documented and tied to specific issues, simplifying the process of monitoring progress and prioritizing tasks.
GitHub Actions
GitHub Actions integrates with GitHub Issues to manage and track issues. This allows workflows to be linked directly to issues and pull requests, providing tracking and visibility into the status of problems related to code changes. You can also connect to issue-tracking tools like Jira for added functionality.
5. Pricing
Understanding pricing is crucial for budgeting, evaluating cost efficiency, and planning your software delivery infrastructure.
CloudBees
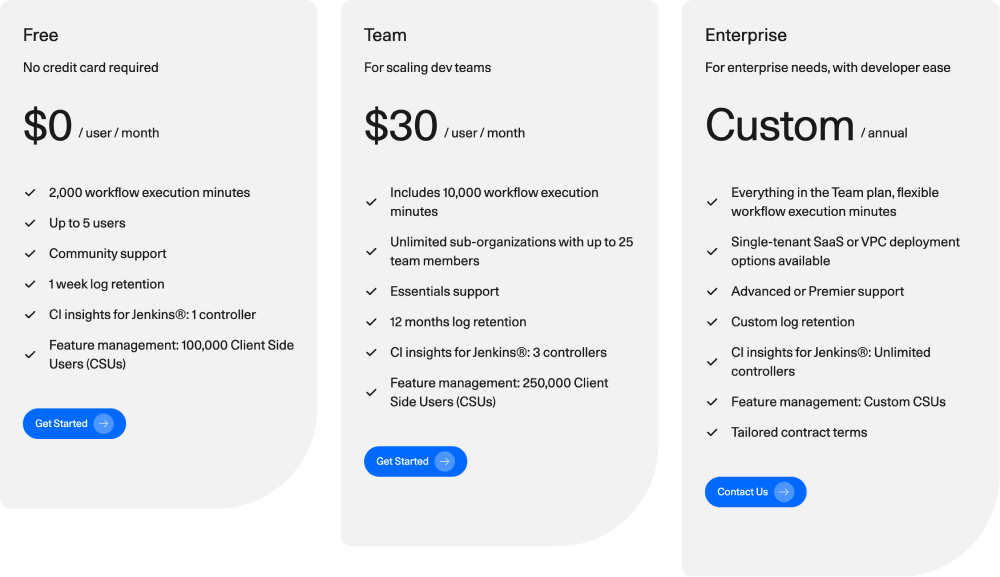
CloudBees CI and CDRO product prices are user-based, depending on usage and service configurations. The CloudBees Platform has three plans:
- Free: This plan is suitable for small teams or individual developers. It includes up to 5 users and 2,000 workflow execution minutes per month.
- Team: Designed for scaling development teams. It includes unlimited sub-organizations, up to 25 team members, and 10,000 workflow execution minutes per month.
- Enterprise: This customizable plan is designed for large enterprises. It includes all the features of the Team plan, with added benefits like flexible workflow execution minutes, advanced support, and single-tenant SaaS or VPC deployment options.
GitHub Actions
GitHub Actions supports self-hosted CICD runners, which can be used free of charge. While this offers flexibility and cost savings on compute time, managing self-hosted runners requires the enterprise to handle setup, maintenance, updates, and infrastructure scaling. For GitHub-managed plans, the options are:
- Free: Ideal for individual developers and small teams, this plan offers up to 2,000 minutes of monthly build time for public repositories. Private repositories also receive build minutes, though limits may vary.
- Team: This plan supports growing teams with up to 3,000 minutes per month.
- Enterprise: Geared towards large organizations, this plan offers unlimited workflow minutes and enhanced security and compliance features.
6. Customizations and Plugins
Customization and plug-ins can extend CI/CD tools' functionality, enabling them to better adapt to diverse deployment environments, complement existing tooling, and seamlessly integrate with other development processes.
CloudBees
CloudBees leverages the extensive Jenkins plugin ecosystem, with over 1,900 plugins available to extend the functionality of CloudBees CI and other products. The CloudBees Assurance Program (CAP) tests and verifies a subset of these plugins to ensure they meet enterprise-grade standards, reducing the risk of instability in CI/CD environments. Additionally, CloudBees supports extending its platform through a YAML-based approach, allowing custom actions to be easily integrated into any source code repository.
GitHub Actions
GitHub Actions features a marketplace with various plugins and actions, including 24 that were officially developed by GitHub and the vast majority created by third-party developers. However, since many of the plugins are developed and maintained by the community, reliability is lower than with actions officially developed and supported by GitHub. Additionally, while many actions are free, some come with a cost, so teams should evaluate the quality and pricing of the actions they integrate into their workflows.
7. Reusable Workflows
A standardized software deployment and management workflow, particularly in cloud-native environments, is crucial for maintaining consistency and efficiency in enterprise processes.
CloudBees
CloudBees CI enables administrators to create standardized, reusable pipeline templates that can be deployed across various teams and projects. Businesses can use "Templates as Code" to ensure that all teams adhere to the same best practices and guidelines when configuring their CI/CD pipelines.
Using the CloudBees Template Plugin, Jenkins administrators can define a simplified, directed experience for configuring jobs. Users only need to fill in a few parameters, while the administrator controls how these map to the full configuration. This simplifies the process for users and ensures that enterprises can centrally manage and enforce governance standards, maintaining a consistent and reliable CI/CD environment.
GitHub Actions
GitHub Actions also supports reusable workflow templates that can be shared across repositories within an organization. However, GitHub Actions lacks enforced templates or standardized paths, and the implementation of standardization depends on organizational practices. This can lead to variability in how developers set up pipelines.
8. Analytics and Reporting Capabilities
Gathering, analyzing, and utilizing key metrics is essential for optimizing software delivery processes and aligning them with business goals.
CloudBees
CloudBees offers a unified and customizable analytics platform that integrates with CloudBees CI, CD/RO, and the CloudBees Platform, providing end-to-end visibility across the entire software delivery pipeline. The platform includes functionality to track key metrics such as build success rates, deployment frequency, and DORA metrics, helping teams identify bottlenecks and optimize their workflows. In Jenkins-based environments, administrators can quickly identify and address high-volume peaks or inefficient jobs, improving pipeline performance and reducing downtime.
CloudBees also offers customizable dashboards with persona-specific views, allowing teams to focus on relevant metrics for their roles. Predictive analytics help teams identify patterns and predict the success of builds, tests, deployments, or releases.
GitHub Actions
GitHub Actions provides analytics and reporting capabilities primarily focused on individual workflows within the GitHub ecosystem. It offers workflow-centric metrics on individual runs, including success/failure rates and execution times. The platform integrates these metrics with other GitHub features like issues and pull requests, providing a cohesive view within the GitHub environment.
However, GitHub Actions users are generally limited to the default metrics provided, which may not cover all the insights required for managing large, complex environments. Users may need technical know-how to create custom dashboards.
9. Release Orchestration
Release orchestration is important for managing the end-to-end software delivery process, ensuring that code changes are rolled out smoothly and effectively.
CloudBees CD/RO
CloudBees CD/RO offers advanced pipeline orchestration features that enable teams to manage releases across multiple applications and teams, automate manual processes, and enforce policies consistently throughout the software delivery lifecycle. Its robust orchestration capabilities help manage dependencies, schedule releases, and ensure that all components are deployed in the correct order.
CloudBees CD/RO supports on-prem, hybrid, and multi-cloud environments and provides real-time insights through customizable dashboards. This makes it easier for enterprises to handle large, complex releases while maintaining compliance, governance, and quality standards.
GitHub Actions
GitHub Actions offers a more lightweight approach to release orchestration by allowing teams to automate workflows based on repository events such as code pushes, pull requests, and issue tracking. While it excels at managing CI/CD pipelines, GitHub Actions does not include a specialized feature for release orchestration.
For more complex release management needs, GitHub Actions relies on third-party integrations, which may require additional effort to achieve the same level of functionality provided by dedicated tools.
CloudBees vs GitHub Actions: Use Cases and Examples
Understanding the unique strengths of CloudBees and GitHub Actions is crucial for making informed decisions about which tool best suits your organization's needs.
CloudBees:
Enterprise-Scale Jenkins Workflows:
- Ideal For: Large organizations relying on Jenkins for CI/CD automation.
- Why Choose CloudBees? With deep integration into Jenkins, CloudBees enables organizations to enhance their Jenkins experience with centralized Jenkins management, automatic scalability, active-active high availability, and granular access control.
Kubernetes-Centric Deployments:
- Ideal For: Organizations heavily invested in Kubernetes infrastructure.
- Why Choose CloudBees? As Spike Washburn, Chief Architect here at CloudBees, puts it, “CloudBees combines the power of Tekton and a container-first environment with the elegance of a GitHub Actions-like language, making it an excellent choice for teams seeking easy container orchestration, advanced scaling, and resource management in cloud-native environments.”
Multi-Repository Environments:
- Ideal For: Companies managing distributed codebases across multiple repositories.
- Why Choose CloudBees? In environments where codebases are spread across various repositories and infrastructure technologies, the CloudBees platform simplifies management and helps maintain robust workflows across diverse development environments, whether on-premises or in the cloud.
GitHub Actions:
GitHub-Centric Development Workflows:
- Ideal For: Smaller teams already using GitHub for source control and collaboration.
- Why Choose GitHub Actions? For teams deeply integrated with GitHub, GitHub Actions extends the platform’s existing features, such as issues and pull requests.
Selecting the Right Tool for Your CI/CD Needs
CloudBees and GitHub Actions significantly enhance your CI/CD pipeline but cater to distinct needs and environments. For organizations that are invested in Jenkins and require a robust, enterprise-grade solution with the flexibility to integrate with various systems—such as GitHub, GitLab, Bitbucket, and legacy systems—CloudBees is an excellent choice. It provides advanced customization options and comprehensive analytics to capture your entire software environment. Sign up for our workshop to explore how to transition workflows from Jenkins to CloudBees CI or discuss your specific needs.


