


Updated on April 20, 2025
Jenkins is renowned for its exceptional flexibility, establishing itself as one of the most widely adopted build orchestrators in use today. And building a secure, scalable, and high-performing Jenkins environment to support a colossal organization with thousands of developers and applications, coupled with a complex development toolchain, is no small feat. You need a developer experience that just works, without disruption, all the time.
A system that empowers Platform Engineers to build a robust platform, scale infinitely, with maximum fault tolerance and resilience. It’s in this spirit that we are excited to introduce a new feature in CloudBees Continuous Integration (CloudBees CI) that addresses these challenges head-on with the new CloudBees High Availability mode.
High Availability: Keeping Your CI Systems Running
The biggest risk for CI systems is the loss of a Jenkins controller, even when this is from a planned maintenance schedule, such as upgrading Kubernetes nodes to unplanned loss due to hardware failure, out of memory, etc. When this happens, all jobs owned by that controller stop running until the controller recovers, which can lead to significant delays in your software delivery lifecycle.
Implementing an active-active high-availability (HA) solution like CloudBees CI High Availability mode can reduce or eliminate downtime and ensure continuity, keeping your software delivery pipelines running even during unexpected losses and scheduled infrastructure maintenance. This means that the operational state of your controller is always up and running, ensuring that all you ever experience is uptime.
Horizontal Scalability: Handling Large Workloads Efficiently
Horizontal scalability (HS) is a technique that distributes the workload among multiple controller replicas, ensuring optimal performance. By enabling the High Availability mode in CloudBees CI, it becomes possible for the controller to handle large workloads seamlessly. This means that even when the controller is under heavy load, the performance remains unaffected as the system automatically divides the work among multiple replicas.
Use cases for this High Availability Mode
Let's take a look at two popular use cases where High Availability Mode fits right in:
Use Case 1: Overloaded or Monolithic Controllers
A monolith controller is a single controller used for multiple teams where all the jobs from every team are on it. And we all know that a single controller can host so many workloads that it can no longer handle the workload efficiently. As these overloaded controllers struggle to handle increasing workloads, the performance suffers, leading to slower pipeline execution, UI lags, and even crashes. When the controller fails or needs to be restarted, all the builds running on that controller and all teams using that controller are impacted by the controller downtime.
In this use case, high availability and horizontal scaling provided by the High Availability Mode can remedy this challenge by spreading the workload across different replicas with dynamic load balancing and removing the single point of failure, thereby making the controller performant and stable with minimal or eliminated downtime.
Use Case 2: Rolling Restart
When upgrading the server where your controllers run, whether it's with CloudBees CI traditional or the Kubernetes nodes with CloudBees CI modern, or Jenkins - the CI service will experience downtime. This regular maintenance is necessary to ensure infrastructure remains up to date.
With this use case, we enable the utilization of the Kubernetes mechanism for rolling restarts. By activating the High Availability Mode, a replica will be spun up during maintenance and allow traffic and workloads to function seamlessly. This ensures uninterrupted operations, even when the first instance is being drained for upgrades.
Why Break up a Monolith?
You may have come across articles and blogs discussing the concept of breaking up the monolith. CloudBees strongly recommends this approach, as it promotes robust architecture with reduced dependencies and improved performance, stability, and scalability. However, it's important to acknowledge that not every enterprise has the luxury of starting with a deliberately designed controller infrastructure, and monolith controllers tend to grow organically as teams expand.
Breaking up a monolith requires careful planning and time investment, which may not be feasible for every company. For such scenarios, High Availability Mode offers an alternative solution. It helps alleviate the overload and enhance the performance of the monolith without physically dividing it into separate controllers.
How Does High Availability Mode Work?
From a high level - we can use this simplistic two-replica diagram to explain how this works in this mode.
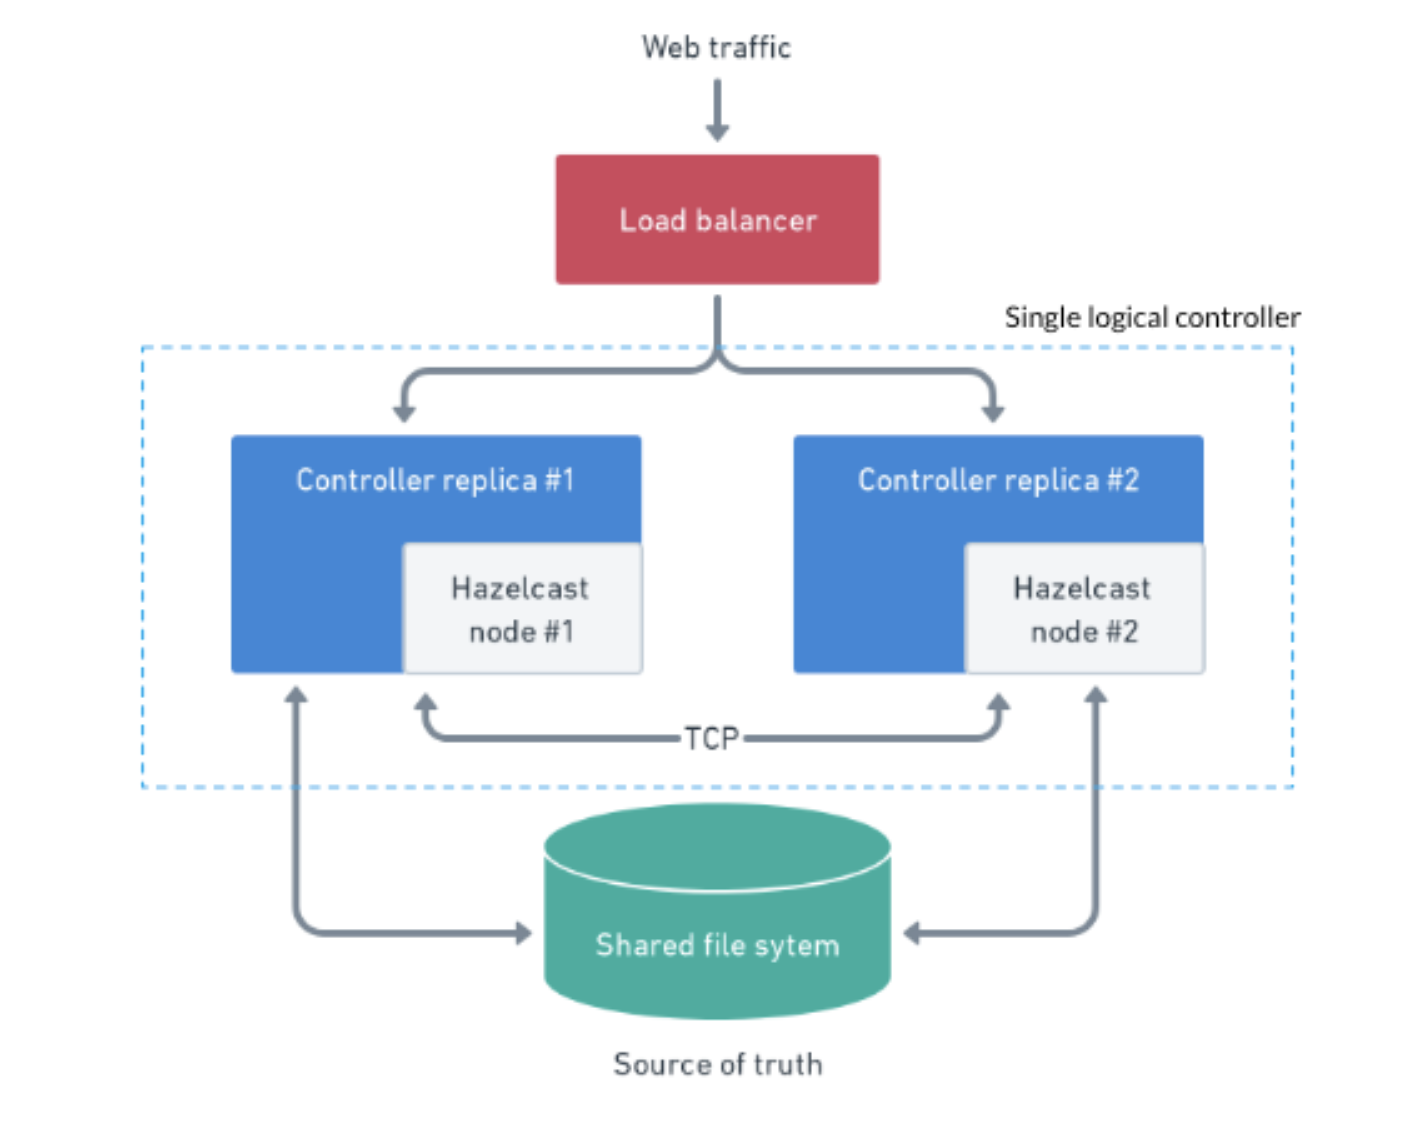
When enabling the High Availability mode - the controller is automatically split into replicas “under the hood” and becomes a single logical controller split into replicas. The minimum and maximum number of replicas can be set in the software and will dynamically scale up or down depending on the workload the controller is experiencing. All the Incoming traffic comes in via webhooks, or polling jobs, and hits the load balancer, where it is assigned to the replicas.
The replicas have the same data and is not a hard data split to each replica. It is dynamically load-balanced across the different replicas. The Hazelcast library is used for synchronization between the replicas and uses an event bus to publish and listen to events to synchronize data structures across replicas. For example - if replica 1 is executing a job and then it is brought down, then the agents will be adopted automatically by replica 2.
Reinvent Controller Management with High Availability Mode
The new High Availablity mode in CloudBees CI brings horizontal scalability and high availability to your controllers. This feature allows work to be transparently shifted to at least one other replica during a “rolling restart,” simplifying administration and adjusting the number of replicas automatically to match scaling requirements.
This results in automatic load balancing between the different controller replicas to avoid performance problems, full horizontal scalability if your cluster needs more replicas of a specific controller due to a heavy workload, and high availability to respond to any controller failure.
With High Availability Mode, we're reinventing how you manage your controller. We are committed to making your controller efficient and resilient at an enterprise scale. Here's to continuous pipeline operation, improved performance, and maximum uptime!
Additional Resources
- See it in action with this CloudBees CI video
- Schedule a demo!
- Read up on this feature in the documentation


