


Run a quick search for Kubernetes (K8s) and Spark and you'll surely encounter a lot of confusion and opinions surrounding their combined use. Yes, some developers have been developing and running their applications in either tool as standalone instances. That's fine. However, plenty more appreciate the benefits of taking the best of both services when hosting data-driven analytical apps.
This post explores the best way to use both tools—running Spark on Kubernetes. We'll begin with a focus on how to get started. Then we'll divulge some advantages of the pair. At last, we close with some best practices to get the most from the symbiosis.
Let's now take a brief look at each of the tools on its own.
What Is Apache Spark?
Spark is a big-data processing tool under the Apache foundation. It's particularly useful for analytical application areas, as it comes with machine learning (ML) libraries, stream processing, and graph processing tools—not to mention the stock APIs for a broad range of back-end programming languages. Some of these are Python, R, and Scala. Please refer to Spark's documentation for its stand-alone intended use.
What Is Kubernetes?
Kubernetes is an orchestration service popular for its effectiveness in automated deployment, scaling, and housekeeping of container-based application infrastructure. As Kubernetes is environment agnostic, engineers can take applications from development environments on their machines and port them into the cloud without the friction of environment disparities.
Spark + Kubernetes Explained
On one hand, Spark is a revolutionary data analytics tool for ML professionals. Then, you have the automation synonymous with K8s, a more robust scheduler than the default Standalone Scheduler that comes stock with Spark. Top all this off with better resource allocation, monitoring, and logging services. All these make K8s a no-brainer companion tool for Spark.
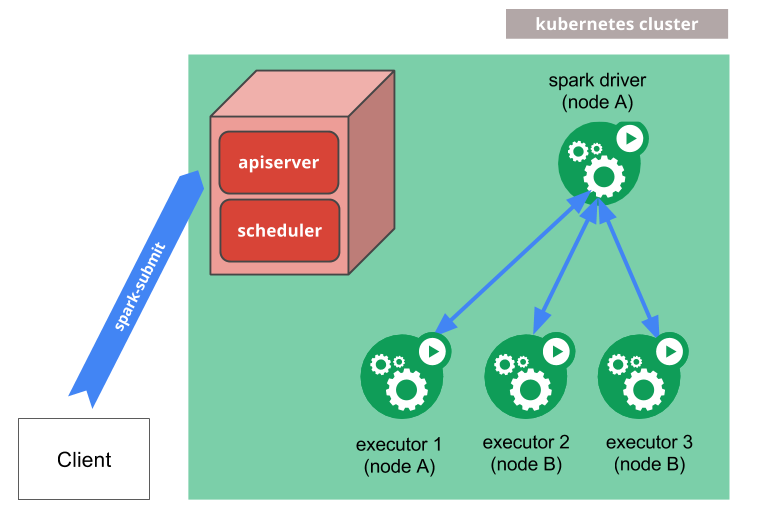
You can execute the bond by simply using K8s clusters to host Spark API-based applications. This means K8s doesn't necessarily have to "know" that it's running Spark in containers. Your Spark instances thus enjoy all the benefits that containerized apps inherit from K8s.
It's best to use the Spark-K8s combination method that maximizes features from both sides. This can be as simple as supplying Spark applications to K8s using spark-submit. This creates resources inside a K8s pod, giving the orchestration activities to the Kubernetes API server and Scheduler.
You can also run the Spark on Kubernetes combination with the apps as clients in pods or separate physical machines.
Advantages of Combining Spark With K8s
Since Kubernetes exposes all its contained applications to an ecosystem of plugins, building an end-to-end pipeline around Spark applications becomes easy. Yes, you could launch Spark applications on separate infrastructure from any visualization tools, DevOps workflows, and logging suites. However, once they all reside in K8s managed pods, you're sure to have a more resilient and secure topology.
1. Easy Deployment of Spark Instances
Kubernetes makes the running of Spark applications easy with automated deployment on a deed basis—this, in comparison to having an always-online, resource-chomping Spark setup. K8s also makes moving your Spark applications across different service providers a seamless process.
2. It's a Free Strategy
K8s is an open source project. This means you'll not have to pay extra charges for the automation it brings. Then there's the free support you stand to gain from the growing developer ecosystem around K8s.
3. A Simplified and Unified Administration Space
Spark projects often have mixes of the various components available for data handling. These can be different back ends, Spark SQL data storage silos, and more. Having these run as workloads in the same Kubernetes cluster is a hack for better performance. This, as K8s makes sure each workload has ample resources and connectivities to any dependencies (in that same cluster and beyond).
These three points are just simple calls to action for the Spark + K8s combined usage. They, however, show logical benefits to the bond. Before using them together, though, be sure that your developers can address the skills gap between admins in Spark and K8s. If you're going to need new hands, then their cost should be canceled out by the benefits they'll infuse into your projects.
How to Configure Spark on Kubernetes
As previously hinted, there are many ways to approach the use of Spark on Kubernetes. Regardless of your cloud service provider, the list we've created to detail the setup process should lead from idea to first run of Spark apps in K8s.
- As a prerequisite, you must have the latest versions of K8s and Spark. It's wise to confirm your Spark version compatibility range with Kubernetes and underlying Docker containers.
- Everything starts with the creation of a cluster in K8s.
- Immediately implement role-based access control (RBAC) to the resources in Kubernetes.
- With your Spark workloads in mind, generate a Docker registry for the Spark images you'll need.
- Start deploying the Spark on K8s operator. The installation steps and requirements are available in the readme file in the repo.
- You'll need to install the Kubernetes Cluster Autoscaler add-on to manage the Spark instances.
- It's best to configure logs to write onto a persistent storage location. This counts for Spark driver and event logs.
- Even though the Spark history server isn't supported anymore, having this server set up comes in handy with visualization of logs when it launches.
- Configure important metric monitoring with the Kubernetes UI.
A few best practices will make the most of any cloud service platform's features and offers. These include having a security-first take on the setup. With K8s, we can set Docker to have "only necessary" permissions for any user and remote access tools, so this should be your default policy. Having your K8s Cluster Autoscaler set to maximize performance is a good way to avoid having too many resources idle.
Use the logging and command tools that come stock in K8s to provide more visibility into the Spark clusters. Not only will this help with building out better goals for the applications, but it also makes stakeholder inclusion easier. This doesn't mean you do away with the Spark UI altogether when monitoring your applications. As a matter of fact, their combined use guarantees a wider observation window into the Spark + K8s combo.
Final Thoughts on Using Spark With Kubernetes
Spark is a powerful data analytics platform to build and serve machine learning applications with. Kubernetes brings automation to a containerized hosting model of applications. It accomplishes this through a core fitted with a scheduler and some APIs that ensure optimized resource usage across hosted applications in clusters.
When used together, Spark and Kubernetes serve the best of both worlds for ML experts. Setting up your Spark instances into K8s clusters is a well-documented process. However, depending on your service provider, some setup steps will need specific research. You can reach out to the K8s community for free support and guaranteed solutions.
The complexity aside, the benefits that teams stand to gain from combining Spark and K8s outweigh the effort. The key is to not throw away tools from either side and enjoy the extension of one side's perks to the other. Better still, you can infuse a third tool to increase your understanding of the specific environment that you'll have built. For this, CloudBees Analytics provides a better logging portal than either K8s or Spark alone. Request a demo and experience the improved visibility for yourself. Then combine it with the default Spark and K8s reporting tools for even greater visibility.
This post was written by Taurai Mutimutema. Taurai is a systems analyst with a knack for writing, which was probably sparked by the need to document technical processes during code and implementation sessions. He enjoys learning new technology and talks about tech even more than he writes.


