


CloudBees CD/RO recently introduced the ability to connect with Argo Rollouts. This addition to our release orchestration tool improves our customers' ability to deliver software faster, with higher quality, and at scale. With CloudBees CD/RO, teams can seamlessly automate the entire software delivery process, from code to production, in cloud-native environments.
Argo Rollouts is a powerful tool for deploying applications to Kubernetes. It's uniquely suited for teams that want to roll out new versions of their applications using advanced strategies, such as canary and blue-green deployments, to deliver customer value more quickly and with less downtime and risk. Argo Rollouts also supports complex topologies, such as using Istio, making it ideal for large-scale applications.
In this post, we'll illustrate how Argo Rollouts fits the needs of our customer base. We'll also explain how we're embracing it for cloud-native deployments.

What is Argo Rollouts?
Argo Rollouts is a Kubernetes controller and set of CRDs which provide advanced deployment capabilities such as blue-green, canary, canary analysis, experimentation, and progressive delivery features to Kubernetes.
It improves the reliability and efficiency of deploying applications to Kubernetes by automating rollouts of new versions of an application, while monitoring its health and performance at the same time. You can use Argo Rollouts with any Kubernetes cluster, and it integrates with various tools such as Helm and Kustomize.
In addition to improving continuous deployment to Kubernetes, Argo Rollouts supports complex application topologies such as service mesh via Istio, Linkerd, and SMI. It also integrates with APM providers, including Prometheus, Dynatrace, and Sumo Logic.
Argo Rollouts is compatible with your existing manifests and CRDs, so you can continue to use them while adding additional support for better deployments and advanced strategies.
How does Argo Rollouts work?
Modern development, especially applications in the cloud, needs automated and optimized development processes. When executed properly, organizations can receive many benefits, such as improved efficiencies, reduced errors, and higher quality code; all of which drive perceived customer value. CloudBees added Argo Rollouts to our clients’ toolboxes because it makes this possible with two robust strategies: Blue/Green and Canary deployments.
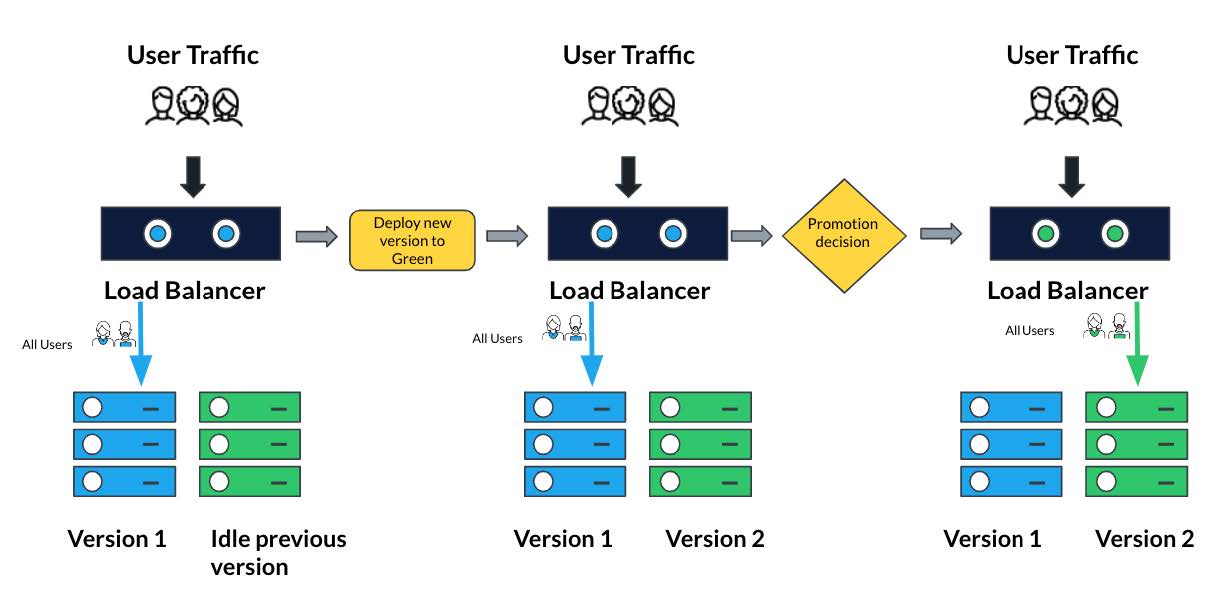
Blue/Green deployments
Blue/Green deployment is an approach where two application versions, called "blue" and "green," run at the same time. The strategy initially directs traffic to the current blue version, then directs it to the new green version. If issues crop up during the process, you switch the traffic back to blue. Once the green version is confirmed stable and operational, you retire the blue application version or keep it as a backup.
In legacy environments, you often implement this strategy with duplicate environments, one for blue and another for green. Argo Rollouts mimics this approach in the cloud for you, using Kubernetes ReplicaSets.
Canary deployments
Canary deployments distribute software updates in a controlled manner, where a small percentage of users are exposed to the new version of the application while the majority continue using the old version. The number of users with the new version gradually increases users over time. This allows you to test the new version of your code in a real-world environment before rolling it out to all users.
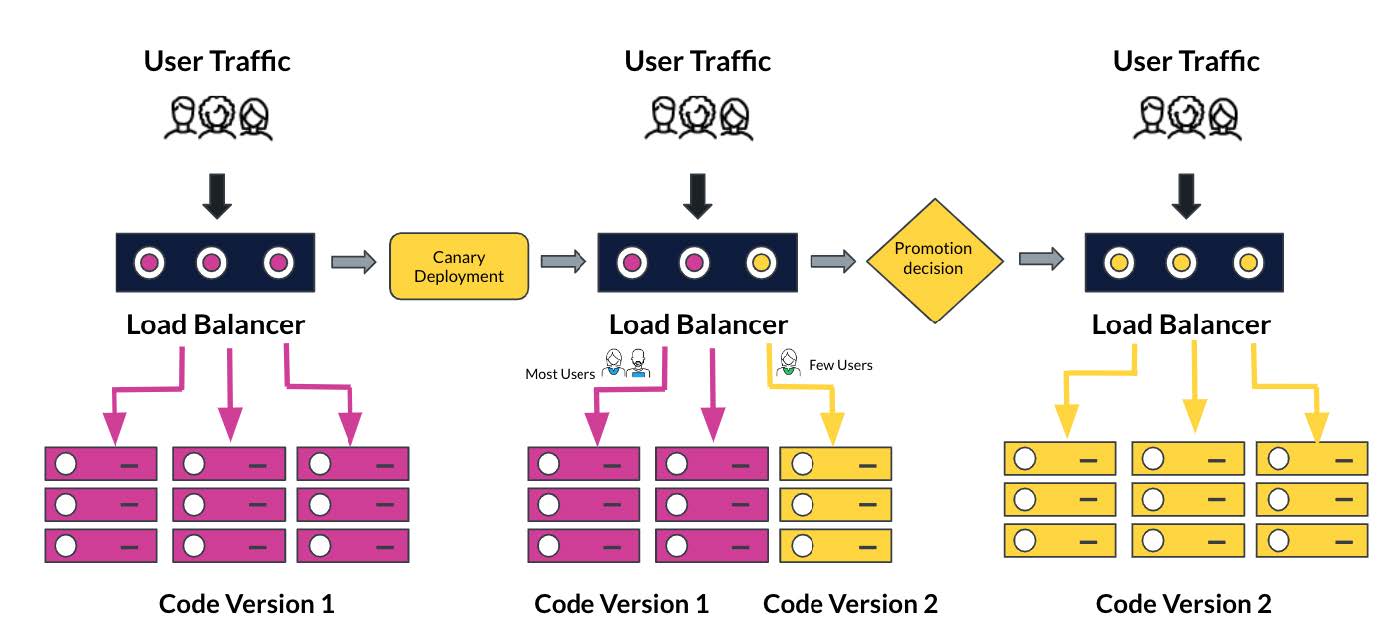
By leveraging Argo Rollouts for canary deployments, you gain many additional advantages:
- It leverages the native Kubernetes resources and concepts to perform canary deployments
- Fine-grained control over how much traffic gets diverted to the new application version
- With built-in instrumentation for Prometheus, along with several other APM solutions, you can monitor the performance of your canary deployment to help ensure a smooth rollout
- If issues arise, you can automatically revert. This helps reduce the risk of issues affecting your users and minimizes the amount of manual intervention needed
- The Argo project is open source, so you avoid vendor lock-in
Why is CloudBees embracing Argo Rollouts?
CloudBees CD/RO has offered the ability to perform blue-green and canary deployments for some time. While this has been seamless for traditional applications, it did require additional knowledge in Kubernetes previously. With our integration to Argo Rollouts, we are providing users with the ability to seamlessly deploy traditional or cloud-native applications, with no learning curve required.
Additionally, integrating Argo Rollouts with CD/RO continues CloudBees' embrace of best-of-class open-source tools. We have experienced considerable success with Jenkins in CloudBees CI, and continue that tradition with Argo Rollouts. This approach allows us to offer enterprise-grade deployment workflows for cloud-native deployments.
By integrating with CD/RO, we provide comprehensive access control, visibility with environment inventory views, and analytics.
- Real-time info about application versions in different environments
- Views into application state during release, such as the Path to Production
- Deployment analytics include frequency, duration and success rates
- Restrict to authorized users only that can promote releases to production
CloudBees is adopting/embracing the Argo Rollouts project for cloud-native deployments, with an emphasis on Canary deployments as the preferred choice.
How is CloudBees embracing Argo Rollouts?
Argo Rollouts is integrated directly into CD/RO via the microservices application modeling feature which provides environment inventory (what image versions are running in which environment) monitor your cloud-native deployments, and analytics to track deployment activities across projects and teams.
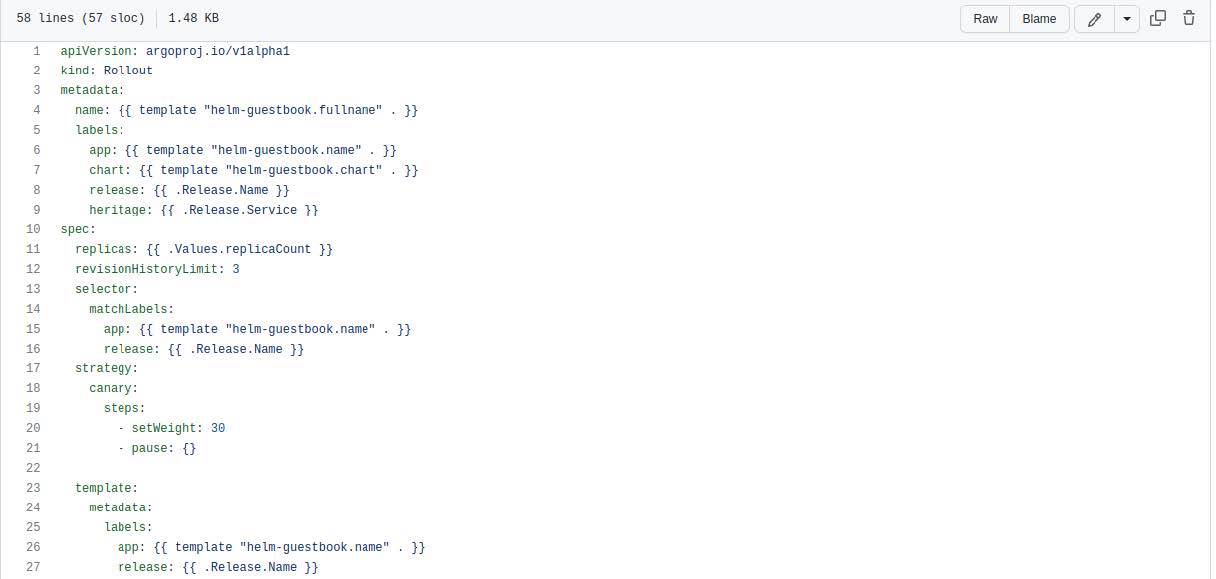
This sample Helm chart file illustrates how the Argo Rollout resource type is declared, where the code calls for a canary deployment on row #18 with a weight of 30% on row #20.
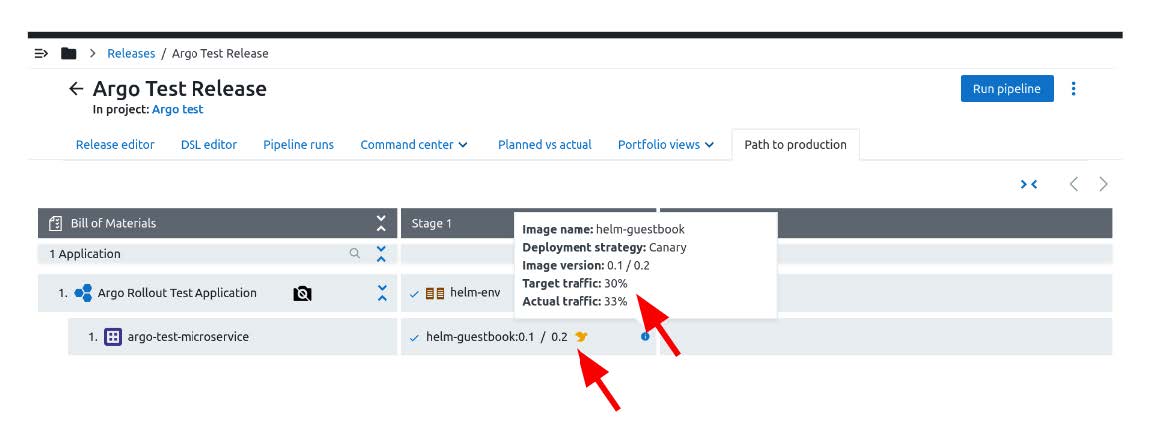
The following image illustrates how the CD/RO interface presents a rollout. The window showcases the target traffic, and a yellow bird icon to signify a Canary Deployment.
In the next screenshot, we showcase how CloudBees CD/RO is able to surface the manual inputs to Argo Rollouts. As a result, all interactions occur directly within CD/RO, meaning it’s not necessary to interact with Rollouts from a command line perspective.

Conclusion
In this post, we've covered how CloudBees is embracing Argo Rollouts for cloud-native deployments. It provides advanced deployment strategies like Blue/Green and Canary, and handles complex topologies such as service mesh. Argo Rollouts also enables advanced metrics to automate rollbacks through integrations with leading APM providers.
With its integration to CloudBees CD/RO, we've added access control and increased visibility to Argo Rollouts through our release orchestration platform. As a result, our customers will have better control and visibility over the deployment process, ensuring a smooth and secure deployment for cloud-native applications.
For additional information:


