In a previous blog , I showed how you can run iOS mobile application builds using MacOS agents managed by Jenkins running as a service on the CloudBees PaaS. Now let's have a look at how to do the same for Android. I'm sure that most Java developers will find many things about the Android development environment pretty familiar and it will probably come as no surprise to find that Jenkins has excellent support for Android builds.
Let's start with the remote agent: just as I did for the iOS build, I'm going to use my MacBook laptop to run the Android build jobs. Here's the script I use to start the remote executor:
java -jar jenkins-cli.jar -s https://partnerdemo.ci.cloudbees.com -i ~/.ssh/id_rsa_partnerdemo customer-managed-agent -fsroot ~/Jenkins -labels android -labels 16 -executors 1 -name mark-android
This is almost identical to the script I use to start the agent for the iOS builds: I have used the labels "android" and "16" (I'll specify these in the Jenkins build configuration). Note that you need to use a version of jenkins-cli.jar 2.13 or greater. You would also use your CloudBees Jenkins account URL rather than https://partnerdemo.ci.cloudbees.com and your own private key with the -i flag. I'll go into a bit more detail on the -fsroot flag at the end of this blog: for now, just remember this is where Jenkins will store various runtime artifacts, project workspaces and Android SDK packages. For convenience, I have two remote agents defined, one to run iOS builds and the other for Android builds. There's no reason why these should be on a single system and for production CI environments you would almost certainly have a number of dedicated, headless servers to run these builds, but for demos and personal development projects it is easy to set things up like this. Here's a view of the two nodes (using the Jenkins console "Manage Nodes" view):
One of the big differences between running iOS and Androids builds with Jenkins is that the Jenkins Android Emulator plugin will automatically download not only the Android SDK but also any system image required for the particular device configuration you want to run your tests against. The first time you run a build using the agent, you will see that it will download the appropriate Android SDK for that OS (it will take quite a bit longer as result, but subsequent builds are fast); whenever you specify a new device configuration for your Jenkins builds, you will similarly see the system image files for the configuration being downloaded and the plugin will automatically configure and initialize the Android emulator. Here's an example of the sort of output you should see in the latter case (for clarity, I have omitted the fairly verbose download progress messages):
$ /Users/markprichard/Jenkins/tools/android-sdk/tools/android list target
[android] The configured Android platform needs to be installed: android-16
$ /Users/markprichard/Jenkins/tools/android-sdk/tools/android list target
$ /Users/markprichard/Jenkins/tools/android-sdk/tools/android list target
[android] Installing the 'android-16,sysimg-16' SDK component(s)...
$ /Users/markprichard/Jenkins/tools/android-sdk/tools/android update sdk -u -a -t android-16,sysimg-16
Refresh Sources:
Fetching https://dl-ssl.google.com/android/repository/addons_list-2.xml
...
Installing Mips System Image, Android API 16, revision 1
Unzipping Mips System Image, Android API 16, revision 1 (1%)
Unzipping Mips System Image, Android API 16, revision 1 (99%)
Installed Mips System Image, Android API 16, revision 1
Done. 4 packages installed.
[android] Using Android SDK: /Users/markprichard/Jenkins/tools/android-sdk
[android] Creating Android AVD: /Users/markprichard/.android/avd/hudson_en-US_240_WVGA_android-16.avd
[android] /Users/markprichard/Jenkins/tools/android-sdk/tools/android create avd -f -a -c 64M -s WVGA800 -n hudson_en-US_240_WVGA_android-16 -t android-16 --abi armeabi-v7a
$ /Users/markprichard/Jenkins/tools/android-sdk/platform-tools/adb start-server
$ /Users/markprichard/Jenkins/tools/android-sdk/tools/emulator -snapshot-list -no-window -avd hudson_en-US_240_WVGA_android-16
[android] Starting Android emulator and creating initial snapshot
$ /Users/markprichard/Jenkins/tools/android-sdk/tools/emulator -no-boot-anim -ports 55496,55497 -prop persist.sys.language=en -prop persist.sys.country=US -avd hudson_en-US_240_WVGA_android-16 -no-snapshot-load -no-snapshot-save -wipe-data
* daemon not running. starting it now on port 55499 *
* daemon started successfully *
…
$ /Users/markprichard/Jenkins/tools/android-sdk/platform-tools/adb connect localhost:55497
[android] Waiting for emulator to finish booting...
$ /Users/markprichard/Jenkins/tools/android-sdk/platform-tools/adb -s localhost:55497 shell getprop dev.bootcomplete
…
$ /Users/markprichard/Jenkins/tools/android-sdk/platform-tools/adb -s localhost:55497 logcat -v time
[android] Giving the system some time to settle before creating initial snapshot...
$ /Users/markprichard/Jenkins/tools/android-sdk/platform-tools/adb connect localhost:55497
$ /Users/markprichard/Jenkins/tools/android-sdk/platform-tools/adb -s localhost:55497 logcat -c
$ /Users/markprichard/Jenkins/tools/android-sdk/platform-tools/adb -s localhost:55497 shell log -p v -t Jenkins "Creating snapshot..."
[android] Creating snapshot...
$ /Users/markprichard/Jenkins/tools/android-sdk/platform-tools/adb connect localhost:55497
[android] Emulator is ready for use (took 148 seconds)
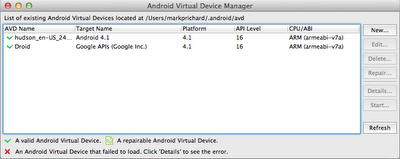
Note the line in bold above: the plugin has created an AVD (Android Virtual Device ) named "hudsonen-US_240_WVGA_android-16 " (we'll see in a minute where that name and those settings come from). The device configuration will be stored by default in the ~/.android directory for the user associated with the Jenkins remote agent. Assuming that you just ran jenkins-cli.jar from a terminal window, you can see the configuration either with the the Android AVD Manager (below, top) or the command _android list avd (below, bottom) - in this example, I have one virtual device that was defined using the Android AVD Manager and the one that was created by the Jenkins plugin. You can use AVDs created by Jenkins just like any other - for example, the following command would start the emulator on my desktop: emulator -avd hudson_en-US_240_WVGA_android-16
 |
| Android Virtual Device Manager |
 |
| android list avd |
Now let's look at the Jenkins configuration. In this example, I'm using a clone of Peter Österlund's excellent DroidFish port of StockFish: I've simplified the build slightly by including a jar with the CuckooChess classes with the source code in my GitHub repository . The Jenkins job is configured to run whenever a push is made to that repository, using the same WebHook URL as in the iOS example (https://partnerdemo.ci.cloudbees.com/github-webhook/ ). I have checked the box "Restrict where this project can be run" and specified the Label Expression "android" to associate the build with the mark-android remote agent we defined earlier on.
The key part of the configuration is the Jenkins Android Emulator plugin (note that the Port Allocator Plugin is a pre-requisite, although there is no additional configuration needed). This plugin has very rich functionality and I'm only using a fairly simple configuration here: check out the documentation for details of what it can do, including very powerful matrix build capability. Here's the configuration that I'm using:
I could have used a pre-defined device configuration, but I prefer to specify the device parameters in the plugin configuration and not rely on any assumptions about the setup on the agent. As you can see, I have chosen a Droid-like configuration (the hudson_en-US_240_WVGA_android-16 AVD definition we saw earlier). The plugin will automatically start the emulator before running the build phase and will stop it after the run completes. The build phase itself is simple, following the standard Android build process: first we use the Execute Shell plugin to run android update project and android update test-project to configure the project correctly for the Android SDK installation, and then we use the built-in Ant plugin to run ant clean debug install test for the DroidFishTest project:
If I run the build, either manually from the console or by pushing a change to the source repository, then I'll see Jenkins start the AVD emulator, run the Android ant build (ant clean debug install test ) to install and run the app with the test .apk files on the device, and finally stop the emulator. You can see the full output if you look at the console output from one of the runs. Here's a screenshot:
Finally, let's take a look at the contents of the directory we specified with the -fsroot flag when starting the remote agent (in my example ~/Jenkins). As you can see, it contains the runtime jars need for the Jenkins remoting, plus the workspaces for the various projects built on that agent and, under ./tools, the Android SDK and all the necessary components to run the build/test.
This is very useful (particularly when you want to run tests using an actual, tethered Android device) but the real value of using Jenkins to control your Android build/test CI cycle comes when you take advantage of the cloud to run many test scenarios in parallel using matrixed Jenkins configurations; more on that in my next blog.
Want to see this technology in action?
I will be demoing this setup on Sept 27 at 10am PDT during our live webinar with SOASTA, Automated Testing & Continuous Deployment for Mobile Apps in the Cloud . Sign up and join us!
Attend Jenkins User Conference SF - A Special Discount For You!
2012 San Francisco Jenkins User Conference on Sunday, 30 September, and enjoy a full day of Jenkins-focused learning and networking opportunities. Register here and as a special "Thank You" for reading all the way to the bottom of my blog, enter promotional code JUC-2012SF to get a $100 discount off the full-price registration!
Mark Prichard, Senior Director of Product Management
CloudBees
cloudbees.com
Mark Prichard is Java PaaS Evangelist for CloudBees. He came to CloudBees after 13 years at BEA Systems and Oracle, where he was Product Manager for the WebLogic Platform. A graduate of St John's College, Cambridge and the Cambridge University Computer Laboratory, Mark works for CloudBees in Los Altos, CA. Follow Mark on Twitter and via his blog Clouds, Bees and Blogs.