


*article updated on September 29, 2024
Soooo, feature flags. You like what you hear about their benefits: extreme flexibility, per-user customization, testing in production, early customer feedback, and more.
You’re itching to get yourself some of that. You want to get your hands dirty, and yet you don’t.
So many variables, so many considerations. It’s hard to pick the best way forward. What if you pick the wrong way? Wouldn’t that defeat the object of the exercise?
Not necessarily.
Actually, not at all.
With feature flags, there’s no one way to do it right. Every way to store their values has its own uses. And, as you gain experience, you’ll find yourself picking whatever suits a specific scenario best.
To get you on your way and fast-track your experience, this article delves into what feature flags are, when to use them, where to keep them, how to make them dynamic and changeable on the fly, and how to pick the method best suited for what you have at hand.
What are Feature Flags?
Feature flags, also known as feature toggles, are powerful development tools that allow teams to dynamically enable or disable specific features in their software without deploying new code. By wrapping features in conditional logic, developers can control their availability in real time, making it easier to test new functionality, roll out updates incrementally, and manage feature releases.
Feature flags offer flexibility and reduce risks during deployment by providing a quick mechanism to turn features on or off as needed.
Let’s go over a quick recap of different types of feature flags.
Different Uses for Feature Flags
As discussed in "Feature Flipper (Or Toggle): What Is It and Why Use It," feature flags aren’t one size fits all.
The simplest is a boolean value. That’s how they started and where they get their name from (feature flags are also known as feature toggles or feature flippers).
But they can be far more complex: a function, aka a toggle router, that uses several inputs to determine its result. One example is a function that checks several configuration settings and even runtime data about the current session and user.
Characteristics of Every Feature Flag
What a feature flag is intended to accomplish determines its characteristics:
- longevity: how long you’ll have it around
- dynamism: when and how often you’ll change its value
- complexity: what data goes into determining that value
- authorization: who may change that data
Simple Feature Toggles
The simplest feature flags control the availability of a feature for everyone. The variable is the environment in which the code runs: test, staging, production. Let’s look at some examples:
- A release toggle to turn code off in production, on in staging, and both off and on in development/testing (to keep testing the current code and test the new feature).
- An operational toggle that serves as a kill switch to allow operators to kill troublesome code or a resource-heavy feature in a graceful degradation to keep serving customers under heavy load—for example, killing a resource-heavy auto-suggestion list when a site experiences a surge in traffic.
Complex Feature Flags
More complex feature flags are those that require more than a single system-wide value. At the very minimum, they use a simple boolean that varies per user. At the other end of the spectrum are flags that use multiple attributes, including non-boolean values, that vary per user and even per action taken by a user (aka per request).
These more complex feature flags facilitate:
- experiments to A/B test a new feature,
- canary releases to gradually release a feature to more users,
- targeted rollouts to get early feedback from internal staff and specific customers, and
- permissions to control access to prized (and more highly priced) features.
It’ll be no surprise that a flag’s characteristics play a huge role in picking the right place to store it, or rather the data it needs to determine its value in various environments.
But, before we dive into picking the right storage, let’s first look at what kinds of storage you can pick from.
Understanding Storage Facilities
You have many options to store configuration and runtime data that your software uses to decide what to do.
So let’s go over them and see what their advantages and disadvantages are.
Easy Does It When You Don’t Need Flexibility
Almost everyone who starts with feature flags starts by putting a constant somewhere in the source code and referencing that at every toggle point.
Hardcoded constants are quick and easy but aren’t very flexible. When you code in a compiled language, every change to the constant will require a rebuild. A drag, even if you have a smart incremental compiler.
Easy Still Does It With Just a Tweak for Flexibility
Putting the values for your toggles in configuration files is the natural progression from hardcoded source code constants.
You no longer have to change the code and replace executable files to change how your application behaves. And it’s still quick and easy.
Storage You Wouldn’t Think of as Storage
As a developer, you’re familiar with command-line parameters and probably berate utilities that don’t offer enough.
Still, command-line parameters are often overlooked as a means of controlling your application’s behavior from the outside—when they’re arguably even easier to use than configuration files.
However, where to document command-line parameters is less obvious, and their default values are less explicit than the defaults of configuration settings can be.
Your Environment Controls More Than You Think
Environment variables are also often overlooked as a means to store toggle values despite being very similar to command-line parameters and configuration files.
As environment variables are part of a system’s or user’s configuration on a machine, they enable you to set up an environment for specific purposes—for example, a staging or automated acceptance testing machine for new features.
And you get an out-of-the-box (at least on Windows) albeit rudimentary UI to set toggle values.

The Natural Choice That Doesn’t Necessarily Cut It
When your application is backed by a database—and what application nowadays isn’t—the natural choice to store toggle values is, of course, that database.
Still, a database may not be the best choice.
Compared to in-memory data, accessing data in a data store is always going to be slower. Apart from slow(er) physical disk access, network latency will be an issue in any application that’s meant to scale.
When you need to read your toggle values often to enable per-session or even per-request customization of behavior, using a database may slow your application more than is acceptable.
The Natural Evolution to the Natural Choice
Of course, if database performance is an issue for toggle values, it’s likely also an issue for your application in general. And it can be addressed in the same way, for example, by using Memcached servers.
A solution more specific to toggle values is the use of distributed key-value stores. Key-value stores are designed for quick lookup of values identified by a key. And a distributed key-value store reduces network latency by always having a store physically close to wherever your code is executing.
Ensure Feature Flags are Dynamic
Feature flags that read or determine their value when your application starts and then never change aren’t very common. Release flags seem to fit the bill, but depending on your type of application, even they may need to be dynamic to avoid having to restart your application to release a feature to your customers.
The thing is, even if you put your toggles’ values in a storage type that allows the values to be changed on the go, that doesn’t mean your application is automatically aware of that change.
Refresh Toggle Values
You’ll need some kind of system to refresh your toggles’ values while your application is running.
That means a notification (push) or polling (pull) system.
A push system by its very nature needs you to have an in-memory copy of all your toggles in your app.
A polling system doesn’t, but polling a database can be a performance killer, so you’ll very quickly feel the need for some kind of caching.
This is something you also need to make hardcoded constants and command-line parameters dynamic. That’s because their values won’t ever change for a running process, no matter how often you read them. The same applies to environment variables, though that depends on how your application is started and how or where an environment variable’s value is changed.
In short, to make your toggles dynamic, you need in-memory copies of all your toggles’ values, and you need to refresh those copies as their “out-of-app” counterparts change.
And then there’s the small matter of who changes those counterparts.
Building Processes Around Toggles
Even though you may create the toggles technically, as a developer you’re not likely the one deciding which ones you need or what their values should be. And you probably don’t even want to be.
Your product manager or your marketing department will decide when to release a feature. They’ll also be the ones deciding on experiments to run and who to invite to targeted rollouts.
Kill switches and canary release toggles naturally fall to operations people. They’re the ones keeping your application running for your customers and rolling out new features in a controlled manner.
While you might expect operations people to be able to change a configuration file, you really don’t want non-tech people rummaging around your application’s vital files. You need to make it easy for them to do what they need to do and hard for them to make mistakes.
That means a UI, and a UI means an application. A management system to keep track of all your toggles, who owns and can flip them, and who can do so safely. If you develop such a system in-house, you may even feel the need to use feature toggles to aid in the development of your feature toggle management system.
But let’s get back to the matter of picking the right place to store your toggles.
So, How Do You Choose the Right Feature Flag?
The use case for a feature flag—what it’s intended to accomplish—determines its characteristics, and those play a big role in picking the best place to store its value. Or the data it uses to determine its value.
Feature Flag Characteristics and Where to Put Them
You’re a developer. You like tables, right?
[1] While dynamic release toggles help avoid having to restart your application to release a feature to your customers, they tend to be overkill, especially when you already have scalability measures in place, so restarting instances is easier and won’t be noticed by customers anyway.
[2] Kill switches need to be dynamic, even if they don’t change often. You don’t want to add to the troubles for operations people when they’re dealing with something that’ll make them want to throw a kill switch.
The table below suggests where to put a feature flag depending on its characteristics.
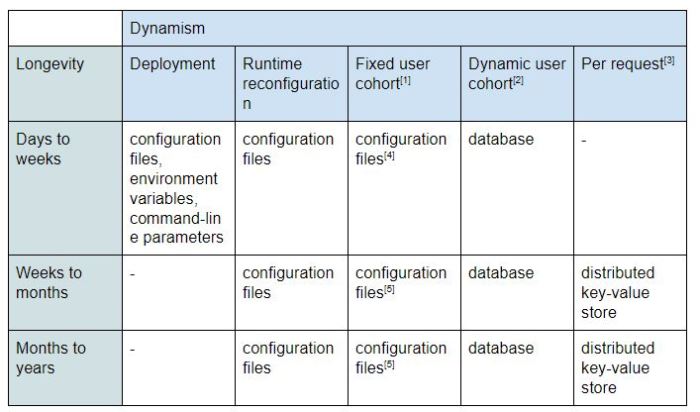
[1] Used with canary releases.
[2] Used with pricing plans and champagne brunches.
[3] Used when authorization for actions is stringent or can change suddenly.
[4] This can be as simple as a range of user IDs or geographic locations to include or exclude from using a feature during a canary release.
[5] Longer-lived toggles with a fixed user cohort are features that, for example, are only available to users in specific countries or some other demographic value. The toggle’s value would be that demographic, but it would play out on a per-user basis.
Of course, this table isn’t a hard and fast rule. There can be other factors at play—for example, your tech stack, the tools and frameworks in use and what developers and operations people are already comfortable with.
So there’s nothing stopping you from using storage suitable for dynamic toggles for static ones as well. However, doing it the other way around will force you to use an in-memory caching system to get the dynamism.
In general, unless you have good reasons to do otherwise, you prefer static over dynamic and simple over complex.
Final Considerations for Feature Flags
Lastly, let’s go over some points to remember when you implement your own feature flags.
- Don’t splatter toggle points all over your code. For a discussion on where to put toggle points in your code considering a feature toggle’s characteristics and coding practices for implementing toggle routers, see Pete Hodgson’s article on Martin Fowler’s site.
- Help yourself and your operations team to diagnose and debug errors by including the state of feature flags in your logs.
- You won’t reach the number of flags used by Uber, Facebook, or any other feature flagging proponents any time soon, but even so, the number of feature flags in your code will grow quickly. And you’ll need to take a very active approach to managing them.
- Feature flag debt—having inactive toggle points in your code for feature flags that are no longer active—is a real problem. And you’ll need to manage them aggressively and proactively. You don’t want to become a victim of accidentally reusing an inactive flag, as told in the hair-raising story of a company going bust in just 45 minutes.
Challenges of DIY Feature Flags
As a final point, take note that managing feature flags is a complex endeavor.
At first, starting with simple release toggles, that won’t be apparent. And, when the number of toggles grows and more than just developers get involved, you’ll be tempted to grow your own system. Then, product managers get a whiff of what’s possible, and your marketers see new opportunities for price differentiation.
Before you know it, you’ll be spending more and more time on your DIY feature flag management system.
Don’t get me wrong. By all means, try your hand at growing your own system, but use it to learn and get more familiar with what’s involved. And be prepared to ditch it long before the time you spend on it eats into the time you can spend on what’s really important: the features of your own application that keep your customers happy and the revenue coming in.
Because you don’t have to reinvent the wheel.
The need for and complexity of feature flagging means there are plenty of libraries and management systems that make it their business to simplify everything for you. Improving the features and maturity of feature flagging is their core business.
Meaning that you’ll get a product with more features and more maturity than you could create yourself in addition to your own product.
Consider Using Feature Flag Management
Like with so many things in software development, there’s no one way to do it right. You’re free to pick and choose what works best in the scenario at hand.
You now know everything you need to use the characteristics of a flag to pick the best storage for that flag.
And you know there’s really only one mistake that can badly trip you up: not cleaning up after yourself. But, of course, you won’t let that happen now, will you?
So stop dragging your feet and start flagging. And, while you’re at it, be sure to check out CloudBees Feature Management to find out how to save yourself a few headaches managing all those flags you’ll create.


